8.7 KiB
![]()
![]()
The kinT keyboard controller is a replacement for your Kinesis Advantage or Advantage 2 ergonomic keyboards.
You can use it for example…
- to build or modify your own keyboard
- to work around bugs in the standard controller
- because you prefer to run open source software such as the QMK firmware, even on your keyboard
Why use the kinT instead of the older replacement board?
-
The kinT supports both, the older Kinesis Advantage (KB500) and the newer Kinesis Advantage 2 (KB600) keyboards. They differ in how the thumb pads are connected. See the soldering instructions below.
-
The kinT is made for the newer Teensy 3.x and 4.x series, which will remain widely available for years to come, whereas the future of the Teensy++ 2.0 is not as certain.
-
The kinT is a smaller PCB (4.25 x 3.39 inches, or 108.0 x 86.1 mm), which makes it:
-
more compact: can be inserted/removed without having to unscrew a key well.
-
cheaper: 72 USD for 3 boards at oshpark, instead of 81 USD.
-
-
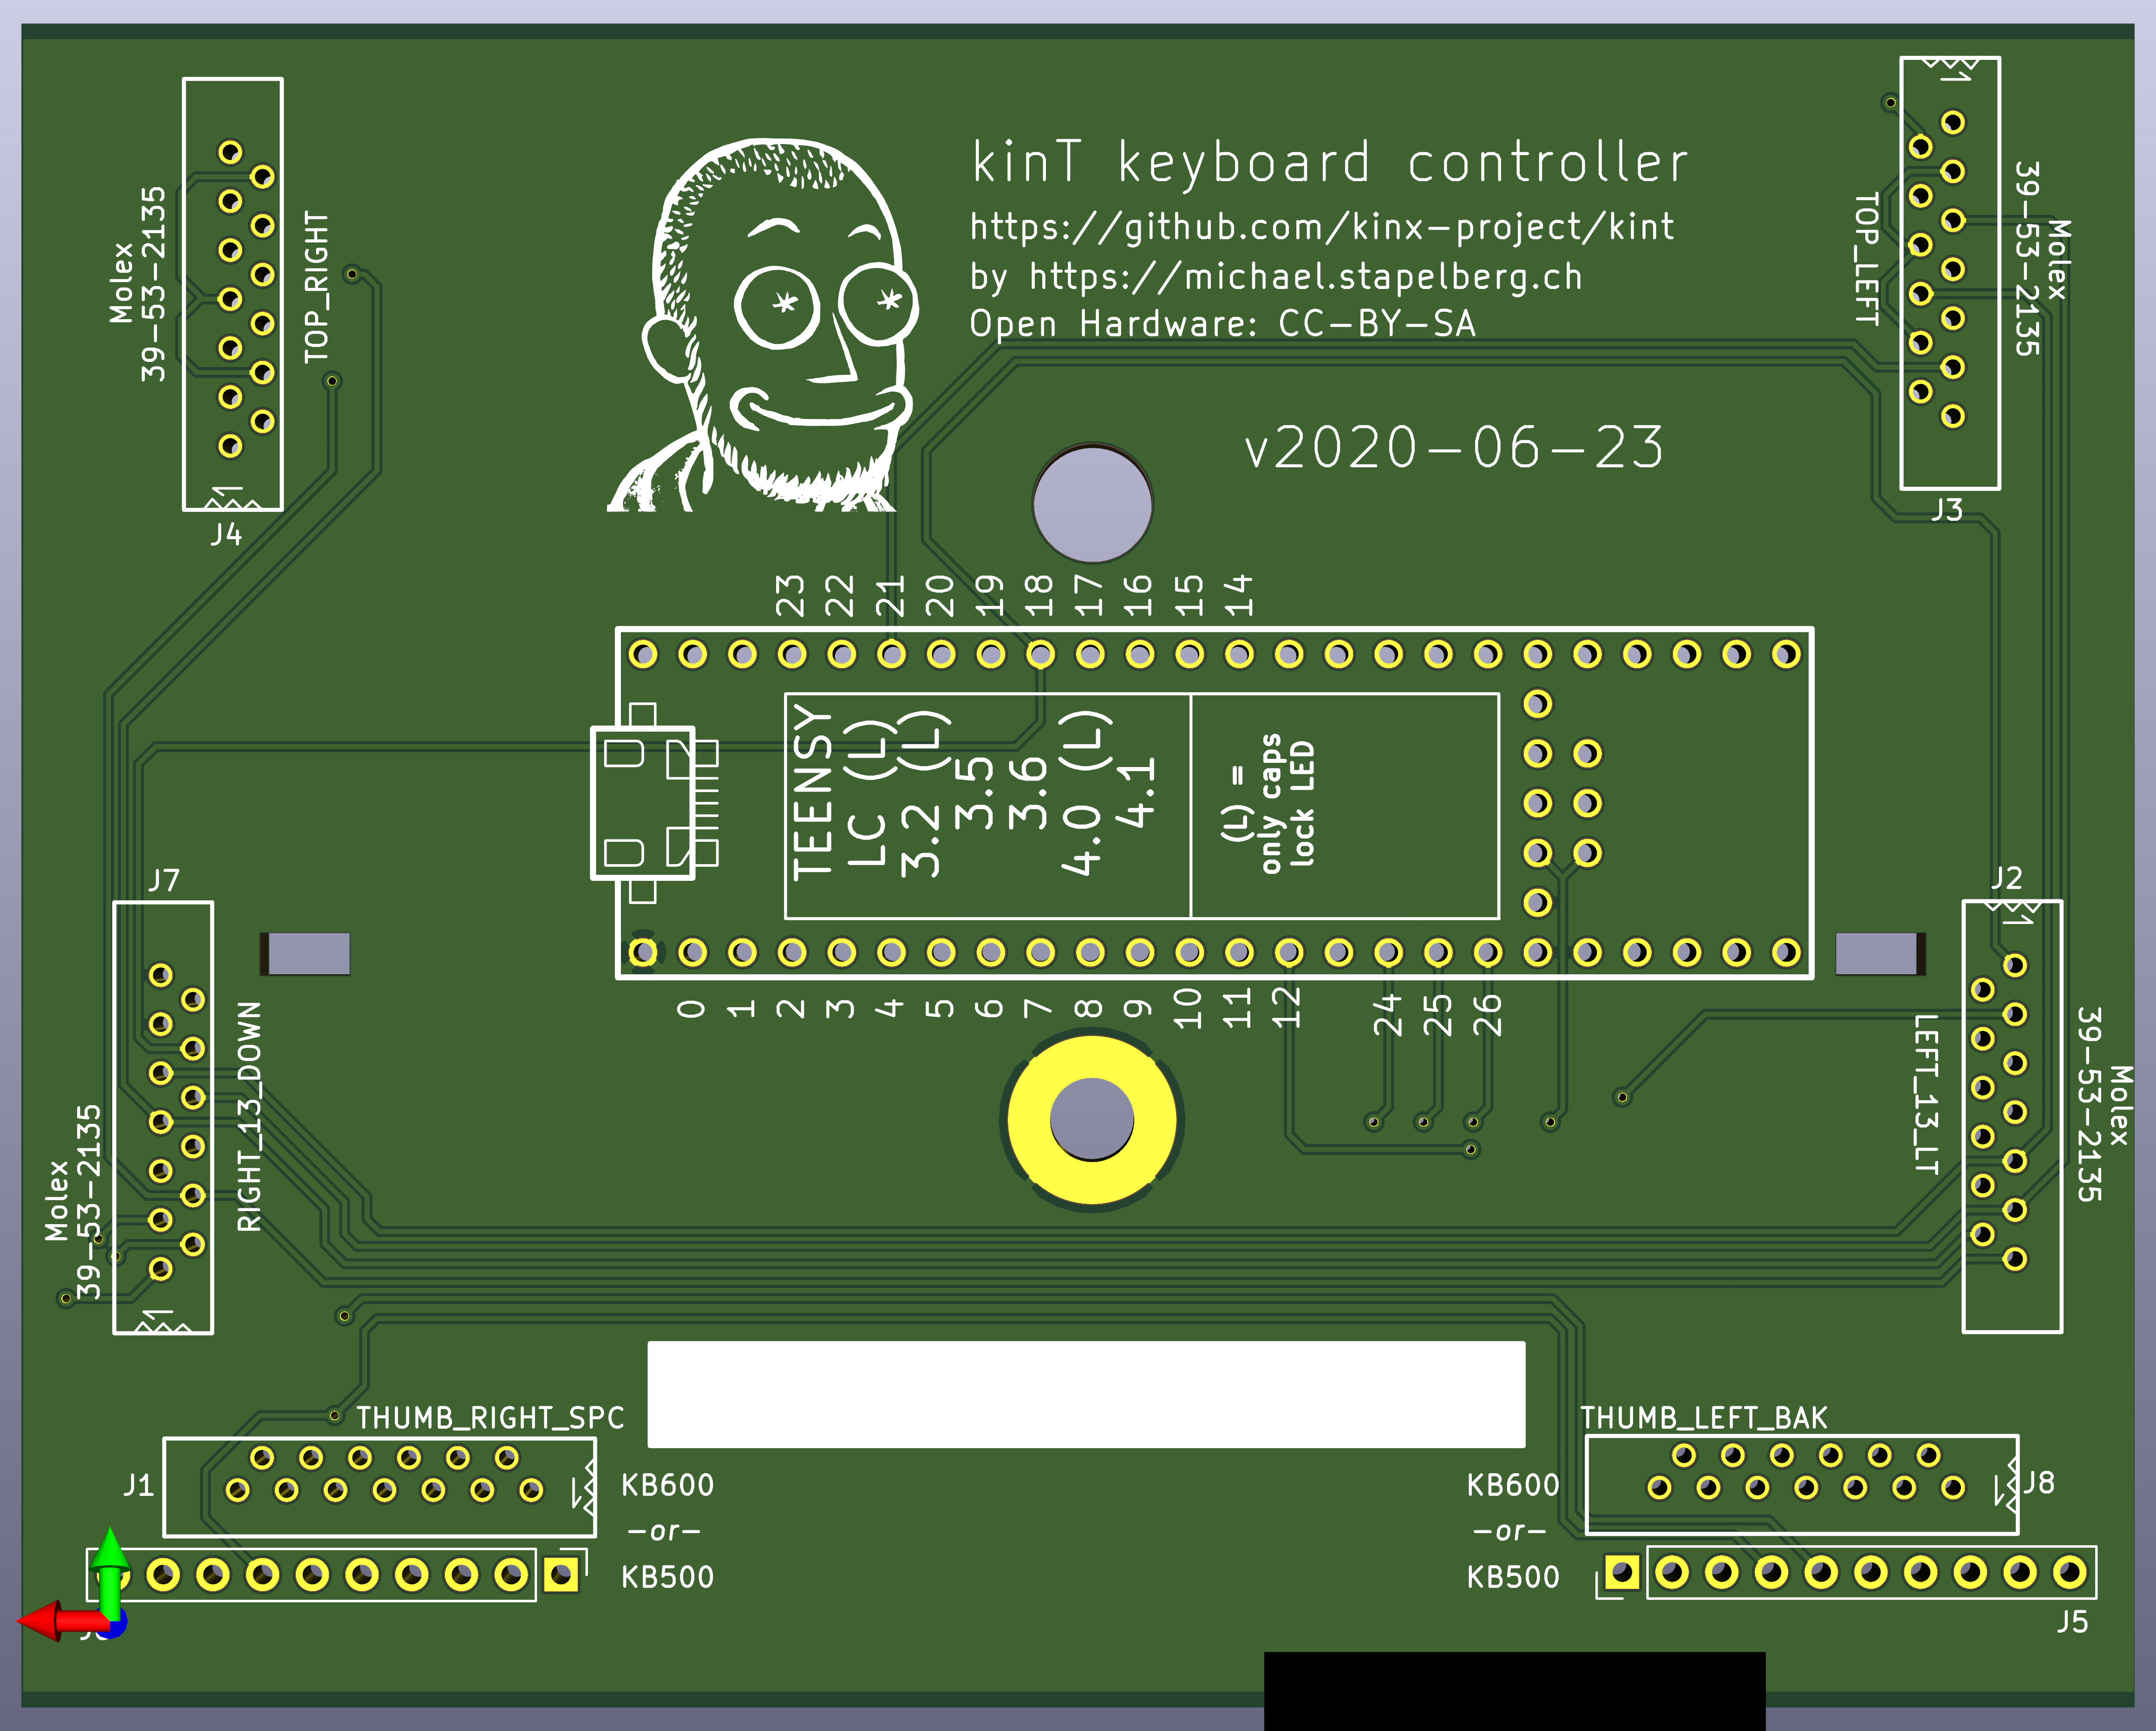
The kinT silkscreen (front, back) and schematic are much much clearer, making assembly a breeze.
-
The kinT is a good starting point for your own project:
-
kinT was designed in the open source KiCad program, meaning you do not need any license subscriptions.
-
The clear silkscreen and schematic make development and debugging easier.
-
-
On the kinT, the Teensy no longer has to be soldered onto the board upside down.
-
On the kinT, the FPC connectors have been moved for less strain on the cables.
-
The kinT makes possible lower-cost builds: if you don’t need the scroll lock, num lock and keypad LEDs, you can use a Teensy LC for merely 11 USD.
Compatibility: which Teensy to use?
The kinT keyboard controller was made for the Teensy 3.x series of devices, which are ARM based.
The older Atmel based Teensy++ 2.0 are also supported, but require slightly more complicated soldering: not connecting a few clashing Teensy++ 2.0 pins and closing 3 soldering jumpers.
Which Teensy should you buy for your build? Here are a few considerations:
-
The Teensy 3.6 is what I have been using for years now.
-
The Teensy++ 2.0 seems to be the most popular choice, also because it was the only option with the the predecessor keyboard controller. Note that the Teensy++ 2.0 may become no longer available at some point:
[…] discontinue Teensy 2.0 […] is a decision we'll consider in mid 2019.
Reference: full Teensy compatibility chart
TODO: add power consumption as a column. relevant for using the keyboard with a laptop on the go
| teensy | LEDs | Cost | USB | clock speed | MCU | QMK |
|---|---|---|---|---|---|---|
| teensy++ 2.0 | yes | $24.00 | 1.1 | 16 MHz AVR | AT90USB1286 | TODO: kint2pp |
| no | 1.1 | 48 MHz M4 | MK20DX128 | untested | ||
| no | 1.1 | MK20DX256 | untested | |||
| teensy LC | no | $11.65 | 1.1 | 48 MHz M0+ | untested | |
| teensy 3.2 | no | $19.80 | 1.1 | 72 MHz M4 | ||
| teensy 3.5 | yes | $24.25 | 1.1 | 120 MHz M4F | MK64FX | |
| teensy 3.6 | yes | $29.25 | 1.1 | 180 MHz M4F | MK66FX | yes |
| teensy 4.0 | no | $19.95 | 2.0 | 600 MHz M7 | MIMXRT1062 | in progress |
| teensy 4.1 | yes | $26.85 | 2.0 | 600 MHz M7 | MIMXRT1062 | in progress |
Buying the board and components (Bill of materials)
- TODO: oshpark project link
To buy the components, check out the kinT BOM in the Octopart BOM tool, from where you can conveniently buy all components via Digi-Key or Mouser.
For your convenience, this is the full BOM (links go to Octopart):
| Part Number | Count | Cost | Description | Note |
|---|---|---|---|---|
| Teensy 3.6 | 1 | $32.5 | your choice! | |
| Würth 61301011121 | 7 | $0.89 | 10 position 2.54mm header | 5 for Teensy 2 for KB500 0 for KB600 |
| Molex 39-53-2135 | 6 | $1.24 | 13 position FPC connector | 4 for KB500 6 for KB600 |
| Kingbright APT3216QBC/D | 4 | $0.47 | 1206 SMD LED | blue 470nm chose your color! |
| Vishay CRCW120610K0FKEAC | 4 | $0.10 | 1206 10K resistor | value determines LED brightness |
| $48.45 |
Note: with all parts (except for the Molex 39-53-2135 FPC connector), there is no need to get the specific versions from the BOM above — if you have LEDs, resistors and pin headers still lying around from other projects, feel free to re-use them!
Soldering
All the soldering connections on the kinT keyboard controller are easy to make, so the whole assembly can be done at home, with a cheap soldering iron and basic electronic hobby equipment. A build takes about 1 hour of time and involves a little over 100 soldering connections.
For example, I used the Miniware TS100 soldering iron, which can be found for 50-60 EUR or USD.
If you’re new to soldering, check out this excellent soldering reference card from adafruit.
Soldering instructions for the Teensy 3.x or 4.x
-
Populate the FPC connectors J2, J3, J4, J7 (all keyboards) and J1, J8 for the newer Advantage 2 (KB600). Turn the board around and solder all their pins.
-
Solder resistors R1, R2, R3, R4 and the four LEDs onto the board.
-
LEDs are directional parts! Their marker marks the cathode, which is labeled as C on the kinT.
-
If you’re new to SMD (Surface Mount Devices) soldering, check out How to Hand Solder SMD, which explains what I call the “One pad at a time” method.
-
-
Turn the board around and place 3 rows of pin headers (top, bottom, vertical) in the Teensy holes. The vertical pin header is required for powering the LEDs. Do not solder these yet!
-
Place your Teensy 3.x or 4.x on top of the pin header and solder all its pins.
- If you’re using a Teensy++ 2.0, you must not connect some pins! See the instructions below.
-
Turn the board around and solder all the pin header pins.
-
For the older Advantage (KB500) keyboard, populate pin headers J5, J6 and solder their pins.
Soldering instructions for the Teensy++ 2.0
Follow the instructions for the Teensy 3.x or 4.x above, but:
-
Do not connect pin 7, pin 15 and pin 16. These are marked with an x on the kinT.
- An easy way to do this is to remove the corresponding pins from your pin header with pliers.
-
Close the solder jumpers JP1, JP2, JP3. These will remap pin 7, pin 15 and pin 16 onto pins that can be used with the Teensy++ 2.0.