6.2 KiB
Modes
xplr is a modal file explorer. That means the users switch between different modes, each containing a different set of key bindings to avoid clashes. Users can switch between these modes at run-time.
The modes can be configured using the xplr.config.modes Lua API.
It contains the following fields:
builtin
Type: mapping of string and Mode
This is exposed by the xplr.config.modes.builtin API.
xplr by default provides the following builtin modes:
- default
- recover
- selection_ops
- create
- create_directory
- create_file
- number
- go_to
- rename
- delete
- action
- search
- filter
- relative_path_does_contain
- relative_path_does_not_contain
- sort
- switch_layout
- quit
Visit the Default Key Bindings to see what each mode does.
custom
Type: mapping of string and Mode
This is exposed by the xplr.config.modes.custom API.
It allows the users to define custom modes.
Example:
xplr.config.modes.custom.example = {
  name = "example",
  key_bindings = {
    on_key = {
      enter = {
        help = "default mode",
        messages = {
          "PopMode",
          { SwitchModeBuiltin = "default" }
        }
      }
    }
  }
}

xplr.config.general.initial_mode = "example"

-- when you load xplr, you should be in the "example" mode,
-- pressing "enter" should take you to the "default" mode.
Mode
A mode contains the following information:
name
Type: string
This is the name of the mode visible in the help menu.
help
Type: nullable string
If specified, the help menu will display this instead of the auto generated mappings.
extra_help
Type: nullable string
If specified, the help menu will display this along-side the auto generated help menu.
key_bindings
Type: Key Bindings
The key bindings available in that mode.
layout
Type: nullable Layout
If specified, this layout will be used to render the UI.
Key Bindings
Key bindings define how each keyboard input will be handled in a specific mode.
See the default key bindings for example.
Key bindings contains the following information:
on_key
Type: mapping of Key to nullable Action
Defines what to do when a specific key is pressed.
on_alphabet
Type: nullable Action
An action to perform if the keyboard input is an alphabet and is not mapped via the on_key field.
on_number
Type: nullable Action
An action to perform if the keyboard input is a number and is not mapped via the on_key field.
on_special_character
Type: nullable Action
An action to perform if the keyboard input is a special character and is not mapped via the on_key field.
default
Type: nullable Action
Default action to perform in case of a keyboard input not mapped via any of the on_key, on_alphabet, on_number or on_special_character field.
Key
A key can be one of the following:
- 0, 1, ... 9
- a, b, ... z
- A, B, ... Z
- f1, f2, ... f12
- ctrl-a, ctrl-b, ... ctrl-z
- alt-a, alt-b, ... alt-z
- backspace
- left
- right
- up
- down
- home
- end
- page-up
- page-down
- back-tab
- delete
- insert
- enter
- tab
- esc
And finally, the special characters - including space (" ").
Action
An action contains the following information:
- help
- messages
help
Type: nullable string
Description of what it does. If unspecified, it will be excluded from the help menu.
messages
Type: A list of Message to send.
The list of messages to send when a key is pressed.
Tutorial: Adding a New Mode
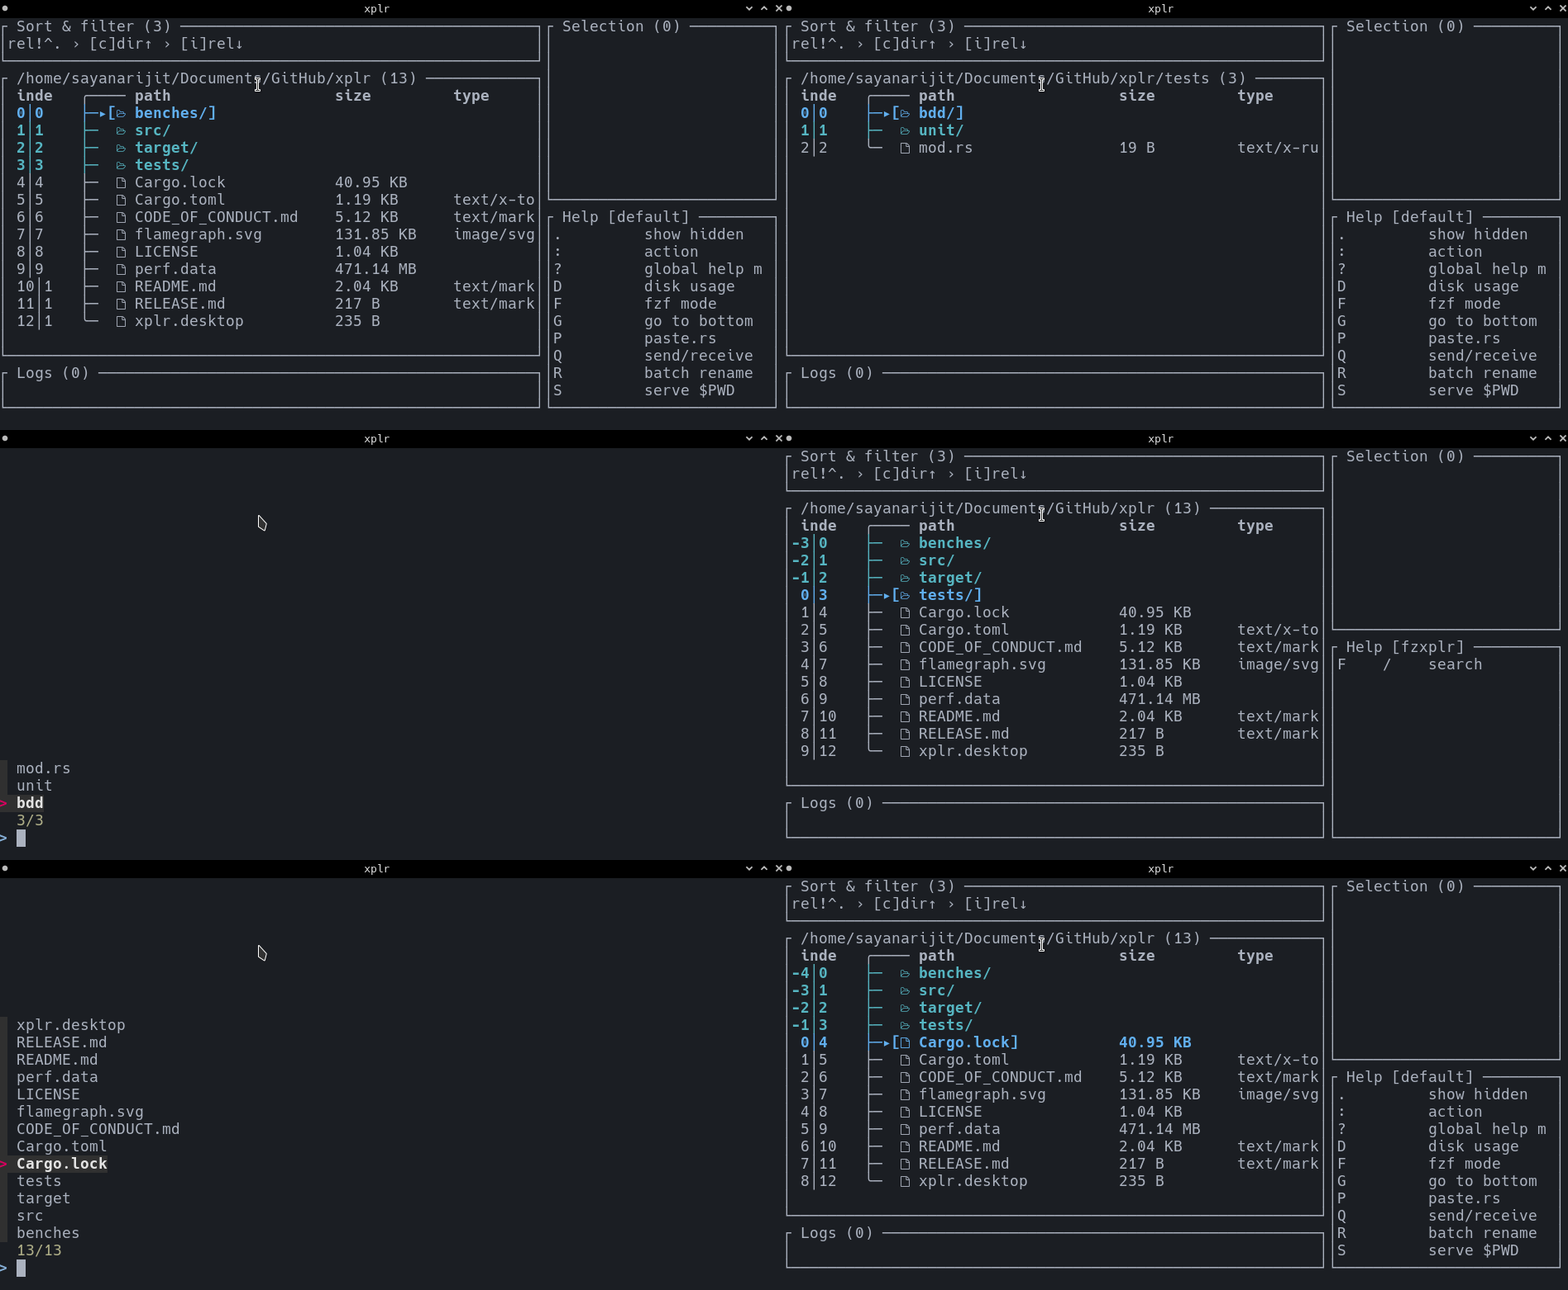
Assuming xplr is installed and setup, let's add our own mode to integrate xplr with fzf.
We'll call it fzxplr mode.
First, let's add a custom mode called fzxplr, and map the key F to an
action that will call fzf to search and focus on a file or enter into a
directory.
xplr.config.modes.custom.fzxplr = {
  name = "fzxplr",
  key_bindings = {
    on_key = {
      F = {
        help = "search",
        messages = {
          {
            BashExec = [===[
            PTH=$(cat "${XPLR_PIPE_DIRECTORY_NODES_OUT:?}" | awk -F/ '{print $NF}' | fzf)
            if [ -d "$PTH" ]; then
              echo ChangeDirectory: "'"${PWD:?}/${PTH:?}"'" >> "${XPLR_PIPE_MSG_IN:?}"
            else
              echo FocusPath: "'"${PWD:?}/${PTH:?}"'" >> "${XPLR_PIPE_MSG_IN:?}"
            fi
            ]===]
          },
          "PopMode",
        },
      },
    },
    default = {
      messages = {
        "PopMode",
      },
    },
  },
}
As you can see, the key F in mode fzxplr (the name can be anything)
executes a script in bash.
BashExec, PopMode, SwitchModeBuiltin, ChangeDirectory and FocusPath
are messages, $XPLR_PIPE_MSG_IN,
$XPLR_PIPE_DIRECTORY_NODES_OUT are
environment variables exported by xplr
before executing the command. They contain the path to the
input and output pipes that
allows external tools to interact with xplr.
Now that we have our new mode ready, let's add an entry point to this mode via
the default mode.
xplr.config.modes.builtin.default.key_bindings.on_key["F"] = {
  help = "fzf mode",
  messages = {
    { SwitchModeCustom = "fzxplr" },
  },
}
Now let's try out the new xplr-fzf integration.
Visit Awesome Plugins for more integration options.
