8.3 KiB
FAQ & Troubleshooting
As a first step we recommend carefully reading our documentation on GitHub. Most steps to successfully set up your Pi-KVM are already described there. If you run into any issues you can check this page which will list common errors. If that still doesn't help you you're welcome to raise an issue ticket or join our Discord for further help.
Common questions
Can I connect multiple servers to a single Pi-KVM?
- Yes, but it will require additional work to set up. See this page.
How can I get the access to Pi-KVM in my local network over Internet?
- You can use port forwarding for port 443 on your router if it has an external IP address. In all other cases, you can use the excellent free VPN service Tailscale, which is configured on Pi-KVM with a few simple commands.
Can I use Pi-KVM with non-Raspberry Pi boards (Orange, Nano, etc)?
- Yes, but you will have to prepare the operating system yourself. As for the Pi-KVM software, you will need to replace some config files (such as UDEV rules). If you are a developer or an experienced system administrator, you will not have any problems with this. In addition, we are open to patches. If you need help with this, please contact us via Discord.
First steps
What is the default password? How do I change it?
-
There are two types of accounts: OS and Pi-KVM (web interface) accounts. The system account
rootcan be used for SSH/UART access and has the passwordroot. The web interface account is calledadminand has the passwordadmin. The Pi-KVM account cannot be used for SSH access and vice versa.To change passwords, use the following commands (under root):
su -  # If you're in the webterm
rw  # Switch filesystem to read-write mode
passwd root  # Change OS root password
kvmd-passwd set admin  # Change web ui admin password
ro  # Back to read-only
How do I get root access in the web terminal?
- The web terminal works with the account
kvmd-webterm. This is a regular user with no administrator privileges and. In addition,sudoand login are disabled for this user for security reasons. To getrootaccess, you need to use thesu -command (minus is important) and enter the root password.
Where is the Pi-KVM configuration located?
-
Almost all KVMD (the main daemon controlling Pi-KVM) configuration files located in
/etc/kvmd. You can also find nginx configs and SSL certificates there. KVMD configs use YAML syntax. The specific platform parameters can be found in the file/etc/kvmd/main.yamland you should never edit it. Use/etc/kvmd/override.yamlto redefine the system parameters.Another files that are also not recommended for editing have read-only permissions. If you edit any of these files, you will need to manually make changes to them when you upgrade your system. You can view the current configuration and all available KVMD parameters using the command
kvmd -m.
I can't edit any file on Pi-KVM. Why is the system in read-only mode?
- The Pi-KVM file system is always mounted in read-only mode. This measure prevents it from being damaged by a sudden power outage. To change the configuration you must first switch the filesystem to write mode using the command
rwfrom root. After the changes, be sure to run the commandroto switch it back to read-only.
How do I update Pi-KVM with the latest software?
-
Pi-KVM OS is based on Arch Linux ARM and is fully updated from the repository by a regular package manager. Connect to your Pi-KVM via ssh and run:
rw
pacman -Syu
reboot
❗ Pacman saves all installed packages in a compressed format so that you can roll back to the old version if something goes wrong. After you've updated and made sure everything works, it makes sense to clear the package cache so that it doesn't take up space on the SD card:
rw; rm -rf /var/cache/pacman/pkg; ro.
Video problems
Pi-KVM does not show the video from the computer at all
-
- Double-check that the video capture device is connected correctly. For the CSI bridge, this should be exactly the camera port, for the USB dongle, strictly the port indicated in the picture.
- Some laptops do not output any signal until you switched the output (usually via the FN + and an F5 key on the keyboard).
- Your computer may have turned on sleep mode for the monitor. Move the mouse and turn it off.
The video works in the booted OS, but not in the BIOSUEFI
- The problem appears on Intel NUC, GA-H77-DS3H, and some other devices with using CSI bridge. All you need to do is change the EDID data. This is the information about supported resolutions that the CSI bridge reports to your computer.
Glitchy or wrong BIOS/UEFI resolution
-
On some motherboards, the BIOS may be displayed at a lower resolution, or with some rendering issues/glitches, specially on newer ASUS ones. Like this:
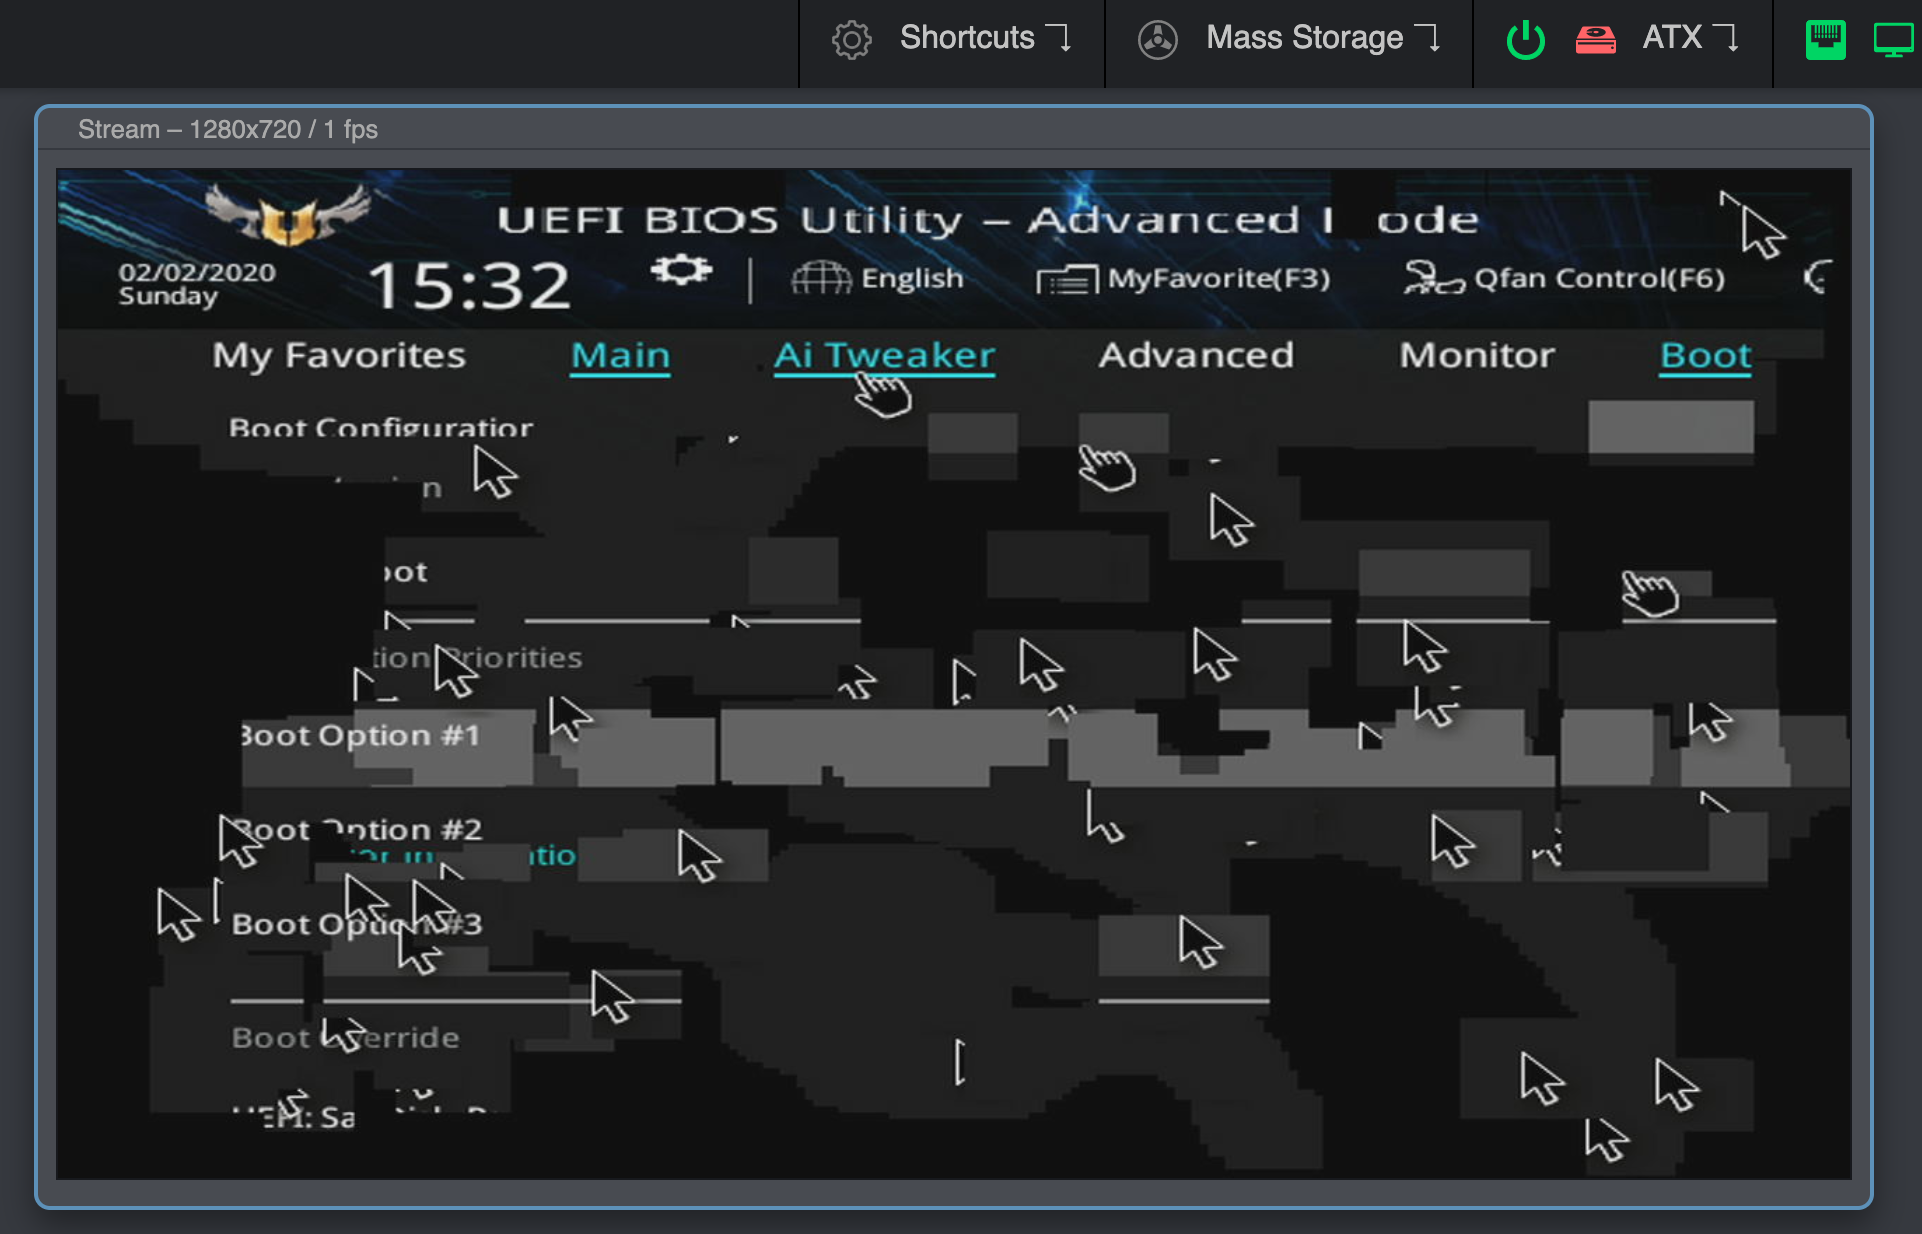
This can be solved by enabling the Compatibility Support Module (CSM) in your BIOS, usually under the Boot options.
If you can't or don't want to enable the CSM, you can try connecting a DisplayPort monitor, or a dummy plug. If you remove the DP cable/adapter the bug will reappear.
If none of this works, try connecting the DP cable first, boot into the BIOS, disable the CSM and shutdown (do not restart) your PC. Then, boot into the BIOS and enable the CSM before shutting down your PC. Then connect the HDMI and turn your PC on again.
CSI bridge does not work with official Raspberry Pi PoE HAT
- Details here. The reason is that the official HAT has a built-in fan controller that conflicts with the TC358743 chip of the bridge. The solution is to disable the fan control and connect it to the power line so that it works continuously. To turn off the controller you need to add the line
disable_poe_fan=1to/boot/config.txt.
No image from computer with Linux + Awesome WM
- Sometimes Awesome WM on Linux can't recognize a video output change on a cable. That is, if the cable was first inserted into the monitor, and then you reconnected it to Pi-KVM - it may happen that you will not see the image. It seems that the problem is Awesome WM, since for example with KDE it does not reproducing. If you turn on your workstation with Pi-KVM already connected, everything will work fine.
USB problems (keyboard, mouse, mass storage)
My computer does not recognize Pi-KVM USB at all
- Make sure that you have used the correct USB cable with DATA lines to connect the OTG port for the Raspberry to the computer. You may have decided to use a USB hub instead of a Y-cable, and it won't work. Use good cables and follow the instructions :)
BIOS/UEFI does not recognize Pi-KVM USB, but computer does
- If you are using a USB hub or USB PCI controller, this may not be handled by your BIOS. Try to use another USB port. Some ports may have a built-in hub on the motherboard and a buggy BIOS that can't handle it.
The keyboard works in BIOS/UEFI, but the mouse does not
- The BIOS does not support absolute mouse mode, which is preferred by Pi-KVM. In this case, you can enable relative positioning mode.