15 KiB
FAQ & Troubleshooting
As a first step, we recommend carefully reading our documentation on GitHub. Most steps to successfully set up your Pi-KVM are already described there. If you run into any issues you can check this page which will list common errors. If that still doesn't help you you're welcome to raise an issue ticket or join our Discord for further help.
Note: if you can't find an answer to your question here, try the Community FAQ. It will be merged with this page in the future
Navigation
- Common questions
- First steps
- Video problems
- USB problems (keyboard, mouse, mass storage)
- Web UI problems
- Hardware problems (Wi-Fi, ATX, etc)
Common questions
Can I connect multiple servers to a single Pi-KVM?
Click to view
- Yes, but it will require additional work to set up. See this page.
How can I get the access to Pi-KVM in my local network over Internet?
Click to view
- You can use port forwarding for port 443 on your router if it has an external IP address. In all other cases, you can use the excellent free VPN service Tailscale, which is configured on Pi-KVM with a few simple commands.
Can I use Pi-KVM with non-Raspberry boards (Orange, Nano, etc)?
Click to view
- Yes, but you will have to prepare the operating system yourself. As for the Pi-KVM software, you will need to replace some config files (such as UDEV rules). If you are a developer or an experienced system administrator, you will not have any problems with this. In addition, we are open to patches. If you need help with this, please contact us via Discord.
First steps
What is the default password? How do I change it?
Click to view
-
There are two types of accounts: OS and Pi-KVM (web interface) accounts. The system account
rootcan be used for SSH/UART access and has the passwordroot. The web interface account is calledadminand has the passwordadmin. The Pi-KVM account cannot be used for SSH access and vice versa.To change passwords, use the following commands (under root):
su -  # If you're in the webterm
rw  # Switch filesystem to read-write mode
passwd root  # Change OS root password
kvmd-htpasswd set admin  # Change web ui admin password
ro  # Back to read-only
How do I get root access in the web terminal?
Click to view
- The web terminal works with the account
kvmd-webterm. This is a regular user with no administrator privileges and. In addition,sudoand login are disabled for this user for security reasons. To getrootaccess, you need to use thesu -command (minus is important) and enter the root password.
Where is the Pi-KVM configuration located?
Click to view
-
Almost all KVMD (the main daemon controlling Pi-KVM) configuration files located in
/etc/kvmd. You can also find nginx configs and SSL certificates there. KVMD configs use YAML syntax. The specific platform parameters can be found in the file/etc/kvmd/main.yamland you should never edit it. Use/etc/kvmd/override.yamlto redefine the system parameters.Another files that are also not recommended for editing have read-only permissions. If you edit any of these files, you will need to manually make changes to them when you upgrade your system. You can view the current configuration and all available KVMD parameters using the command
kvmd -m.
I can't edit any file on Pi-KVM. Why is the system in read-only mode?
Click to view
- The Pi-KVM file system is always mounted in read-only mode. This measure prevents it from being damaged by a sudden power outage. To change the configuration you must first switch the filesystem to write mode using the command
rwfrom root. After the changes, be sure to run the commandroto switch it back to read-only.
How do I update Pi-KVM with the latest software?
Click to view
-
Pi-KVM OS is based on Arch Linux ARM and is fully updated from the repository by a regular package manager. Connect to your Pi-KVM via ssh and run:
rw
pacman -Syu
reboot
❗ Pacman saves all installed packages in a compressed format so that you can roll back to the old version if something goes wrong. After you've updated and made sure everything works, it makes sense to clear the package cache so that it doesn't take up space on the SD card:
rw; rm -rf /var/cache/pacman/pkg; ro.
Video problems
Pi-KVM does not show the video from the computer at all
Click to view
- Double-check that the video capture device is connected correctly. For the CSI bridge, this should be exactly the camera port, for the USB dongle, strictly the port indicated in the picture.
- Some laptops do not output any signal until you switched the output (usually via the FN + and an F5 key on the keyboard).
- Your computer may have turned on sleep mode for the monitor. Move the mouse and turn it off.
The video works in the booted OS, but not in the BIOS/UEFI
Click to view
- The problem appears on Intel NUC, GA-H77-DS3H, and some other devices with using CSI bridge. All you need to do is change the EDID data. This is the information about supported resolutions that the CSI bridge reports to your computer.
Glitchy or wrong BIOS/UEFI resolution
Click to view
-
On some motherboards, the BIOS may be displayed at a lower resolution, or with some rendering issues/glitches, specially on newer ASUS ones. Like this:
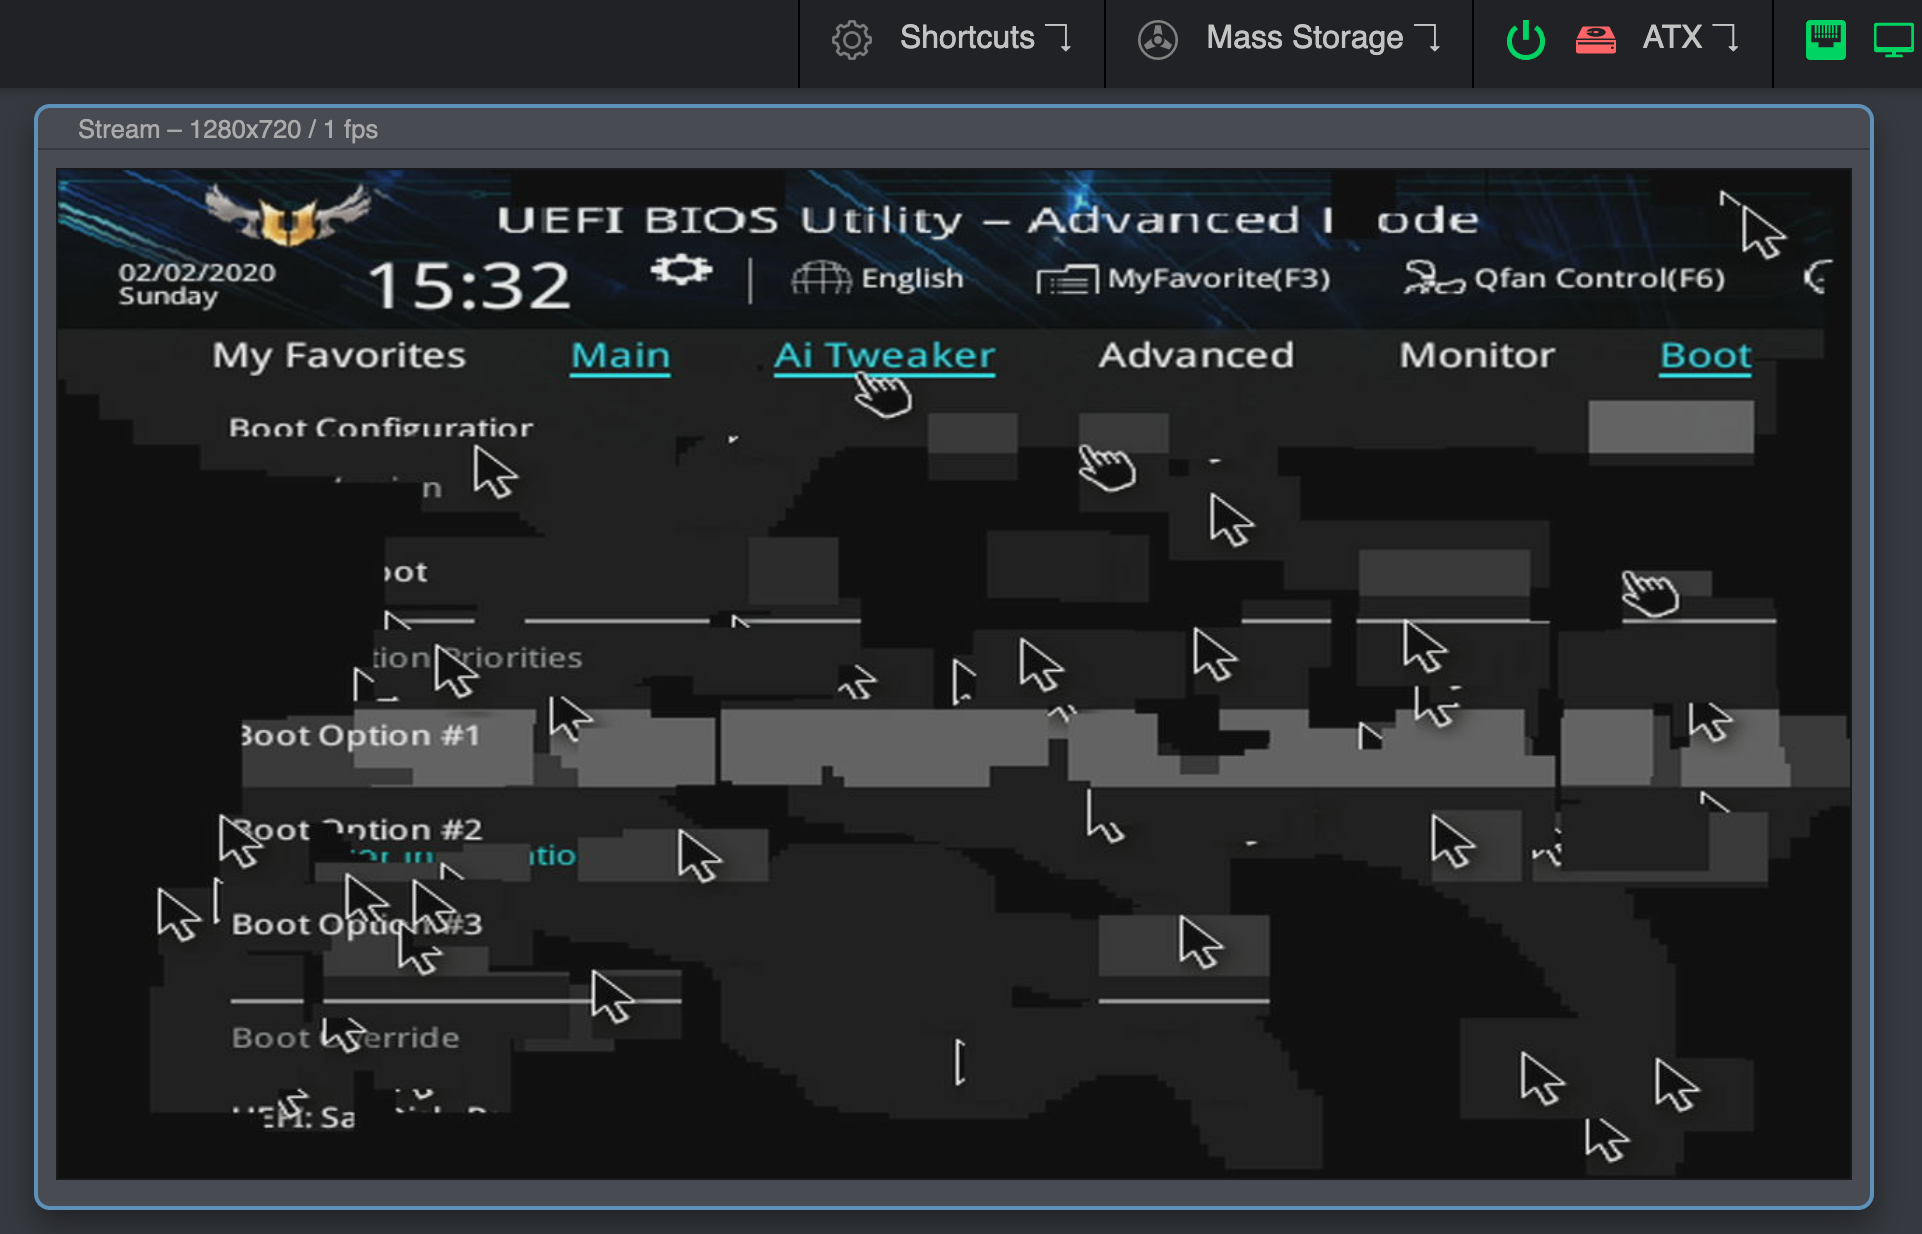
This can be solved by enabling the Compatibility Support Module (CSM) in your BIOS, usually under the Boot options.
If you can't or don't want to enable the CSM, you can try connecting a DisplayPort monitor, or a dummy plug. If you remove the DP cable/adapter the bug will reappear.
If none of this works, try connecting the DP cable first, boot into the BIOS, disable the CSM and shutdown (do not restart) your PC. Then, boot into the BIOS and enable the CSM before shutting down your PC. Then connect the HDMI and turn your PC on again.
CSI bridge does not work with official Raspberry Pi PoE HAT
Click to view
- Details here. The reason is that the official HAT has a built-in fan controller that conflicts with the TC358743 chip of the bridge. The solution is to disable the fan control and connect it to the power line so that it works continuously. To turn off the controller you need to add the line
disable_poe_fan=1to/boot/config.txt.
The video freezes a few seconds after the start, restarting the Web UI or VNC does not help
Click to view
-
The story is here. Very-very rarely, Raspberry boards can have a hardware defect that causes some of the chip blocks to be unstable under normal power. The solution is to slightly increase the power supply, as in overclocking. Add
over_voltage=1(orover_voltage=2if previous doesn't help) to/boot/config.txtand performreboot.To make sure that you are facing this particular problem, first perform a diagnostic:
- Boot the Pi-KVM without the specified options.
- Open Web-UI and wait for freezing.
- Click System -> Reset Stream.
- Click System -> Open log and make sure that the log contains messages like
H264: Can't wait for the VCOS semaphore. - Make sure that the last message from ustreamer was
H264: Configuring MMAL encoder(not counting messages about connecting and disconnecting stream clients).
No image from computer with Linux + Awesome WM
Click to view
- Sometimes Awesome WM on Linux can't recognize a video output change on a cable. That is, if the cable was first inserted into the monitor, and then you reconnected it to Pi-KVM - it may happen that you will not see the image. It seems that the problem is Awesome WM, since for example with KDE, it is not reproducable. If you turn on your workstation with Pi-KVM already connected, everything will work fine.
USB problems (keyboard, mouse, mass storage, etc)
My computer does not recognize USB of Pi-KVM v2+ at all
Click to view
- Make sure that you have used the correct USB cable with DATA lines to connect the OTG port for the Raspberry to the computer. You may have decided to use a USB hub instead of a Y-cable and it won't work. Use good cables and follow the instructions :)
- In very rare cases, some motherboards contain a buggy BIOS that does not understand the composite USB device because BIOS doesn't implement the USB stack correctly. In this case, we can suggest the Arduino HID emulator from v0 platform with v2.
BIOS/UEFI does not recognize USB of v2+, but computer does
Click to view
- If you are using a USB hub or USB PCI controller, this may not be handled by your BIOS. Try to use another USB port. Some ports may have a built-in hub on the motherboard and a buggy BIOS that can't handle it.
The keyboard works in BIOS/UEFI, but the mouse does not
Click to view
- The BIOS does not support absolute mouse mode, which is preferred by Pi-KVM. In this case, you can enable relative positioning mode.
Mass storage drive working (I can boot an image from Pi-KVM v2+), but keyboard/mouse does not
Click to view
- In very rare cases, some motherboards contain a buggy BIOS that does not understand the composite USB device because BIOS doesn't implement the USB stack correctly. In this case, we can suggest the Arduino HID emulator from v0 platform with v2+. Thus the Pi-KVM will be connected by two USB cables to the motherboard: one of them will be responsible for the keyboard and mouse, the other for everything else.
I can't get into UEFI/FileVault when booting my Mac using Pi-KVM v2+
Click to view
- The problem is specific to early-model Macs and does not occur on ARM-based Macs (Apple M1 or so). UEFI does not initialize the keyboard of the composite device during boot, however, if you use the standard keyboard to get to the UEFI/FileVault menu, you will see that the keyboard, mouse, and mass storage will work fine. In this case, we can suggest the Arduino HID emulator from v0 platform with v2+. Thus, the Pi-KVM will be connected by two USB cables to the Mac: one of them will be responsible for the keyboard and mouse, the other for everything else.
Big mouse latency on another Raspberry as managed server
Click to view
- Unusual case: RPi4 is used as a Pi-KVM to control RPi3. In this case, the mouse delay may be several seconds. To fix it, just add line
usbhid.mousepoll=0to/boot/config.txtto the server (i.e. RPI3 in our case) and reboot it.
Web UI problems
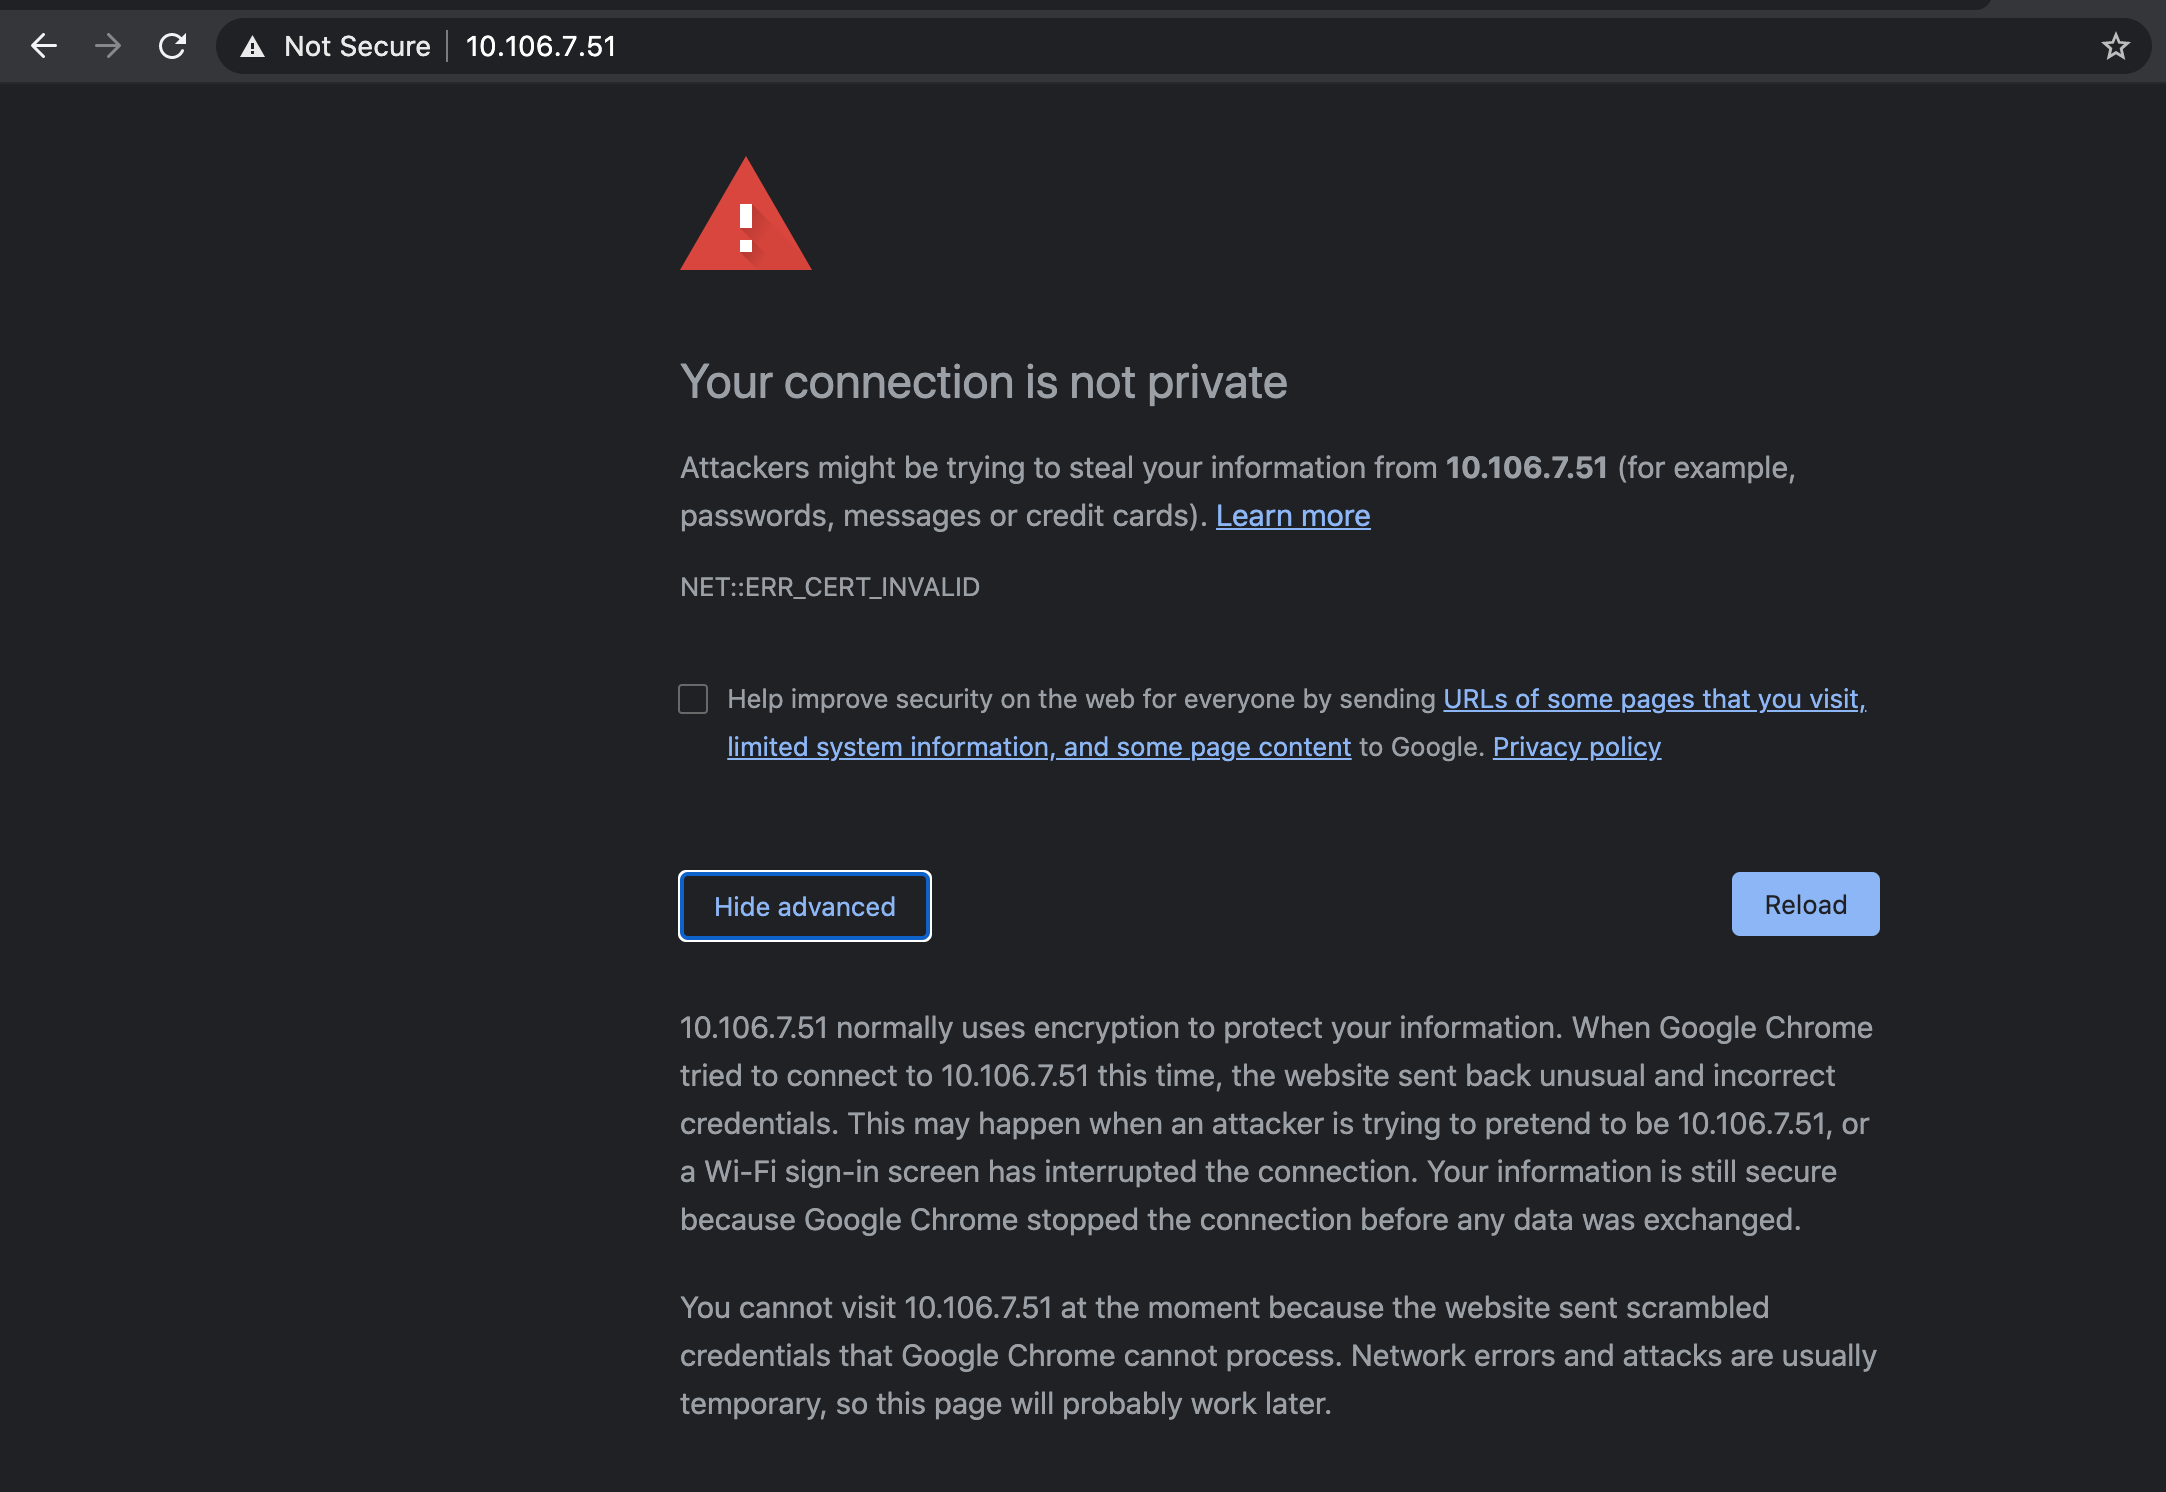
Chrome Certificate Issue
Click to view
-
The latest versions of Chrome do not allow access to the page with a self signed certificate, so if you see the following screen when loading the pi-kvm website:
-
You can proceed by typing
thisisunsafeand Chrome will then load the page.
Pressing ESC in full screen mode causes this to close
Click to view
- Your browser does not support keyboard lock. Right now, only Chrome implements this.
I can't use this on iOS: the Web UI network indicator flashes yellow
Click to view
- Safari on iOS contains an old bug that prevents a web application from connecting over a web socket if you use a self-signed certificate on the server (the default for Pi-KVM). There are two solutions:
-
Install a valid SSL certificate for Pi-KVM host to
/etc/kvmd/nginx/ssl. -
Disable HTTPS at all in
/etc/kvmd/nginx/nginx.conf. To do this, comment some lines like in this file and restart web server:systemctl restart kvmd-nginx.❗ Don't do this for insecure networks or the Internet. Your passwords and what you type on the keyboard will be transmitted in unencrypted form.
-
The Web UI doesn't work properly in Firefox while it works fine in Chrome
Click to view
- This might be related to your specific hardware combination or browser hardware acceleration. Try disabling hardware acceleration in Firefox or updating your GPU and chipset drivers.
Unexpected interruption while loading the image for Mass storage drive
Click to view
- If problems occur when uploading even a small disk image it may be due to unstable network operation or antivirus software. It is well known that Kaspersky antivirus cuts off Pi-KVM connections during uploading, so you should add the Pi-KVM website to Kaspersky's list of exceptions or not filter web requests with the antivirus. Antivirus programs can also affect the performance of certain interface elements, for example the quality slider. For Kaspersky, the steps to add the network address of Pi-KVM's website to the exclusion list is: Protection -> Private browsing -> Categories and exclusions -> Exclusions.
I can't copy clipboard contents from the server (the machine controlled via Pi-KVM) to the client
Click to view
- The clipboard only works from the client to the server not vice versa. There is currently no way to do it.
Hardware problems (Wi-Fi, ATX, etc)
No Wi-Fi on Raspberry Pi Zero W
Click to view
- Some Zeros contain a defective Wi-Fi chip. You can either return the device to the store, or try the software workaround.
LEDs/Switches does not work in ATX control
Click to view
- Double check your wiring as per the documentation. Make sure you placed the relays (G3VM-61A1) in the correct orientation. The relays for switches (Power, Reset) have a different orientation than the ones for LEDs.