41 KiB
High Dynamic Range Rendering
Up to this point we've been using the sRGB colorspace to render our scene.
While this is fine it limits what we can do with our lighting. We are using
TextureFormat::Bgra8UnormSrgb (on most systems) for our surface texture.
This means that we have 8bits for each of the color and alpha channels. While
the channels are stored as integers between 0 and 255 inclusively, they get
converted to and from floating point values between 0.0 and 1.0. The TL:DR of
this is that using 8bit textures we only get 256 possible values in each
channel.
The kicker with this is most of the precision gets used to represent darker values of the scene. This means that bright objects like a light bulb have the same value as exeedingly bright objects such as the sun. This inaccuracy makes realistic lighting difficult to do right. Because of this, we are going to switch our rendering system to use high dynamic range in order to give our scene more flexibility and enable use to leverage more advanced techniques such as Physically Based Rendering.
What is High Dynamic Range?
In laymans terms, a High Dynamic Range texture is a texture with more bits per pixel. In addition to this, HDR textures are stored as floating point values instead of integer values. This means that the texture can have brightness values greater than 1.0 meaning you can have a dynamic range of brighter objects.
Switching to HDR
As of writing, wgpu doesn't allow us to use a floating point format such as
TextureFormat::Rgba16Float as the surface texture format (not all
monitors support that anyways), so we will have to render our scene in
an HDR format, then convert the values to a supported format such as
TextureFormat::Bgra8UnormSrgb using a technique called tonemapping.
There are some talks about implementing HDR surface texture support in wgpu. Here is a github issues if you want to contribute to that effort: https://github.com/gfx-rs/wgpu/issues/2920
Before we do that though we need to switch to using an HDR texture for rendering.
To start we'll create a file called hdr.rs and put the some code in it:
use wgpu::Operations;

use crate::{create_render_pipeline, texture};

/// Owns the render texture and controls tonemapping
pub struct HdrPipeline {
    pipeline: wgpu::RenderPipeline,
    bind_group: wgpu::BindGroup,
    texture: texture::Texture,
    width: u32,
    height: u32,
    format: wgpu::TextureFormat,
    layout: wgpu::BindGroupLayout,
}

impl HdrPipeline {
    pub fn new(device: &wgpu::Device, config: &wgpu::SurfaceConfiguration) -> Self {
        let width = config.width;
        let height = config.height;

        // We could use `Rgba32Float`, but that requires some extra
        // features to be enabled for rendering.
        let format = wgpu::TextureFormat::Rgba16Float;

        let texture = texture::Texture::create_2d_texture(
            device,
            width,
            height,
            format,
            wgpu::TextureUsages::TEXTURE_BINDING | wgpu::TextureUsages::RENDER_ATTACHMENT,
            wgpu::FilterMode::Nearest,
            Some("Hdr::texture"),
        );

        let layout = device.create_bind_group_layout(&wgpu::BindGroupLayoutDescriptor {
            label: Some("Hdr::layout"),
            entries: &[
                // This is the HDR texture
                wgpu::BindGroupLayoutEntry {
                    binding: 0,
                    visibility: wgpu::ShaderStages::FRAGMENT,
                    ty: wgpu::BindingType::Texture {
                        sample_type: wgpu::TextureSampleType::Float { filterable: true },
                        view_dimension: wgpu::TextureViewDimension::D2,
                        multisampled: false,
                    },
                    count: None,
                },
                wgpu::BindGroupLayoutEntry {
                    binding: 1,
                    visibility: wgpu::ShaderStages::FRAGMENT,
                    ty: wgpu::BindingType::Sampler(wgpu::SamplerBindingType::Filtering),
                    count: None,
                },
            ],
        });
        let bind_group = device.create_bind_group(&wgpu::BindGroupDescriptor {
            label: Some("Hdr::bind_group"),
            layout: &layout,
            entries: &[
                wgpu::BindGroupEntry {
                    binding: 0,
                    resource: wgpu::BindingResource::TextureView(&texture.view),
                },
                wgpu::BindGroupEntry {
                    binding: 1,
                    resource: wgpu::BindingResource::Sampler(&texture.sampler),
                },
            ],
        });

        // We'll cover the shader next
        let shader = wgpu::include_wgsl!("hdr.wgsl");
        let pipeline_layout = device.create_pipeline_layout(&wgpu::PipelineLayoutDescriptor {
            label: None,
            bind_group_layouts: &[&layout],
            push_constant_ranges: &[],
        });

        let pipeline = create_render_pipeline(
            device,
            &pipeline_layout,
            config.format,
            None,
            // We'll use some math to generate the vertex data in
            // the shader, so we don't need any vertex buffers
            &[],
            wgpu::PrimitiveTopology::TriangleList,
            shader,
        );

        Self {
            pipeline,
            bind_group,
            layout,
            texture,
            width,
            height,
            format,
        }
    }

    /// Resize the HDR texture
    pub fn resize(&mut self, device: &wgpu::Device, width: u32, height: u32) {
        self.texture = texture::Texture::create_2d_texture(
            device,
            width,
            height,
            wgpu::TextureFormat::Rgba16Float,
            wgpu::TextureUsages::TEXTURE_BINDING | wgpu::TextureUsages::RENDER_ATTACHMENT,
            wgpu::FilterMode::Nearest,
            Some("Hdr::texture"),
        );
        self.bind_group = device.create_bind_group(&wgpu::BindGroupDescriptor {
            label: Some("Hdr::bind_group"),
            layout: &self.layout,
            entries: &[
                wgpu::BindGroupEntry {
                    binding: 0,
                    resource: wgpu::BindingResource::TextureView(&self.texture.view),
                },
                wgpu::BindGroupEntry {
                    binding: 1,
                    resource: wgpu::BindingResource::Sampler(&self.texture.sampler),
                },
            ],
        });
        self.width = width;
        self.height = height;
    }

    /// Exposes the HDR texture
    pub fn view(&self) -> &wgpu::TextureView {
        &self.texture.view
    }

    /// The format of the HDR texture
    pub fn format(&self) -> wgpu::TextureFormat {
        self.format
    }

    /// This renders the internal HDR texture to the [TextureView]
    /// supplied as parameter.
    pub fn process(&self, encoder: &mut wgpu::CommandEncoder, output: &wgpu::TextureView) {
        let mut pass = encoder.begin_render_pass(&wgpu::RenderPassDescriptor {
            label: Some("Hdr::process"),
            color_attachments: &[Some(wgpu::RenderPassColorAttachment {
                view: &output,
                resolve_target: None,
                ops: Operations {
                    load: wgpu::LoadOp::Load,
                    store: true,
                },
            })],
            depth_stencil_attachment: None,
        });
        pass.set_pipeline(&self.pipeline);
        pass.set_bind_group(0, &self.bind_group, &[]);
        pass.draw(0..3, 0..1);
    }
}
You may have noticed that we added a new parameter to create_render_pipeline. Here a the changes to that function:
fn create_render_pipeline(
    device: &wgpu::Device,
    layout: &wgpu::PipelineLayout,
    color_format: wgpu::TextureFormat,
    depth_format: Option<wgpu::TextureFormat>,
    vertex_layouts: &[wgpu::VertexBufferLayout],
    topology: wgpu::PrimitiveTopology, // NEW!
    shader: wgpu::ShaderModuleDescriptor,
) -> wgpu::RenderPipeline {
    let shader = device.create_shader_module(shader);

    device.create_render_pipeline(&wgpu::RenderPipelineDescriptor {
        // ...
        primitive: wgpu::PrimitiveState {
            topology, // NEW!
            // ...
        },
        // ...
    })
}
Tonemapping
The process of tonemapping is taking an HDR image and converting it to a Standard Dynamic Range (SDR) which is usually sRGB. The exact tonemapping curve you uses is ultimately up to your artistic needs, but for this tutorial we'll use a popular one know as the Academy Color Encoding System or ACES used throughout the game industry as well as the film industry.
With that let's jump into the the shader. Create a file called hdr.wgsl
and add the following code:
// Maps HDR values to linear values
// Based on http://www.oscars.org/science-technology/sci-tech-projects/aces
fn aces_tone_map(hdr: vec3<f32>) -> vec3<f32> {
    let m1 = mat3x3(
        0.59719, 0.07600, 0.02840,
        0.35458, 0.90834, 0.13383,
        0.04823, 0.01566, 0.83777,
    );
    let m2 = mat3x3(
        1.60475, -0.10208, -0.00327,
        -0.53108,  1.10813, -0.07276,
        -0.07367, -0.00605,  1.07602,
    );
    let v = m1 * hdr;
	let a = v * (v + 0.0245786) - 0.000090537;
	let b = v * (0.983729 * v + 0.4329510) + 0.238081;
    return clamp(m2 * (a / b), vec3(0.0), vec3(1.0));
}

struct VertexOutput {
    @location(0) uv: vec2<f32>,
    @builtin(position) clip_position: vec4<f32>,
};

@vertex
fn vs_main(
    @builtin(vertex_index) vi: u32,
) -> VertexOutput {
    var out: VertexOutput;
    // Generate a triangle that covers the whole screen
    out.uv = vec2<f32>(
        f32((vi << 1u) & 2u),
        f32(vi & 2u),
    );
    out.clip_position = vec4<f32>(out.uv * 2.0 - 1.0, 0.0, 1.0);
    // We need to invert the y coordinate so the image
    // is not upside down
    out.uv.y = 1.0 - out.uv.y;
    return out;
}

@group(0)
@binding(0)
var hdr_image: texture_2d<f32>;

@group(0)
@binding(1)
var hdr_sampler: sampler;

@fragment
fn fs_main(vs: VertexOutput) -> @location(0) vec4<f32> {
    let hdr = textureSample(hdr_image, hdr_sampler, vs.uv);
    let sdr = aces_tone_map(hdr.rgb);
    return vec4(sdr, hdr.a);
}
With those in place we can start using our HDR texture in our core
render pipeline. First we need to add the new HdrPipeline to State:
// lib.rs

mod hdr; // NEW!

// ...

struct State {
    // ...
    // NEW!
    hdr: hdr::HdrPipeline,
}

impl State {
    pub fn new(window: Window) -> anyhow::Result<Self> {
        // ...
        // NEW!
        let hdr = hdr::HdrPipeline::new(&device, &config);

        // ...

        Self {
            // ...
            hdr, // NEW!
        }
    }
}
Then when we resize the window, we need to call resize() on our
HdrPipeline:
fn resize(&mut self, new_size: winit::dpi::PhysicalSize<u32>) {
    // UPDATED!
    if new_size.width > 0 && new_size.height > 0 {
        // ...
        self.hdr
            .resize(&self.device, new_size.width, new_size.height);
        // ...
    }
}
Next in render() we need to switch the RenderPass to use our HDR
texture instead of the surface texture:
// render()
let mut render_pass = encoder.begin_render_pass(&wgpu::RenderPassDescriptor {
    label: Some("Render Pass"),
    color_attachments: &[Some(wgpu::RenderPassColorAttachment {
        view: self.hdr.view(), // UPDATED!
        resolve_target: None,
        ops: wgpu::Operations {
            load: wgpu::LoadOp::Clear(wgpu::Color {
                r: 0.1,
                g: 0.2,
                b: 0.3,
                a: 1.0,
            }),
            store: true,
        },
    })],
    depth_stencil_attachment: Some(
        // ...
    ),
});
Finally after we draw all the objects in the frame we can run our tonemapper with the surface texture as the output:
// NEW!
// Apply tonemapping
self.hdr.process(&mut encoder, &view);
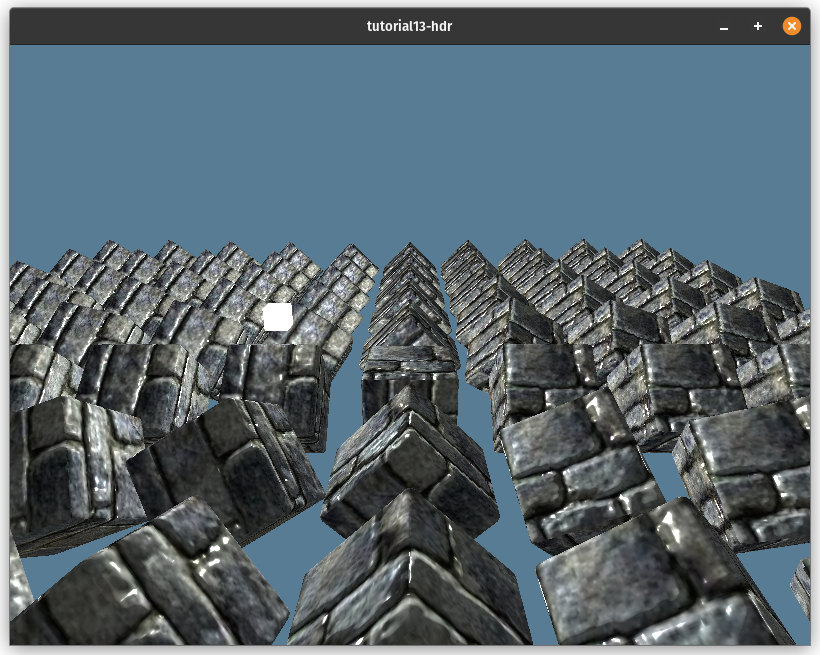
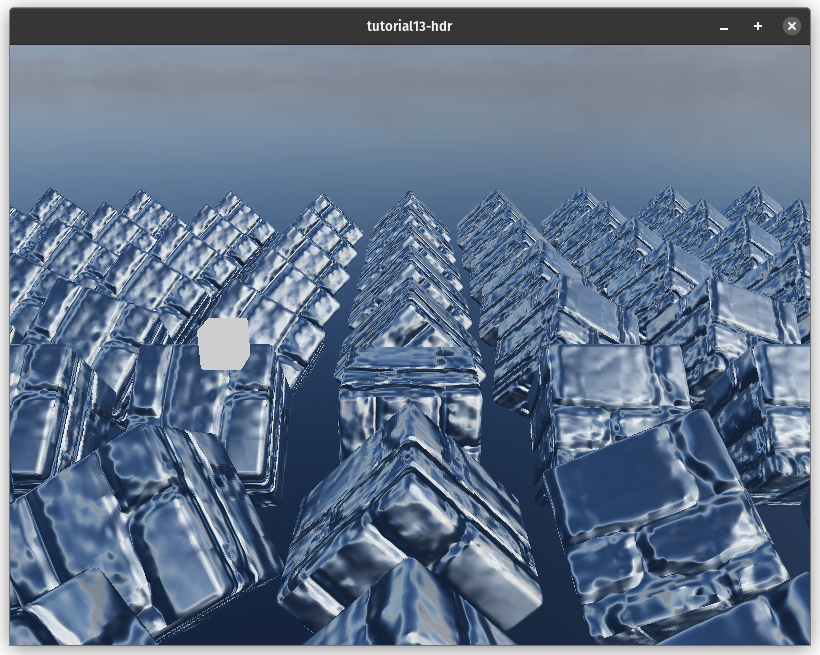
It's a pretty easy switch. Here's the image before using HDR:
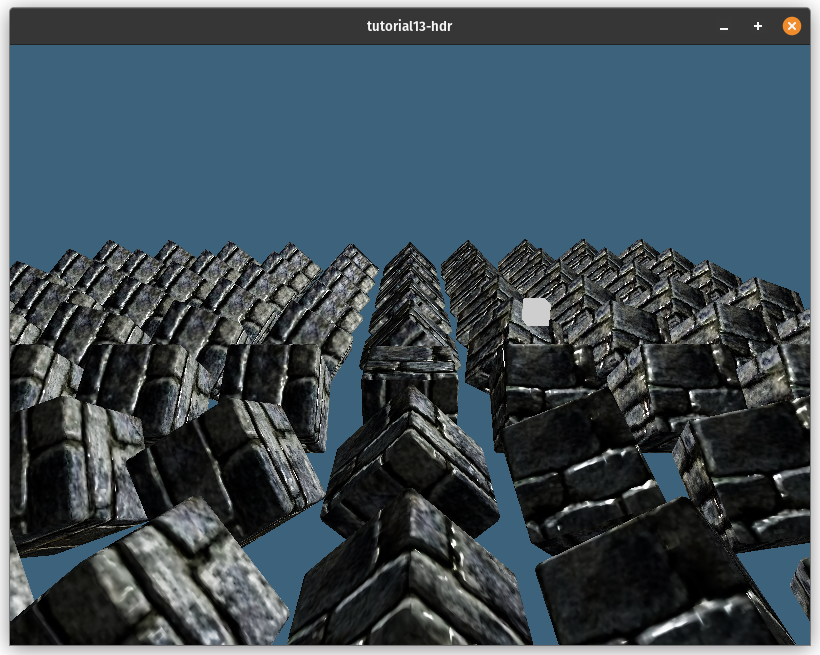
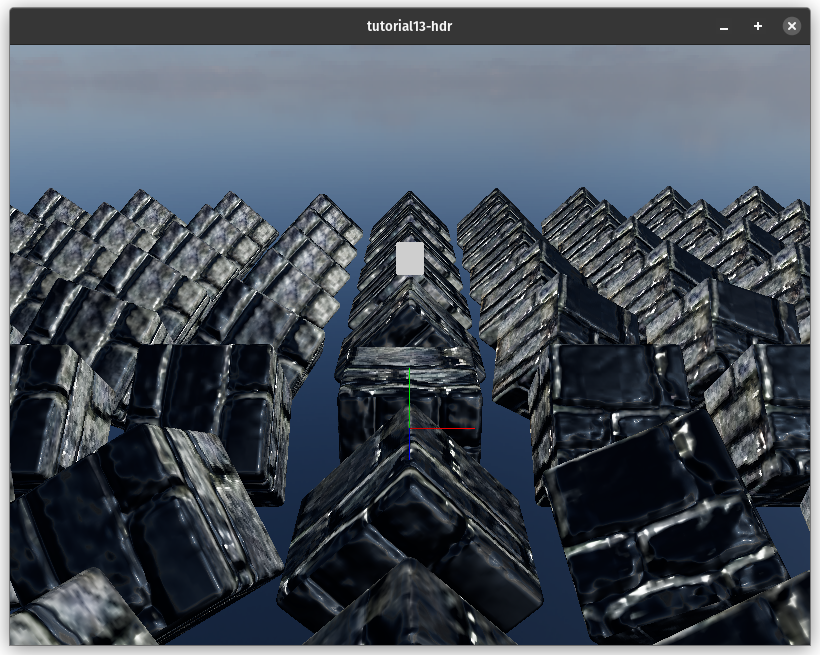
Here's what it looks like after implementing HDR:
Loading HDR textures
Now that we have an HDR render buffer, we can start leveraging HDR textures to their fullest. One of the main uses for HDR textures is to store lighting information in the form of an environment map.
This map can be used to light objects, display reflections and also to make a skybox. We're going to create a skybox using HDR texture, but first we need to talk about how environment maps are stored.
Equirectangular textures
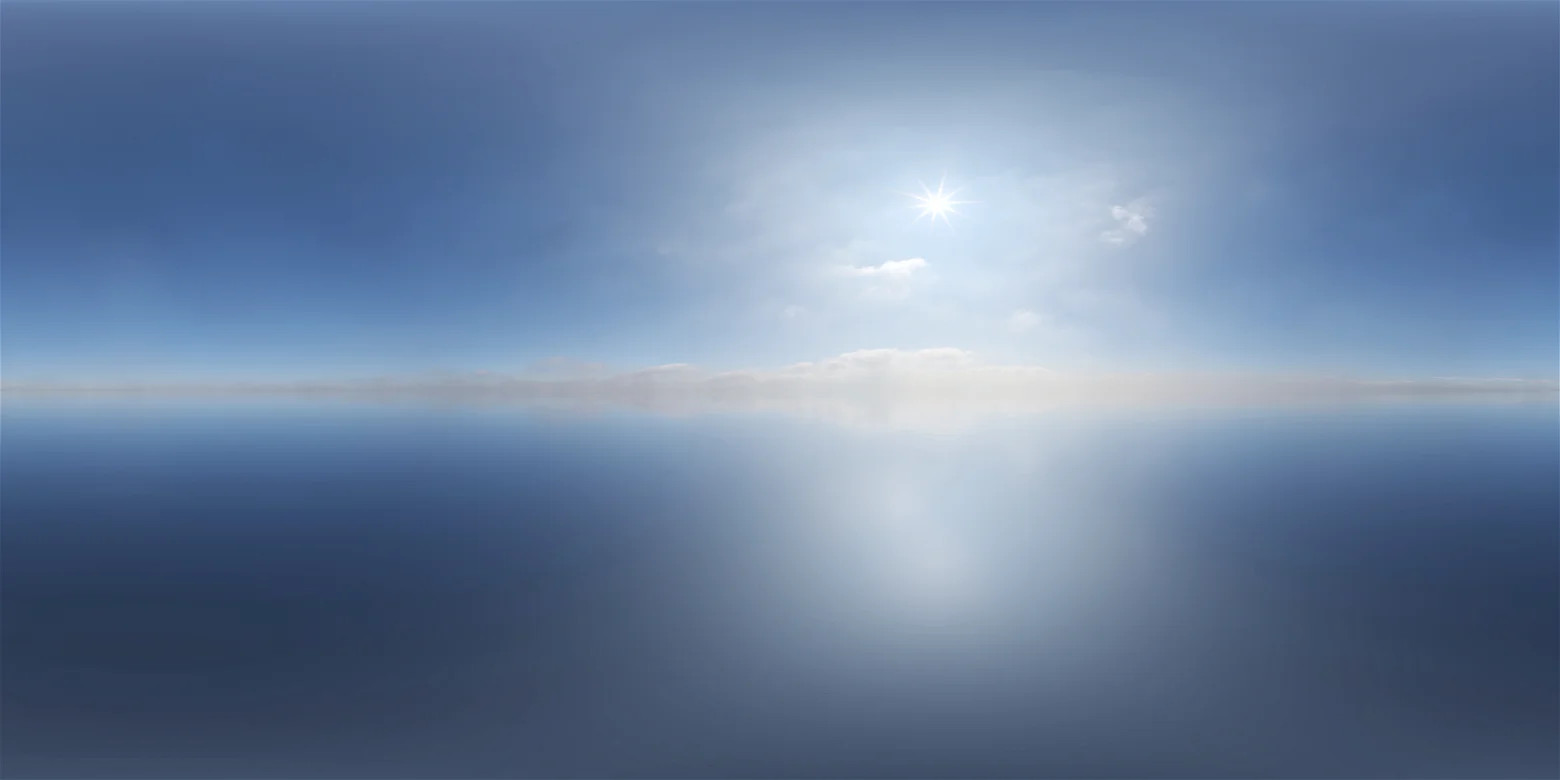
An equirectangluar texture is a texture where a sphere is stretched across a rectangular surface using what's known as an equirectangular projection. This map of the Earth is an example of this projection.

This projection maps the latitude values of the sphere to the horizontal coordinates of the texture. The longitude values get mapped to the vertical coordinates. This means that the vertical middle of the texture is the equator (0° longitude) of the sphere, the horizontal middle is the prime meridian (0° latitude) of the sphere, the left and right edges of the texture are the anti-meridian (+180°/-180° latitude) the top and bottom edges of the texture are the north pole (90° longitude) and south pole (-90° longitude) respectively.

This simple projection is easy to use, leading it to be one of the most popular projections for storing spherical textures. You can see the particular environment map we are going to use below.
Cube Maps
While we technically can use an equirectangular map directly as long as we do some math to figure out the correct coordinates, it is a lot more convenient to convert our environment map into a cube map.
A cube map is special kind of texture that has 6 layers. Each layer corresponds to a different face of an imaginary cube that is aligned to the X, Y and Z axes. The layers are stored in the following order: +X, -X, +Y, -Y, +Z, -Z.
To prepare to store the cube texture, we are going to create
a new struct called CubeTexture in texture.rs.
pub struct CubeTexture {
    texture: wgpu::Texture,
    sampler: wgpu::Sampler,
    view: wgpu::TextureView,
}

impl CubeTexture {
    pub fn create_2d(
        device: &wgpu::Device,
        width: u32,
        height: u32,
        format: wgpu::TextureFormat,
        mip_level_count: u32,
        usage: wgpu::TextureUsages,
        mag_filter: wgpu::FilterMode,
        label: Option<&str>,
    ) -> Self {
        let texture = device.create_texture(&wgpu::TextureDescriptor {
            label,
            size: wgpu::Extent3d {
                width,
                height,
                // A cube has 6 sides, so we need 6 layers
                depth_or_array_layers: 6,
            },
            mip_level_count,
            sample_count: 1,
            dimension: wgpu::TextureDimension::D2,
            format,
            usage,
            view_formats: &[],
        });

        let view = texture.create_view(&wgpu::TextureViewDescriptor {
            label,
            dimension: Some(wgpu::TextureViewDimension::Cube),
            array_layer_count: Some(6),
            ..Default::default()
        });

        let sampler = device.create_sampler(&wgpu::SamplerDescriptor {
            label,
            address_mode_u: wgpu::AddressMode::ClampToEdge,
            address_mode_v: wgpu::AddressMode::ClampToEdge,
            address_mode_w: wgpu::AddressMode::ClampToEdge,
            mag_filter,
            min_filter: wgpu::FilterMode::Nearest,
            mipmap_filter: wgpu::FilterMode::Nearest,
            ..Default::default()
        });

        Self {
            texture,
            sampler,
            view,
        }
    }

    pub fn texture(&self) -> &wgpu::Texture { &self.texture }

    pub fn view(&self) -> &wgpu::TextureView { &self.view }

    pub fn sampler(&self) -> &wgpu::Sampler { &self.sampler }

}
With this we can now write the code to load the HDR into a cube texture.
Compute shaders
Up to this point we've been exclusively using render pipelines, but I felt this was a good time to introduce compute pipelines and by extension compute shaders. Compute pipelines are a lot easier to setup. All you need is to tell the pipeline what resources you want to use, what code you want to run, and how many threads you'd like the GPU to use when running your code. We're going to use a compute shader to give each pixel in our cube textue a color from the HDR image.
Before we can use compute shaders, we need to enable them
in wgpu. We can do that just need to change the line where
we specify what features we want to use. In lib.rs, change
the code where we request a device:
let (device, queue) = adapter
    .request_device(
        &wgpu::DeviceDescriptor {
            label: None,
            // UPDATED!
            features: wgpu::Features::all_webgpu_mask(),
            // UPDATED!
            limits: wgpu::Limits::downlevel_defaults(),
        },
        None, // Trace path
    )
    .await
    .unwrap();
You may have noted that we have switched from
downlevel_webgl2_defaults() to downlevel_defaults().
This means that we are dropping support for WebGL2. The
reason for this is that WebGL2 doesn't support compute
shaders. WebGPU was built with compute shaders in mind. As
of writing the only browser that supports WebGPU is Chrome,
and some experimental browsers such as Firefox Nightly.
Consequently we are going to remove the webgl feature from
Cargo.toml. This line in particular:
wgpu = { version = "0.17", features = ["webgl"]}
Now that we've told wgpu that we want to use compute
shaders, let's create a struct in resource.rs that we'll
use to load the HDR image into our cube map.
pub struct HdrLoader {
    texture_format: wgpu::TextureFormat,
    equirect_layout: wgpu::BindGroupLayout,
    equirect_to_cubemap: wgpu::ComputePipeline,
}

impl HdrLoader {
    pub fn new(device: &wgpu::Device) -> Self {
        let module = device.create_shader_module(wgpu::include_wgsl!("equirectangular.wgsl"));
        let texture_format = wgpu::TextureFormat::Rgba32Float;
        let equirect_layout = device.create_bind_group_layout(&wgpu::BindGroupLayoutDescriptor {
            label: Some("HdrLoader::equirect_layout"),
            entries: &[
                wgpu::BindGroupLayoutEntry {
                    binding: 0,
                    visibility: wgpu::ShaderStages::COMPUTE,
                    ty: wgpu::BindingType::Texture {
                        sample_type: wgpu::TextureSampleType::Float { filterable: false },
                        view_dimension: wgpu::TextureViewDimension::D2,
                        multisampled: false,
                    },
                    count: None,
                },
                wgpu::BindGroupLayoutEntry {
                    binding: 1,
                    visibility: wgpu::ShaderStages::COMPUTE,
                    ty: wgpu::BindingType::StorageTexture {
                        access: wgpu::StorageTextureAccess::WriteOnly,
                        format: texture_format,
                        view_dimension: wgpu::TextureViewDimension::D2Array,
                    },
                    count: None,
                },
            ],
        });

        let pipeline_layout = device.create_pipeline_layout(&wgpu::PipelineLayoutDescriptor {
            label: None,
            bind_group_layouts: &[&equirect_layout],
            push_constant_ranges: &[],
        });

        let equirect_to_cubemap =
            device.create_compute_pipeline(&wgpu::ComputePipelineDescriptor {
                label: Some("equirect_to_cubemap"),
                layout: Some(&pipeline_layout),
                module: &module,
                entry_point: "compute_equirect_to_cubemap",
            });

        Self {
            equirect_to_cubemap,
            texture_format,
            equirect_layout,
        }
    }

    pub fn from_equirectangular_bytes(
        &self,
        device: &wgpu::Device,
        queue: &wgpu::Queue,
        data: &[u8],
        dst_size: u32,
        label: Option<&str>,
    ) -> anyhow::Result<texture::CubeTexture> {
        let hdr_decoder = HdrDecoder::new(Cursor::new(data))?;
        let meta = hdr_decoder.metadata();
        let mut pixels = vec![[0.0, 0.0, 0.0, 0.0]; meta.width as usize * meta.height as usize];
        hdr_decoder.read_image_transform(
            |pix| {
                // There's no Rgb32Float format, so we need
                // an extra float
                let rgb = pix.to_hdr();
                [rgb.0[0], rgb.0[1], rgb.0[2], 1.0f32]
            },
            &mut pixels[..],
        )?;

        let src = texture::Texture::create_2d_texture(
            device,
            meta.width,
            meta.height,
            self.texture_format,
            wgpu::TextureUsages::TEXTURE_BINDING | wgpu::TextureUsages::COPY_DST,
            wgpu::FilterMode::Linear,
            None,
        );

        queue.write_texture(
            wgpu::ImageCopyTexture {
                texture: &src.texture,
                mip_level: 0,
                origin: wgpu::Origin3d::ZERO,
                aspect: wgpu::TextureAspect::All,
            },
            &bytemuck::cast_slice(&pixels),
            wgpu::ImageDataLayout {
                offset: 0,
                bytes_per_row: Some(src.size.width * std::mem::size_of::<[f32; 4]>() as u32),
                rows_per_image: Some(src.size.height),
            },
            src.size,
        );

        let dst = texture::CubeTexture::create_2d(
            device,
            dst_size,
            dst_size,
            self.texture_format,
            1,
            // We are going to write to `dst` texture so we
            // need to use a `STORAGE_BINDING`.
            wgpu::TextureUsages::STORAGE_BINDING
                | wgpu::TextureUsages::TEXTURE_BINDING,
            wgpu::FilterMode::Nearest,
            label,
        );

        let dst_view = dst.texture().create_view(&wgpu::TextureViewDescriptor {
            label,
            // Normally you'd use `TextureViewDimension::Cube`
            // for a cube texture, but we can't use that
            // view dimension with a `STORAGE_BINDING`.
            // We need to access the cube texure layers
            // directly.
            dimension: Some(wgpu::TextureViewDimension::D2Array),
            ..Default::default()
        });

        let bind_group = device.create_bind_group(&wgpu::BindGroupDescriptor {
            label,
            layout: &self.equirect_layout,
            entries: &[
                wgpu::BindGroupEntry {
                    binding: 0,
                    resource: wgpu::BindingResource::TextureView(&src.view),
                },
                wgpu::BindGroupEntry {
                    binding: 1,
                    resource: wgpu::BindingResource::TextureView(&dst_view),
                },
            ],
        });

        let mut encoder = device.create_command_encoder(&Default::default());
        let mut pass = encoder.begin_compute_pass(&wgpu::ComputePassDescriptor { label });

        let num_workgroups = (dst_size + 15) / 16;
        pass.set_pipeline(&self.equirect_to_cubemap);
        pass.set_bind_group(0, &bind_group, &[]);
        pass.dispatch_workgroups(num_workgroups, num_workgroups, 6);

        drop(pass);

        queue.submit([encoder.finish()]);

        Ok(dst)
    }
}
The dispatch_workgroups call tells the gpu to run our
code in batchs called workgroups. Each workgroup has a
number of worker threads called invocations that run the
code in parallel. Workgroups are organized as a 3d grid
with the dimensions we pass to dispatch_workgroups.
In this example we have a workgroup grid divided into 16x16 chunks and storing the layer in z dimension.
The compute shader
Now let's write a compute shader that will convert
our equirectangular texture to a cube texture. Create a file
called equirectangular.wgsl. We're going to break it down
chunk by chunk.
const PI: f32 = 3.1415926535897932384626433832795;

struct Face {
    forward: vec3<f32>,
    up: vec3<f32>,
    right: vec3<f32>,
}
Two things here:
- wgsl doesn't have a builtin for PI so we need to specify it ourselves.
- each face of the cube map has an orientation to it, so we need to store that.
@group(0)
@binding(0)
var src: texture_2d<f32>;

@group(0)
@binding(1)
var dst: texture_storage_2d_array<rgba32float, write>;
Here we have the only two bindings we need. The equirectangular
src texture and our dst cube texture. Some things to note:
about dst:
- While
dstis a cube texture, it's stored as a array of 2d textures. - The type of binding we're using here is a storage texture. An array storage texture to be precise. This is a unique binding only available to compute shaders. It allows us to directly write to the texture.
- When using a storage texture binding we need to specify the format of the texture. If you try to bind a texture with a different format, wgpu will panic.
@compute
@workgroup_size(16, 16, 1)
fn compute_equirect_to_cubemap(
    @builtin(global_invocation_id)
    gid: vec3<u32>,
) {
    // If texture size is not divisible by 32 we
    // need to make sure we don't try to write to
    // pixels that don't exist.
    if gid.x >= u32(textureDimensions(dst).x) {
        return;
    }

    var FACES: array<Face, 6> = array(
        // FACES +X
        Face(
            vec3(1.0, 0.0, 0.0),  // forward
            vec3(0.0, 1.0, 0.0),  // up
            vec3(0.0, 0.0, -1.0), // right
        ),
        // FACES -X
        Face (
            vec3(-1.0, 0.0, 0.0),
            vec3(0.0, 1.0, 0.0),
            vec3(0.0, 0.0, 1.0),
        ),
        // FACES +Y
        Face (
            vec3(0.0, -1.0, 0.0),
            vec3(0.0, 0.0, 1.0),
            vec3(1.0, 0.0, 0.0),
        ),
        // FACES -Y
        Face (
            vec3(0.0, 1.0, 0.0),
            vec3(0.0, 0.0, -1.0),
            vec3(1.0, 0.0, 0.0),
        ),
        // FACES +Z
        Face (
            vec3(0.0, 0.0, 1.0),
            vec3(0.0, 1.0, 0.0),
            vec3(1.0, 0.0, 0.0),
        ),
        // FACES -Z
        Face (
            vec3(0.0, 0.0, -1.0),
            vec3(0.0, 1.0, 0.0),
            vec3(-1.0, 0.0, 0.0),
        ),
    );

    // Get texture coords relative to cubemap face
    let dst_dimensions = vec2<f32>(textureDimensions(dst));
    let cube_uv = vec2<f32>(gid.xy) / dst_dimensions * 2.0 - 1.0;

    // Get spherical coordinate from cube_uv
    let face = FACES[gid.z];
    let spherical = normalize(face.forward + face.right * cube_uv.x + face.up * cube_uv.y);

    // Get coordinate on the equirectangular texture
    let inv_atan = vec2(0.1591, 0.3183);
    let eq_uv = vec2(atan2(spherical.z, spherical.x), asin(spherical.y)) * inv_atan + 0.5;
    let eq_pixel = vec2<i32>(eq_uv * vec2<f32>(textureDimensions(src)));

    // We use textureLoad() as textureSample() is not allowed in compute shaders
    var sample = textureLoad(src, eq_pixel, 0);

    textureStore(dst, gid.xy, gid.z, sample);
}
While I commented some the previous code, there are some things I want to go over that wouldn't fit well in a comment.
The workgroup_size decorator tells the dimensions of the
workgroup's local grid of invocations. Because we are
dispatching one workgroup for every pixel in the texture,
we have each workgroup be a 16x16x1 grid. This means that each workgroup can have 256 threads to work with.
For Webgpu each workgroup can only have a max of 256 threads (also called invocations).
With this we can load the environment map in the new() function:
let hdr_loader = resources::HdrLoader::new(&device);
let sky_bytes = resources::load_binary("pure-sky.hdr").await?;
let sky_texture = hdr_loader.from_equirectangular_bytes(
    &device,
    &queue,
    &sky_bytes,
    1080,
    Some("Sky Texture"),
)?;
Skybox
No that we have an environment map to render. Let's use it to make our skybox. There are different ways to render a skybox. A standard way is to render a cube and map the environment map on it. While that method works, it can have some artifacts in the corners and edges where the cubes faces meet.
Instead we are going to render to the entire screen and
compute the view direction from each pixel, and use that
to sample the texture. First though we need to create a
bindgroup for the environment map so that we can use it
for rendering. Add the following to new():
let environment_layout =
    device.create_bind_group_layout(&wgpu::BindGroupLayoutDescriptor {
        label: Some("environment_layout"),
        entries: &[
            wgpu::BindGroupLayoutEntry {
                binding: 0,
                visibility: wgpu::ShaderStages::FRAGMENT,
                ty: wgpu::BindingType::Texture {
                    sample_type: wgpu::TextureSampleType::Float { filterable: false },
                    view_dimension: wgpu::TextureViewDimension::Cube,
                    multisampled: false,
                },
                count: None,
            },
            wgpu::BindGroupLayoutEntry {
                binding: 1,
                visibility: wgpu::ShaderStages::FRAGMENT,
                ty: wgpu::BindingType::Sampler(wgpu::SamplerBindingType::NonFiltering),
                count: None,
            },
        ],
    });

let environment_bind_group = device.create_bind_group(&wgpu::BindGroupDescriptor {
    label: Some("environment_bind_group"),
    layout: &environment_layout,
    entries: &[
        wgpu::BindGroupEntry {
            binding: 0,
            resource: wgpu::BindingResource::TextureView(&sky_texture.view()),
        },
        wgpu::BindGroupEntry {
            binding: 1,
            resource: wgpu::BindingResource::Sampler(sky_texture.sampler()),
        },
    ],
});
Now that we have the bindgroup, we need a render pipeline to render the skybox.
// NEW!
let sky_pipeline = {
    let layout = device.create_pipeline_layout(&wgpu::PipelineLayoutDescriptor {
        label: Some("Sky Pipeline Layout"),
        bind_group_layouts: &[&camera_bind_group_layout, &environment_layout],
        push_constant_ranges: &[],
    });
    let shader = wgpu::include_wgsl!("sky.wgsl");
    create_render_pipeline(
        &device,
        &layout,
        hdr.format(),
        Some(texture::Texture::DEPTH_FORMAT),
        &[],
        wgpu::PrimitiveTopology::TriangleList,
        shader,
    )
};
One thing to not here. We added the primitive format to
create_render_pipeline(). Also we changed the depth compare
function to CompareFunction::LessEqual (we'll discuss why when
we go over the sky shader). Here's the changes to that:
fn create_render_pipeline(
    device: &wgpu::Device,
    layout: &wgpu::PipelineLayout,
    color_format: wgpu::TextureFormat,
    depth_format: Option<wgpu::TextureFormat>,
    vertex_layouts: &[wgpu::VertexBufferLayout],
    topology: wgpu::PrimitiveTopology, // NEW!
    shader: wgpu::ShaderModuleDescriptor,
) -> wgpu::RenderPipeline {
    let shader = device.create_shader_module(shader);

    device.create_render_pipeline(&wgpu::RenderPipelineDescriptor {
        // ...
        primitive: wgpu::PrimitiveState {
            topology, // NEW!
            // ...
        },
        depth_stencil: depth_format.map(|format| wgpu::DepthStencilState {
            format,
            depth_write_enabled: true,
            depth_compare: wgpu::CompareFunction::LessEqual, // UDPATED!
            stencil: wgpu::StencilState::default(),
            bias: wgpu::DepthBiasState::default(),
        }),
        // ...
    })
}
Don't forget to add the new bindgroup and pipeline to the
to State.
struct State {
    // ...
    // NEW!
    hdr: hdr::HdrPipeline,
    environment_bind_group: wgpu::BindGroup,
    sky_pipeline: wgpu::RenderPipeline,
}

// ...
impl State {
    async fn new(window: Window) -> anyhow::Result<Self> {
        // ...
        Ok(Self {
            // ...
            // NEW!
            hdr,
            environment_bind_group,
            sky_pipeline,
            debug,
        })
    }
}
Now let's cover sky.wgsl.
struct Camera {
    view_pos: vec4<f32>,
    view: mat4x4<f32>,
    view_proj: mat4x4<f32>,
    inv_proj: mat4x4<f32>,
    inv_view: mat4x4<f32>,
}
@group(0) @binding(0)
var<uniform> camera: Camera;

@group(1)
@binding(0)
var env_map: texture_cube<f32>;
@group(1)
@binding(1)
var env_sampler: sampler;

struct VertexOutput {
    @builtin(position) frag_position: vec4<f32>,
    @location(0) clip_position: vec4<f32>,
}

@vertex
fn vs_main(
    @builtin(vertex_index) id: u32,
) -> VertexOutput {
    let uv = vec2<f32>(vec2<u32>(
        id & 1u,
        (id >> 1u) & 1u,
    ));
    var out: VertexOutput;
    // out.clip_position = vec4(uv * vec2(4.0, -4.0) + vec2(-1.0, 1.0), 0.0, 1.0);
    out.clip_position = vec4(uv * 4.0 - 1.0, 1.0, 1.0);
    out.frag_position = vec4(uv * 4.0 - 1.0, 1.0, 1.0);
    return out;
}

@fragment
fn fs_main(in: VertexOutput) -> @location(0) vec4<f32> {
    let view_pos_homogeneous = camera.inv_proj * in.clip_position;
    let view_ray_direction = view_pos_homogeneous.xyz / view_pos_homogeneous.w;
    var ray_direction = normalize((camera.inv_view * vec4(view_ray_direction, 0.0)).xyz);

    let sample = textureSample(env_map, env_sampler, ray_direction);
    return sample;
}
Let's break this down:
- We create a triangle twice the size of the screen.
- In the fragment shader we get the view direction from the clip position. We use the inverse projection matrix to get convert the clip coordinates to view direction. Then we use the inverse view matrix to get the direction into world space as that's what we need for to sample the sky box correctly.
- We then sample the sky texture with the view direction.
In order for this to work we need to change our camera
uniforms a bit. We need to add the inverse view matrix,
and inverse projection matrix to CameraUniform struct.
#[repr(C)]
#[derive(Copy, Clone, bytemuck::Pod, bytemuck::Zeroable)]
struct CameraUniform {
    view_position: [f32; 4],
    view: [[f32; 4]; 4], // NEW!
    view_proj: [[f32; 4]; 4],
    inv_proj: [[f32; 4]; 4], // NEW!
    inv_view: [[f32; 4]; 4], // NEW!
}

impl CameraUniform {
    fn new() -> Self {
        Self {
            view_position: [0.0; 4],
            view: cgmath::Matrix4::identity().into(),
            view_proj: cgmath::Matrix4::identity().into(),
            inv_proj: cgmath::Matrix4::identity().into(), // NEW!
            inv_view: cgmath::Matrix4::identity().into(), // NEW!
        }
    }

    // UPDATED!
    fn update_view_proj(&mut self, camera: &camera::Camera, projection: &camera::Projection) {
        self.view_position = camera.position.to_homogeneous().into();
        let proj = projection.calc_matrix();
        let view = camera.calc_matrix();
        let view_proj = proj * view;
        self.view = view.into();
        self.view_proj = view_proj.into();
        self.inv_proj = proj.invert().unwrap().into();
        self.inv_view = view.transpose().into();
    }
}
Make sure to change the Camera definition in
shader.wgsl, and light.wgsl. Just as a reminder
it looks like this:
struct Camera {
    view_pos: vec4<f32>,
    view: mat4x4<f32>,
    view_proj: mat4x4<f32>,
    inv_proj: mat4x4<f32>,
    inv_view: mat4x4<f32>,
}
var<uniform> camera: Camera;
You may have noticed that we removed the OPENGL_TO_WGPU_MATRIX. The reason for this is
that it was messing with the projection of the
skybox.
It wasn't technically needed, so I felt fine removing it.
Reflections
Now that we have a sky, we can mess around with using it for lighting. This won't be physically accurate (we'll look into that later). That being said, we have the environment map, we might as well use it.
In order to do that though we need to change our shader to do lighting in world space instead of tangent space because our environment map is in world space. Because there are a lot of changes I'll post the whole shader here:
// Vertex shader

struct Camera {
    view_pos: vec4<f32>,
    view: mat4x4<f32>,
    view_proj: mat4x4<f32>,
    inv_proj: mat4x4<f32>,
    inv_view: mat4x4<f32>,
}
@group(0) @binding(0)
var<uniform> camera: Camera;

struct Light {
    position: vec3<f32>,
    color: vec3<f32>,
}
@group(2) @binding(0)
var<uniform> light: Light;

struct VertexInput {
    @location(0) position: vec3<f32>,
    @location(1) tex_coords: vec2<f32>,
    @location(2) normal: vec3<f32>,
    @location(3) tangent: vec3<f32>,
    @location(4) bitangent: vec3<f32>,
}
struct InstanceInput {
    @location(5) model_matrix_0: vec4<f32>,
    @location(6) model_matrix_1: vec4<f32>,
    @location(7) model_matrix_2: vec4<f32>,
    @location(8) model_matrix_3: vec4<f32>,
    @location(9) normal_matrix_0: vec3<f32>,
    @location(10) normal_matrix_1: vec3<f32>,
    @location(11) normal_matrix_2: vec3<f32>,
}

struct VertexOutput {
    @builtin(position) clip_position: vec4<f32>,
    @location(0) tex_coords: vec2<f32>,
    // Updated!
    @location(1) world_position: vec3<f32>,
    @location(2) world_view_position: vec3<f32>,
    @location(3) world_light_position: vec3<f32>,
    @location(4) world_normal: vec3<f32>,
    @location(5) world_tangent: vec3<f32>,
    @location(6) world_bitangent: vec3<f32>,
}

@vertex
fn vs_main(
    model: VertexInput,
    instance: InstanceInput,
) -> VertexOutput {
    let model_matrix = mat4x4<f32>(
        instance.model_matrix_0,
        instance.model_matrix_1,
        instance.model_matrix_2,
        instance.model_matrix_3,
    );
    let normal_matrix = mat3x3<f32>(
        instance.normal_matrix_0,
        instance.normal_matrix_1,
        instance.normal_matrix_2,
    );

    // UPDATED!
    let world_position = model_matrix * vec4<f32>(model.position, 1.0);

    var out: VertexOutput;
    out.clip_position = camera.view_proj * world_position;
    out.tex_coords = model.tex_coords;
    out.world_normal = normalize(normal_matrix * model.normal);
    out.world_tangent = normalize(normal_matrix * model.tangent);
    out.world_bitangent = normalize(normal_matrix * model.bitangent);
    out.world_position = world_position.xyz;
    out.world_view_position = camera.view_pos.xyz;
    return out;
}

// Fragment shader

@group(0) @binding(0)
var t_diffuse: texture_2d<f32>;
@group(0)@binding(1)
var s_diffuse: sampler;
@group(0)@binding(2)
var t_normal: texture_2d<f32>;
@group(0) @binding(3)
var s_normal: sampler;

@group(3)
@binding(0)
var env_map: texture_cube<f32>;
@group(3)
@binding(1)
var env_sampler: sampler;

@fragment
fn fs_main(in: VertexOutput) -> @location(0) vec4<f32> {
    let object_color: vec4<f32> = textureSample(t_diffuse, s_diffuse, in.tex_coords);
    let object_normal: vec4<f32> = textureSample(t_normal, s_normal, in.tex_coords);

    // NEW!
    // Adjust the tangent and bitangent using the Gramm-Schmidt process
    // This makes sure that they are perpedicular to each other and the
    // normal of the surface.
    let world_tangent = normalize(in.world_tangent - dot(in.world_tangent, in.world_normal) * in.world_normal);
    let world_bitangent = cross(world_tangent, in.world_normal);

    // Convert the normal sample to world space
    let TBN = mat3x3(
        world_tangent,
        world_bitangent,
        in.world_normal,
    );
    let tangent_normal = object_normal.xyz * 2.0 - 1.0;
    let world_normal = TBN * tangent_normal;

    // Create the lighting vectors
    let light_dir = normalize(light.position - in.world_position);
    let view_dir = normalize(in.world_view_position - in.world_position);
    let half_dir = normalize(view_dir + light_dir);

    let diffuse_strength = max(dot(world_normal, light_dir), 0.0);
    let diffuse_color = light.color * diffuse_strength;

    let specular_strength = pow(max(dot(world_normal, half_dir), 0.0), 32.0);
    let specular_color = specular_strength * light.color;

    // NEW!
    // Calculate reflections
    let world_reflect = reflect(-view_dir, world_normal);
    let reflection = textureSample(env_map, env_sampler, world_reflect).rgb;
    let shininess = 0.1;

    let result = (diffuse_color + specular_color) * object_color.xyz + reflection * shininess;

    return vec4<f32>(result, object_color.a);
}
A little note on the reflection math. The view_dir
gives us the direction to the camera from the surface.
The reflection math needs the direction from the
camera to the surface so we negate view_dir. We
then use wgsl's builtin reflect function to
reflect the inverted view_dir about the world_normal.
This gives us a direction that we can use sample the
environment map to get the color of the sky in that
direction. Just looking at the reflection component
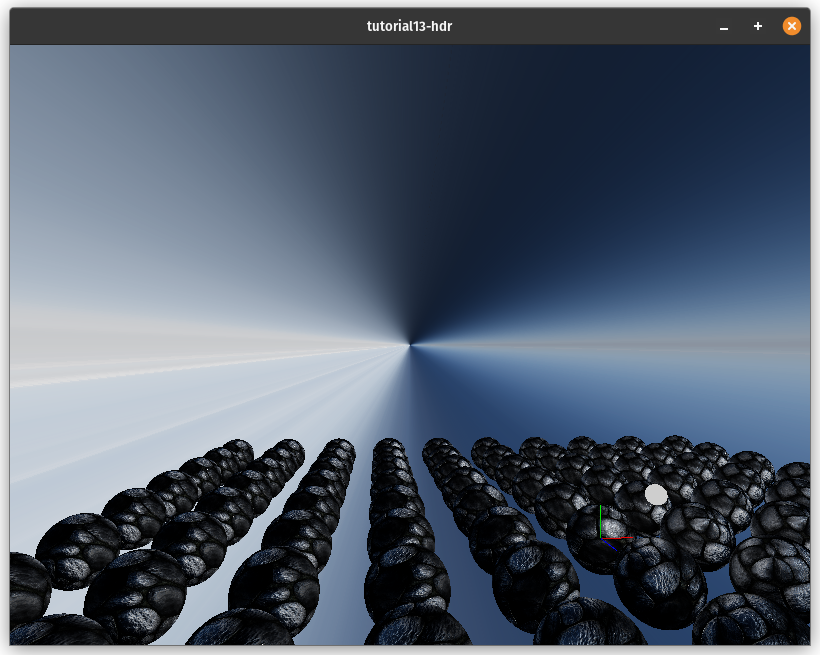
gives us the following:
Here's the finished scene:
Demo
If your browser doesn't support WebGPU, this example won't work for you.