15 KiB
Textures and bind groups
Up to this point we have been drawing super simple shapes. While we can make a game with just triangles, but trying to draw highly detailed objects would massively limit what devices could even run our game. We can get around this problem with textures. Textures are images overlayed over a triangle mesh to make the mesh seem more detailed. There are multiple types of textures such as normal maps, bump maps, specular maps, and diffuse maps. We're going to talk about diffuse maps, or in laymens terms, the color texture.
Loading an image from a file
If we want to map an image to our mesh, we first need an image. Let's use this happy little tree.

We'll use the image crate to load our tree. In State's new() method add the following just after creating the swap_chain:
let diffuse_bytes = include_bytes!("happy-tree.png");
let diffuse_image = image::load_from_memory(diffuse_bytes).unwrap();
let diffuse_rgba = diffuse_image.as_rgba8().unwrap();

use image::GenericImageView;
let dimensions = diffuse_image.dimensions();
Here we just grab the bytes from our image file, and load them into an image, which we then convert into a Vec of rgba bytes. We also save the image's dimensions for when we create the actual Texture. Speaking of creating the actual Texture.
let size = wgpu::Extent3d {
    width: dimensions.0,
    height: dimensions.1,
    depth: 1,
};
let diffuse_texture = device.create_texture(&wgpu::TextureDescriptor {
    // All textures are stored as 3d, we represent our 2d texture
    // by setting depth to 1.
    size: wgpu::Extent3d {
        width: dimensions.0,
        height: dimensions.1,
        depth: 1,
    },
    // You can store multiple textures of the same size in one
    // Texture object
    array_layer_count: 1,
    mip_level_count: 1, // We'll talk about this a little later
    sample_count: 1,
    dimension: wgpu::TextureDimension::D2,
    format: wgpu::TextureFormat::Rgba8UnormSrgb,
    // SAMPLED tells wgpu that we want to use this texture in shaders
    // COPY_DST means that we want to copy data to this texture
    usage: wgpu::TextureUsage::SAMPLED | wgpu::TextureUsage::COPY_DST,
});
Getting data into a Texture
The Texture struct has no methods to interact with the data directly. We actually need to load the data into a Buffer and copy it into the Texture. First we need to create a buffer big enough to hold our texture data. Luckily we have diffuse_rgba!
let diffuse_buffer = device
    .create_buffer_mapped(diffuse_rgba.len(), wgpu::BufferUsage::COPY_SRC)
    .fill_from_slice(&diffuse_rgba);
We specified our diffuse_buffer to be COPY_SRC so that we can copy it to our diffuse_texture. We preform the copy using a CommandEncoder. We'll need to change device's mutablility so we can submit the resulting CommandBuffer.
let mut device = // ...

// ...

let mut encoder = device.create_command_encoder(&wgpu::CommandEncoderDescriptor {
    todo: 0,
});

encoder.copy_buffer_to_texture(
    wgpu::BufferCopyView {
        buffer: &diffuse_buffer,
        offset: 0,
        row_pitch: 4 * dimensions.0, // the width of the texture in bytes
        image_height: dimensions.1,
    },
    wgpu::TextureCopyView {
        texture: &diffuse_texture,
        mip_level: 0,
        array_layer: 0,
        origin: wgpu::Origin3d::ZERO,
    },
    size,
);

device.get_queue().submit(&[encoder.finish()]);
TextureViews and Samplers
Now that our texture has data in it, we need a way to use it. This is where a TextureView and a Sampler. A TextureView offers us a view into our texture. A Sampler controls how the Texture is sampled. Sampling works similar to the eyedropper tool in Gimp/Photoshop. Our program supplies a coordinate on the texture (known as a texture coordinate), and the sampler then returns a color back based on it's internal parameters.
Let's define our diffuse_texture_view and diffuse_sampler now.
// We don't need to configure the texture view much, so let's
// let wgpu define it.
let diffuse_texture_view = diffuse_texture.create_default_view();

let diffuse_sampler = device.create_sampler(&wgpu::SamplerDescriptor {
    address_mode_u: wgpu::AddressMode::ClampToEdge,
    address_mode_v: wgpu::AddressMode::ClampToEdge,
    address_mode_w: wgpu::AddressMode::ClampToEdge,
    mag_filter: wgpu::FilterMode::Linear,
    min_filter: wgpu::FilterMode::Nearest,
    mipmap_filter: wgpu::FilterMode::Nearest,
    lod_min_clamp: -100.0,
    lod_max_clamp: 100.0,
    compare_function: wgpu::CompareFunction::Always,
});
The address_mode_* parameter's determine what to do if the sampler get's a texture coordinate that's outside of the texture. There's a few that we can use.
ClampToEdge: Any texture coordinates outside the texture will return the color of the nearest pixel on the edges of the texture.Repeat: The texture will repeat as texture coordinates exceed the textures dimensions.MirrorRepeat: Similar toRepeat, but the image will flip when going over boundaries.
The mag_filter and min_filter options describe what to do when a fragment covers multiple pixels, or there are multiple fragments for one pixel respectively. This often comes into play when viewing a surface from up close, or far away. There are 2 options:
Linear: This option will attempt to blend the in-between fragments so that they seem to flow together.Nearest: In-between fragments will use the color of the nearest pixel. This creates an image that's crisper from far away, but pixelated when view from close up. This can be desirable however if your textures are designed to be pixelated such is in pixel art games, or voxel games like Minecraft.
Mipmaps are a complex topic, and will require their own section. Suffice to say mipmap_filter functions similar to (mag/min)_filter as it tells the sampler how to blend between mipmaps.
lod_(min/max)_clamp are also related to mipmapping, so will skip over them.
The compare_function is often use in filtering. This is used in techniques such as shadow mapping. We don't really care here, but the options are Never, Less, Equal, LessEqual, Greater, NotEqual, GreaterEqual, and Always.
All these different resources are nice and all, but they doesn't do us much good if we can't plug them in anywhere. This is where BindGroups and PipelineLayouts come in.
The BindGroup
A BindGroup describes a set of resources and how they can be accessed by a shader. We create a BindGroup using a BindGroupLayout. Let's make one of those first.
let texture_bind_group_layout = device.create_bind_group_layout(&wgpu::BindGroupLayoutDescriptor {
    bindings: &[
        wgpu::BindGroupLayoutBinding {
            binding: 0,
            visibility: wgpu::ShaderStage::FRAGMENT,
            ty: wgpu::BindingType::SampledTexture {
                multisampled: false,
                dimension: wgpu::TextureViewDimension::D2,
            },
        },
        wgpu::BindGroupLayoutBinding {
            binding: 1,
            visibility: wgpu::ShaderStage::FRAGMENT,
            ty: wgpu::BindingType::Sampler,
        },
    ],
});
Our texture_bind_group_layout has two bindings: one for a sampled texture at binding 0, and one for a sampler at binding 1. Both of these bindings are visible only to the fragment shader as specified by FRAGMENT. The possible values are any bit combination of NONE, VERTEX, FRAGMENT, or COMPUTE. Most of the time we'll only use FRAGMENT for textures and samplers, but it's good to know what's available.
With texture_bind_group_layout, we can now create our BindGroup.
let diffuse_bind_group = device.create_bind_group(&wgpu::BindGroupDescriptor {
    layout: &texture_bind_group_layout,
    bindings: &[
        wgpu::Binding {
            binding: 0,
            resource: wgpu::BindingResource::TextureView(&diffuse_texture_view),
        },
        wgpu::Binding {
            binding: 1,
            resource: wgpu::BindingResource::Sampler(&diffuse_sampler),
        }
    ],
});
Looking at this you might get a bit of déjà vu. That's because a BindGroup is a more specific declaration of the BindGroupLayout. The reason why these are separate is to allow us to swap out BindGroups on the fly, so long as they all share the same BindGroupLayout. For each texture and sampler we create, we need to create a BindGroup.
Now that we have our diffuse_bind_group, let's add our texture information to the State struct.
struct State {
    // ...

    diffuse_texture: wgpu::Texture,
    diffuse_texture_view: wgpu::TextureView,
    diffuse_sampler: wgpu::Sampler,
    diffuse_bind_group: wgpu::BindGroup,

    // ...
}

// ...
impl State {
    fn new() -> Self {
        // ...
        Self {
            surface,
            device,
            sc_desc,
            swap_chain,
            render_pipeline,
            vertex_buffer,
            index_buffer,
            num_indices,
            diffuse_texture,
            diffuse_texture_view,
            diffuse_sampler,
            diffuse_bind_group,
            hidpi_factor,
            size,
        }
    }
}
We actually use the bind group in the render() function.
// render()
render_pass.set_bind_group(0, &self.diffuse_bind_group, &[]);
PipelineLayout
Remember the PipelineLayout we created back in the pipeline section? This is finally the time when we get to actually use it. The PipelineLayout contains a list of BindGroupLayouts that the pipeline can use. Modify render_pipeline_layout to use our texture_bind_group_layout.
let render_pipeline_layout = device.create_pipeline_layout(&wgpu::PipelineLayoutDescriptor {
    bind_group_layouts: &[&texture_bind_group_layout],
});
A change to the VERTICES
There's a few things we need to change about our Vertex definition. Up to now we've been using a color attribute to dictate the color of our mesh. Now that we're using a texture we want to replace our color with tex_coords.
#[repr(C)]
#[derive(Copy, Clone, Debug)]
struct Vertex {
    position: [f32; 3],
    tex_coords: [f32; 2],
}
We need to reflect these changes in the VertexBufferDescriptor.
impl Vertex {
    fn desc<'a>() -> wgpu::VertexBufferDescriptor<'a> {
        use std::mem;
        wgpu::VertexBufferDescriptor {
            stride: mem::size_of::<Vertex>() as wgpu::BufferAddress,
            step_mode: wgpu::InputStepMode::Vertex,
            attributes: &[
                wgpu::VertexAttributeDescriptor {
                    offset: 0,
                    shader_location: 0,
                    format: wgpu::VertexFormat::Float3,
                },
                wgpu::VertexAttributeDescriptor {
                    offset: mem::size_of::<[f32; 3]>() as wgpu::BufferAddress,
                    shader_location: 1,
                    // We only need to change this to reflect that tex_coords
                    // is only 2 floats and not 3. It's in the same position
                    // as color was, so nothing else needs to change
                    format: wgpu::VertexFormat::Float2,
                },
            ]
        }
    }
}
Lastly we need to change VERTICES itself.
const VERTICES: &[Vertex] = &[
    Vertex { position: [-0.0868241, -0.49240386, 0.0], tex_coords: [0.4131759, 0.99240386], }, // A
    Vertex { position: [-0.49513406, -0.06958647, 0.0], tex_coords: [0.0048659444, 0.56958646], }, // B
    Vertex { position: [-0.21918549, 0.44939706, 0.0], tex_coords: [0.28081453, 0.050602943], }, // C
    Vertex { position: [0.35966998, 0.3473291, 0.0], tex_coords: [0.85967, 0.15267089], }, // D
    Vertex { position: [0.44147372, -0.2347359, 0.0], tex_coords: [0.9414737, 0.7347359], }, // E
];
Shader time
Our shaders will need to change inorder to support textures as well. We'll also need to remove any reference to the color attribute we used to have. Let's start with the vertex shader.
// shader.vert
#version 450

layout(location=0) in vec3 a_position;
// Changed
layout(location=1) in vec2 a_tex_coords;

// Changed
layout(location=0) out vec2 v_tex_coords;

void main() {
    // Changed
    v_tex_coords = a_tex_coords;
    gl_Position = vec4(a_position, 1.0);
}
We need to change the fragment shader to take in v_tex_coords. We also need to add a reference to our texture and sampler.
// shader.frag
#version 450

// Changed
layout(location=0) in vec2 v_tex_coords;
layout(location=0) out vec4 f_color;

// New
layout(set = 0, binding = 0) uniform texture2D t_diffuse;
layout(set = 0, binding = 1) uniform sampler s_diffuse;

void main() {
    // Changed
    f_color = texture(sampler2D(t_diffuse, s_diffuse), v_tex_coords);
}
You'll notice that t_diffuse and s_diffuse are defined with the uniform keyword, they don't have in nor out, and the layout definition uses set and binding instead of location. This is because t_diffuse and s_diffuse are what we call uniforms. We won't go too deep into what a uniform is, until we talk about uniform buffers in the cameras section. What we need to know, for now, is that set = 0 corresponds to the 1st parameter in set_bind_group, binding = 0 relates the the binding specified when we create the BindGroupLayout and BindGroup.
The results
If we run our program now we should get the following result.
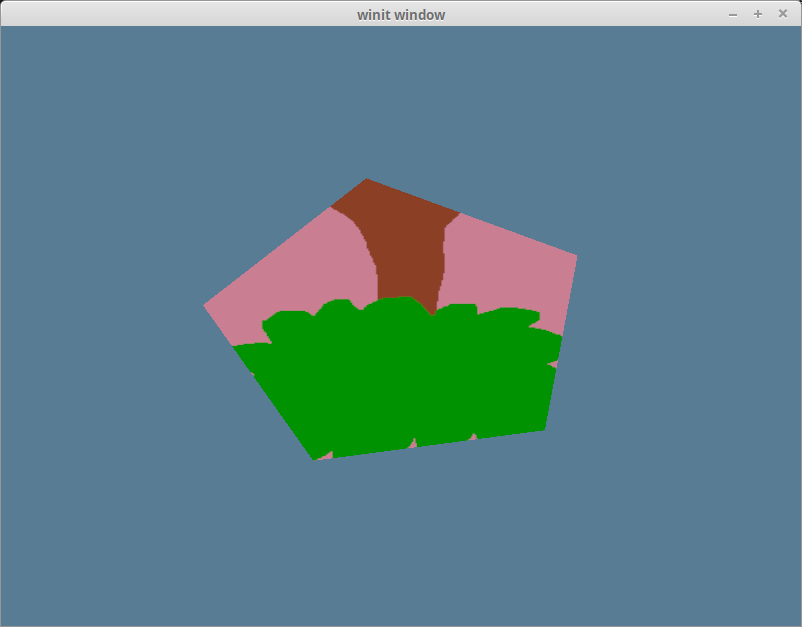
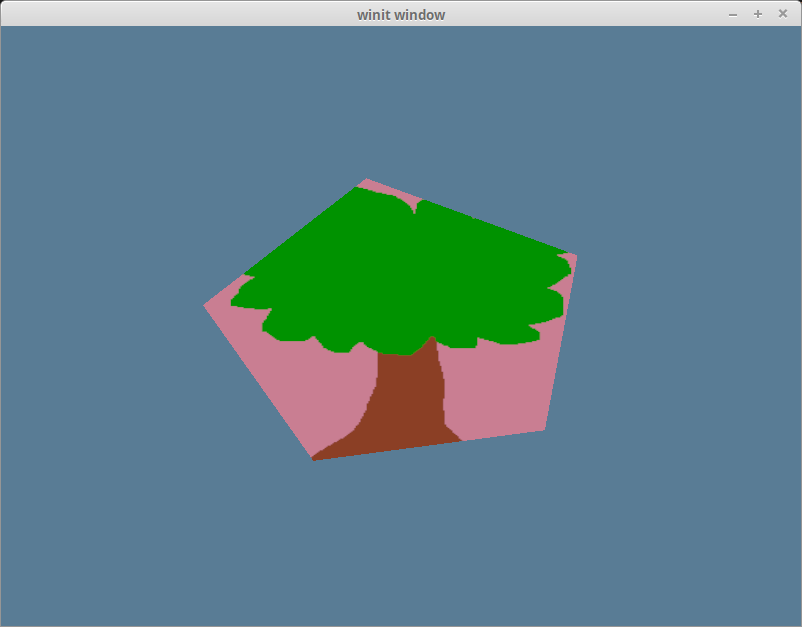
That's weird, our tree is upside down! This is because wgpu's coordinate system has positive y values going down while texture coords have y as up. We can get our triangle right-side up by inverting the y coord of each texture coord.
const VERTICES: &[Vertex] = &[
    Vertex { position: [-0.0868241, -0.49240386, 0.0], tex_coords: [0.4131759, 1.0 - 0.99240386], }, // A
    Vertex { position: [-0.49513406, -0.06958647, 0.0], tex_coords: [0.0048659444, 1.0 - 0.56958646], }, // B
    Vertex { position: [-0.21918549, 0.44939706, 0.0], tex_coords: [0.28081453, 1.0 - 0.050602943], }, // C
    Vertex { position: [0.35966998, 0.3473291, 0.0], tex_coords: [0.85967, 1.0 - 0.15267089], }, // D
    Vertex { position: [0.44147372, -0.2347359, 0.0], tex_coords: [0.9414737, 1.0 - 0.7347359], }, // E
];
With that in place we now have our tree subscribed right-side up on our hexagon.