|
|
## GOPROXY Introduction
|
|
|
|
|
|
<div align="center">
|
|
|
<img src="https://mirrors.goproxyauth.com/https://raw.githubusercontent.com/snail007/goproxy/master/doc/images/logo.jpg" width="500" height="auto"/>
|
|
|
|
|
|
[](https://github.com/snail007/goproxy/) []() [](https://github.com/snail007/goproxy/releases) [](https://github.com/snail007/goproxy/releases)
|
|
|
|
|
|
---
|
|
|
|
|
|
The GoProxy is a high-performance http proxy, https proxy, socks5 proxy, ss proxy, websocket proxies, tcp proxies, udp proxies, game shield, game proxies. Support forward proxies, reverse proxy, transparent proxy, internet nat proxies, https proxy load balancing, http proxy load balancing , socks5 proxies load balancing, socket proxy load balancing, ss proxy load balancing, TCP / UDP port mapping, SSH transit, TLS encrypted transmission, protocol conversion, anti-pollution DNS proxy, API authentication, speed limit, limit connection. Reverse proxies to help you expose a local server behind a NAT or firewall to the internet so that you or your visitors can access it directly and easily.
|
|
|
|
|
|
</div>
|
|
|
|
|
|
---
|
|
|
|
|
|
## 赞助者/Sponsors
|
|
|
|
|
|
<a target="_blank" href="https://www.capsolver.com/zh?utm_source=github&utm_medium=banner_github&utm_campaign=goproxy">
|
|
|
<img src="/doc/images/zanzhu_capsolver.jpg" height="200">
|
|
|
</a>
|
|
|
|
|
|
[Capsolver.com](https://www.capsolver.com/?utm_source=github&utm_medium=banner_github&utm_campaign=goproxy) is an
|
|
|
AI-powered service that specializes in solving various types of captchas automatically. It supports captchas such as
|
|
|
[reCAPTCHA V2](https://docs.capsolver.com/guide/captcha/ReCaptchaV2.html?utm_source=github&utm_medium=banner_github&utm_campaign=goproxy),
|
|
|
[reCAPTCHA V3](https://docs.capsolver.com/guide/captcha/ReCaptchaV3.html?utm_source=github&utm_medium=banner_github&utm_campaign=goproxy),
|
|
|
[hCaptcha](https://docs.capsolver.com/guide/captcha/HCaptcha.html?utm_source=github&utm_medium=banner_github&utm_campaign=goproxy),
|
|
|
[FunCaptcha](https://docs.capsolver.com/guide/captcha/FunCaptcha.html?utm_source=github&utm_medium=banner_github&utm_campaign=goproxy),
|
|
|
[DataDome](https://docs.capsolver.com/guide/captcha/DataDome.html?utm_source=github&utm_medium=banner_github&utm_campaign=goproxy),
|
|
|
[AWS Captcha](https://docs.capsolver.com/guide/captcha/awsWaf.html?utm_source=github&utm_medium=banner_github&utm_campaign=goproxy),
|
|
|
[Geetest](https://docs.capsolver.com/guide/captcha/Geetest.html?utm_source=github&utm_medium=banner_github&utm_campaign=goproxy),
|
|
|
and Cloudflare [Captcha](https://docs.capsolver.com/guide/antibots/cloudflare_turnstile.html?utm_source=github&utm_medium=banner_github&utm_campaign=goproxy) /
|
|
|
[Challenge 5s](https://docs.capsolver.com/guide/antibots/cloudflare_challenge.html?utm_source=github&utm_medium=banner_github&utm_campaign=goproxy),
|
|
|
[Imperva / Incapsula](https://docs.capsolver.com/guide/antibots/imperva.html?utm_source=github&utm_medium=banner_github&utm_campaign=goproxy), among others.
|
|
|
|
|
|
For developers, Capsolver offers API integration options detailed in their
|
|
|
[documentation](https://docs.capsolver.com/?utm_source=github&utm_medium=banner_github&utm_campaign=goproxy),
|
|
|
facilitating the integration of captcha solving into applications. They also provide browser extensions for
|
|
|
[Chrome](https://chromewebstore.google.com/detail/captcha-solver-auto-captc/pgojnojmmhpofjgdmaebadhbocahppod) and
|
|
|
[Firefox](https://addons.mozilla.org/es/firefox/addon/capsolver-captcha-solver/),
|
|
|
making it easy to use their service directly within a browser. Different pricing packages are available to accommodate
|
|
|
varying needs, ensuring flexibility for users.
|
|
|
|
|
|
---
|
|
|
|
|
|
## 中文用户请看 *中文说明*,中文与英文内容的安装等资源链接是不一样的,谢谢合作!
|
|
|
|
|
|
### [Official Website](https://www.goproxy.win/)
|
|
|
### [官方网站](https://www.goproxy.win/)
|
|
|
### [点击我观看视频教程](https://space.bilibili.com/472844633)
|
|
|
|
|
|
- [中文 README ](https://github.com/snail007/goproxy/blob/master/README_ZH.md)
|
|
|
- [使用手册](https://snail007.goproxyauth.com/goproxy/manual/zh/)
|
|
|
- [下载地址](https://github.com/snail007/goproxy/releases)
|
|
|
- [Download](https://github.com/snail007/goproxy/releases)
|
|
|
- [Desktop Edition](https://github.com/snail007/proxy_admin_free)
|
|
|
- [Android Global Edition](https://github.com/snail007/goproxy-ss-plugin-android)
|
|
|
- [Android Server Edition](https://github.com/snail007/goproxy-android)
|
|
|
- [SDK](https://github.com/snail007/goproxy-sdk)
|
|
|
- [GORPOXY Manual](https://snail007.github.io/goproxy/manual/)
|
|
|
- [GORPOXY Tutorial](https://snail007.github.io/goproxy)
|
|
|
- [Free version VS commercial version](https://snail007.github.io/goproxy/page/free_vs_commercial/)
|
|
|
|
|
|
### ProxyAdmin Demo
|
|
|
|
|
|
And ProxyAdmin is a powerful web console of snail007/goproxy .
|
|
|
|
|
|

|
|
|
|
|
|
### What can it do?
|
|
|
- Chained proxies, the program itself can be used as an proxies, and if it is set up, it can be used as a secondary proxies or even an N-level proxies.
|
|
|
- Communication encryption, if the program is not a level one proxies, and the upper level proxies is also the program, then the communication between the upper level proxies and the upper level proxies can be encrypted, and the underlying tls high-intensity encryption is used, and the security is featureless.
|
|
|
- Smart HTTP, SOCKS5 proxy, will automatically determine whether the visited website is blocked. If it is blocked, it will use the upstream proxies (provided that the upstream proxies is configured) to access the website; if the visited website is not blocked, in order to speed up the access, the proxies will Direct access to the website without using a upstream proxies.
|
|
|
- Domain name black and white list, more free to control the way the website is accessed.
|
|
|
- Cross-platform, whether you are windows, linux, mac, or even raspberry pie, you can run the proxy very well.
|
|
|
- Multi-protocol support, support for HTTP(S), TCP, UDP, Websocket, SOCKS5 proxy.
|
|
|
- TCP/UDP port forwarding.
|
|
|
- Support intranet penetration, protocol supports TCP and UDP.
|
|
|
- SSH relay, HTTP (S), SOCKS5 proxy supports SSH relay, the upper Linux server does not need any server, a local proxy can be happy online.
|
|
|
- [KCP](https://github.com/xtaci/kcp-go) protocol support, HTTP(S), SOCKS5, SPS proxy supports KCP protocol to transmit data, reduce latency and improve browsing experience.
|
|
|
- Dynamic selection of upstream proxies, through the external API, HTTP (S), SOCKS5, SPS proxies can achieve user-based or IP-based speed limit, connection limit, dynamic access to upstream.
|
|
|
- Flexible upstream allocation, HTTP(S), SOCKS5 proxy can implement user- or IP-based speed limit, connection limit, and upper-level through configuration files.
|
|
|
- Transparent HTTP (S) proxy, in conjunction with iptables, forwards the outgoing 80, 443 traffic directly to the proxy at the gateway, enabling non-aware intelligent router proxy.
|
|
|
- Protocol conversion, which can convert existing HTTP(S) or SOCKS5 or SS proxy into one port and support HTTP(S) and SOCKS5 and SS proxy at the same time. Converted SOCKS5 and SS proxy. If the upstream is SOCKS5 proxy, then UDP is supported. Features while supporting powerful cascading authentication.
|
|
|
- Custom underlying encrypted transmission, http(s)\sps\socks proxy can encrypt tcp data via tls standard encryption and kcp protocol on top of tcp, in addition to support custom encryption after tls and kcp, that is Said custom encryption and tls|kcp can be used in combination, the internal AES256 encryption, you only need to define a password when you use it.
|
|
|
- Underlying compression efficient transmission, http(s)\sps\socks proxy can encrypt tcp data through custom encryption and tls standard encryption and kcp protocol on tcp, and can also compress data after encryption, that is, compression function And custom encryption and tls|kcp can be used in combination.
|
|
|
- Secure DNS proxy, which can secure and prevent pollution DNS queries through encrypted proxy communication between the DNS proxy server provided by the local proxy and the upstream proxy.
|
|
|
- Load balancing, high availability, HTTP(S)\SOCKS5\SPS proxies supports upstream load balancing and high availability, and multiple upstream repeat-P parameters can be used.
|
|
|
- Specify the egress IP. The HTTP(S)\SOCKS5\SPS\TCP proxy supports the client to connect with the ingress IP, and uses the ingress IP as the egress IP to access the target website. If the ingress IP is an intranet IP, the egress IP does not use the ingress IP.
|
|
|
- Support speed limit, HTTP(S)\SOCKS5\SPS\TCP proxy supports speed limit.
|
|
|
- SOCKS5 proxies supports cascading certification.
|
|
|
- The certificate parameter uses base64 data. By default, the -C, -K parameter is the path of the crt certificate and the key file. If it is the beginning of base64://, then the latter data is considered to be base64 encoded and will be used after decoding.
|
|
|
- Support client IP black and white list, more secure control of client access to proxy service, if black and white list is set at the same time, then only whitelist is effective. Socks / HTTP(S) / SPS / TCP / UDP / DNS / intranet NAT The bridge/intranet NAT the tbridge and supports the client IP black and white list.
|
|
|
- Range ports listen on, HTTP(S)\SOCKS5\SPS\TCP proxy supports port range listening, avoiding starting too many processes and improving performance.
|
|
|
|
|
|
### Why do you need it?
|
|
|
|
|
|
- When for some reason we are unable to access our services elsewhere, we can establish a secure tunnel to access our services through multiple connected proxy nodes.
|
|
|
- WeChat interface is developed locally for easy debugging.
|
|
|
- Remote access to intranet machines.
|
|
|
- Play LAN games with your friends.
|
|
|
- I used to play only on the LAN, and now I can play anywhere.
|
|
|
- Replace the sword inside Netnet, show IP internal Netcom, peanut shell and other tools.
|
|
|
- ..
|
|
|
|
|
|
|
|
|
The manual on this page applies to the latest version of goproxy. Other versions may not be applicable. Please use the command according to your own instructions.
|
|
|
|
|
|
|
|
|
### Joining the organization
|
|
|
|
|
|
[Click to join the Telegram](https://t.me/snail007_goproxy)
|
|
|
|
|
|
## Download and install
|
|
|
|
|
|
### Quick installation
|
|
|
|
|
|
0. If your VPS is a Linux 64-bit system, you only need to execute the following sentence to complete the automatic installation and configuration.
|
|
|
|
|
|
Tip: All operations require root privileges.
|
|
|
|
|
|
The free version performs this:
|
|
|
|
|
|
```shell
|
|
|
bash -c "$(curl -s -L https://raw.githubusercontent.com/snail007/goproxy/master/install_auto.sh)"
|
|
|
```
|
|
|
|
|
|
The commercial version performs this:
|
|
|
|
|
|
```shell
|
|
|
bash -c "$(curl -s -L https://raw.githubusercontent.com/snail007/goproxy/master/install_auto_commercial.sh)"
|
|
|
```
|
|
|
|
|
|
The installation is complete, the configuration directory is /etc/proxy. For more detailed usage, please refer to the manual directory above to learn more about the features you want to use.
|
|
|
If the installation fails or your vps is not a linux64-bit system, follow the semi-automatic steps below to install:
|
|
|
|
|
|
### Manual installation
|
|
|
|
|
|
1. Download the proxy
|
|
|
|
|
|
Download address: https://github.com/snail007/goproxy/releases/latest
|
|
|
|
|
|
Let's take v7.9 as an example. If you have the latest version, please use the latest version of the link. Note that the version number in the download link below is the latest version number.
|
|
|
|
|
|
The free version performs this:
|
|
|
|
|
|
```shell
|
|
|
cd /root/proxy/
|
|
|
wget https://github.com/snail007/goproxy/releases/download/v7.9/proxy-linux-amd64.tar.gz
|
|
|
```
|
|
|
|
|
|
The commercial version performs this:
|
|
|
|
|
|
```shell
|
|
|
cd /root/proxy/
|
|
|
wget https://github.com/snail007/goproxy/releases/download/v7.9/proxy-linux-amd64_commercial.tar.gz
|
|
|
```
|
|
|
|
|
|
2. Download the automatic installation script
|
|
|
|
|
|
The free version performs this:
|
|
|
|
|
|
```shell
|
|
|
cd /root/proxy/
|
|
|
wget https://raw.githubusercontent.com/snail007/goproxy/master/install.sh
|
|
|
chmod +x install.sh
|
|
|
./install.sh
|
|
|
```
|
|
|
|
|
|
The commercial version performs this:
|
|
|
|
|
|
```shell
|
|
|
cd /root/proxy/
|
|
|
wget https://raw.githubusercontent.com/snail007/goproxy/master/install_commercial.sh
|
|
|
chmod +x install_commercial.sh
|
|
|
./install_commercial.sh
|
|
|
```
|
|
|
|
|
|
## UPDATE
|
|
|
proxy update use mirror to download, if your update has error with mirror, you can set an environment variable `UPDATE_MIRROR=false`
|
|
|
Windows: `set UPDATE_MIRROR=false` then `proxy update`
|
|
|
Linux: `export UPDATE_MIRROR=false` then `proxy update`
|
|
|
|
|
|
### Linux
|
|
|
|
|
|
```shell
|
|
|
proxy update
|
|
|
```
|
|
|
|
|
|
Force update.
|
|
|
|
|
|
```shell
|
|
|
proxy update -f
|
|
|
```
|
|
|
|
|
|
### Windows
|
|
|
|
|
|
For example `proxy` placed in `c:\gp\proxy`.
|
|
|
|
|
|
```bat
|
|
|
c:\
|
|
|
cd gp
|
|
|
proxy update
|
|
|
```
|
|
|
|
|
|
Force update.
|
|
|
|
|
|
```shell
|
|
|
c:\
|
|
|
cd gp
|
|
|
proxy update -f
|
|
|
```
|
|
|
|
|
|
## License
|
|
|
Proxy is licensed under GPLv3 license.
|
|
|
|
|
|
## Contact
|
|
|
Official Telegram Group: [goproxy](https://t.me/snail007_goproxy)
|
|
|
|
|
|
### Source code declaration
|
|
|
|
|
|
The author of this project found that a large number of developers based on the project for secondary development or using a large number of core code of the project without complying with the GPLv3 agreement, which seriously violates the original intention of using the GPLv3 open source agreement in this project. In view of this situation, the project adopts the source. The code delays the release strategy, to a certain extent, to curb these behaviors that do not respect open source and do not respect the labor results of others.
|
|
|
This project will continue to update the iterations and continue to release the full platform binary program, providing you with powerful and convenient proxies tools.
|
|
|
If you have customized, business needs, please send an email to `arraykeys@gmail.com`
|
|
|
|
|
|
## Goproxy Manual
|
|
|
|
|
|
|
|
|
## How to Install
|
|
|
|
|
|
### 1. Linux Install
|
|
|
|
|
|
[click me get Linux installation](https://github.com/snail007/goproxy/blob/master/README_ZH.md#%E4%B8%8B%E8%BD%BD%E5%AE%89%E8%A3%85-goproxy)
|
|
|
|
|
|
### 2. MacOS Install
|
|
|
|
|
|
[click me get MacOS installation](https://github.com/snail007/proxy_admin_free/blob/master/README_ZH.md#%E8%A7%86%E9%A2%91%E5%AE%89%E8%A3%85%E6%95%99%E7%A8%8B)
|
|
|
|
|
|
### 3. Windows Install
|
|
|
|
|
|
[click me get Windows installation](https://github.com/snail007/proxy_admin_free/blob/master/README_ZH.md#%E8%A7%86%E9%A2%91%E5%AE%89%E8%A3%85%E6%95%99%E7%A8%8B)
|
|
|
|
|
|
### 4. Others Install
|
|
|
|
|
|
[click me get Windows installation](https://github.com/snail007/goproxy/blob/master/README_ZH.md#%E6%89%8B%E5%8A%A8%E5%AE%89%E8%A3%85-goproxy)
|
|
|
|
|
|
## Purchase Commercial Edition
|
|
|
|
|
|
This manual describes the functions, all of which are included in the commercial version; the free version of advanced
|
|
|
functional parameters such as authentication is not included;
|
|
|
If you encounter some commands when you use the free version to execute some commands, a prompt similar to the following
|
|
|
xxx parameter does not exist, indicating that this parameter is a function of the commercial version.
|
|
|
`err: unknown long flag '-a'`
|
|
|
Comparison between the features of the free version and the commercial version, detailed operations on how to purchase
|
|
|
and use the commercial
|
|
|
version [please click here to view](https://snail007.goproxyauth.com/goproxy/page/free_vs_commercial_en/)
|
|
|
|
|
|
## First Start
|
|
|
|
|
|
### 1. Environment
|
|
|
|
|
|
The manual tutorial, the default system is linux, the program is proxy; all operations require root privileges;
|
|
|
|
|
|
If you are windows, please use the windows version of proxy.exe.
|
|
|
|
|
|
### 2. Using configuration files
|
|
|
|
|
|
The next tutorial will introduce the usage method through the command line parameters, or you can get the parameters by reading the configuration file.
|
|
|
|
|
|
The specific format is to specify the configuration file by the @ symbol, for example: proxy @configfile.txt
|
|
|
|
|
|
The format in configfile.txt is that the first line is the name of the subcommand, and the second line starts with one parameter per line.
|
|
|
|
|
|
Format: `parameter Parameter value`, direct write parameter without parameter value, for example: --nolog
|
|
|
|
|
|
For example, the contents of configfile.txt are as follows:
|
|
|
|
|
|
```shell
|
|
|
Http
|
|
|
-t tcp
|
|
|
-p :33080
|
|
|
--forever
|
|
|
```
|
|
|
|
|
|
### 3. Debug output
|
|
|
|
|
|
By default, the information output by the log does not include the number of file lines. In some cases, in order to troubleshoot the program, the problem is quickly located.
|
|
|
|
|
|
You can use the --debug parameter to output the number of lines of code and milliseconds.
|
|
|
|
|
|
### 4. Using log files
|
|
|
|
|
|
By default, the log is displayed directly in the console. If you want to save to a file, you can use the --log parameter.
|
|
|
|
|
|
For example: --log proxy.log, the log will be output to the proxy.log to facilitate troubleshooting.
|
|
|
|
|
|
Logging INFO and WARN by default, you can set `--warn` to output warn logging only.
|
|
|
|
|
|
### 5. Generate the certificate file required for encrypted communication
|
|
|
|
|
|
The http, tcp, udp proxy process communicates with the upstream. For security, we use encrypted communication. Of course, we can choose not to encrypt the communication. All the communication and the upstream communication in this tutorial are encrypted, and the certificate file is required.
|
|
|
|
|
|
1. Generate a self-signed certificate and key file with the following command.
|
|
|
`proxy keygen -C proxy`
|
|
|
The certificate file proxy.crt and the key file proxy.key will be generated under the current program directory.
|
|
|
|
|
|
2. Use the following command to generate a new certificate using the self-signed certificate proxy.crt and the key file proxy.key: goproxy.crt and goproxy.key.
|
|
|
`proxy keygen -s -C proxy -c goproxy`
|
|
|
The certificate file goproxy.crt and the key file goproxy.key will be generated under the current program directory.
|
|
|
|
|
|
3. By default, the domain name inside the certificate is random and can be specified using the `-n test.com` parameter.
|
|
|
|
|
|
4. More usage: `proxy keygen --help`.
|
|
|
|
|
|
### 6. Running in the background
|
|
|
|
|
|
After the proxy is executed by default, you cannot close the command line if you want to keep the proxy running.
|
|
|
|
|
|
If you want to run the proxy in the background, the command line can be closed, just add the --daemon parameter at the end of the command.
|
|
|
|
|
|
For example:
|
|
|
|
|
|
`proxy http -t tcp -p "0.0.0.0:38080" --daemon`
|
|
|
|
|
|
### 7. Guardian running
|
|
|
The daemon runs the parameter --forever, for example: `proxy http --forever` ,
|
|
|
|
|
|
The proxy will fork the child process, and then monitor the child process. If the child process exits abnormally, restart the child process after 5 seconds.
|
|
|
|
|
|
This parameter is matched with the background running parameter --daemon and log parameter --log, which can guarantee that the proxy will always execute in the background without accidentally exiting.
|
|
|
|
|
|
And you can see the output log content of the proxy through the log file.
|
|
|
|
|
|
For example: `proxy http -p ":9090" --forever --log proxy.log --daemon`
|
|
|
|
|
|
### 8. Security advice
|
|
|
|
|
|
When the VPS is behind the nat device, the vps network interface IP is the intranet IP. At this time, you can use the -g parameter to add the vps external network ip to prevent the infinite loop.
|
|
|
|
|
|
Suppose your vps external network ip is 23.23.23.23. The following command sets 23.23.23.23 with the -g parameter.
|
|
|
|
|
|
`proxy http -g "23.23.23.23"`
|
|
|
|
|
|
### 9. Load balancing and high availability
|
|
|
|
|
|
The HTTP(S)\SOCKS5\SPS proxy supports upper-level load balancing and high availability, and multiple upstream repeat-P parameters can be used.
|
|
|
|
|
|
The load balancing policy supports five types, which can be specified by the `--lb-method` parameter:
|
|
|
|
|
|
Roundrobin used in turn
|
|
|
|
|
|
Leastconn uses the minimum number of connections
|
|
|
|
|
|
Leasttime uses the least connection time
|
|
|
|
|
|
Hash uses a fixed upstream based on the client address
|
|
|
|
|
|
Weight Select a upstream according to the weight and number of connections of each upstream
|
|
|
|
|
|
prompt:
|
|
|
|
|
|
1. The load balancing check interval can be set by `--lb-retrytime` in milliseconds.
|
|
|
|
|
|
2. The load balancing connection timeout can be set by `--lb-timeout` in milliseconds.
|
|
|
|
|
|
3. If the load balancing policy is weight, the -P format is: 2.2.2.2: 3880?w=1, where 1 is the weight and an integer greater than 0.
|
|
|
|
|
|
4. If the load balancing policy is hash, the default is to select the upstream based on the client address. You can select the upstream by using the destination address of the access `--lb-hashtarget`.
|
|
|
|
|
|
5. The TCP proxies has no parameter `--lb-hashtarget`.
|
|
|
|
|
|
6. Default is load balancing + high availability mode. If the parameter `--lb-onlyha` is used, only the high availability mode is used, then a node is selected according to the load balancing strategy, and this node will be used until it is not alive, then another node will be selected for using, thus cycling.
|
|
|
|
|
|
7. If the all nodes are not alive, a random node will be selected for using.
|
|
|
|
|
|
### 10. Agent springboard jump
|
|
|
|
|
|
Http (s) agent, SPS agent, intranet penetration, tcp agent support the connection of upstreams through intermediate third-party agents,
|
|
|
|
|
|
The parameters are: --jumper, all the formats are as follows:
|
|
|
|
|
|
```text
|
|
|
http://username:password@host:port
|
|
|
http://host:port
|
|
|
https://username:password@host:port
|
|
|
https://host:port
|
|
|
socks5://username:password@host:port
|
|
|
socks5://host:port
|
|
|
socks5s://username:password@host:port
|
|
|
socks5s://host:port
|
|
|
ss://method:password@host:port
|
|
|
```
|
|
|
|
|
|
Http,socks5 represents the normal http and socks5 proxy.
|
|
|
|
|
|
Https,socks5s represents the http and socks5 agents protected by tls.
|
|
|
|
|
|
That is http proxy over TLS, socks over TLS.
|
|
|
|
|
|
### 11. Domain Name Black and White List
|
|
|
|
|
|
The socks/http(s)/sps proxy supports domain name black and white lists.
|
|
|
|
|
|
Use the --stop parameter to specify a domain name blacklist file, then the connection will be disconnected when the user connects these domains in the file.
|
|
|
|
|
|
Specify a domain name whitelist file with the --only parameter, then the connection will be disconnected when the user connects to a domain other than those domains in the file.
|
|
|
|
|
|
If both --stop and --only are set, then only --only will work.
|
|
|
|
|
|
The format of the black and white domain name list file is as follows:
|
|
|
|
|
|
```text
|
|
|
**.baidu.com
|
|
|
*.taobao.com
|
|
|
A.com
|
|
|
192.168.1.1
|
|
|
192.168.*.*
|
|
|
?.qq.com
|
|
|
```
|
|
|
|
|
|
Description:
|
|
|
|
|
|
1. One domain name per line, domain name writing supports wildcards `*` and `?`, `*` represents any number of characters, `?` represents an arbitrary character,
|
|
|
|
|
|
2.`**.baidu.com` Matches no matter how many levels all suffixes are ..baidu.com`.
|
|
|
|
|
|
3.`*.taobao.com` The matching suffix is the third-level domain name of `.taobao.com`.
|
|
|
|
|
|
4. It can also be an IP address directly.
|
|
|
|
|
|
5.`#` at the beginning of the comment.
|
|
|
|
|
|
### 12. Client IP Blacklist and Whitelist
|
|
|
|
|
|
socks/http(s)/sps/tcp/udp/dns/ intranet penetration bridge/intranet penetration tbridge, support client IP black and white list.
|
|
|
|
|
|
Use the --ip-deny parameter to specify a client IP blacklist list file, then the connection will be disconnected when the user's IP is in this file.
|
|
|
|
|
|
Use the --ip-allow parameter to specify a client IP whitelist file, then the connection will be disconnected when the user's IP is not in the file.
|
|
|
|
|
|
If both --ip-deny and --ip-allow are set, then only --ip-allow will work.
|
|
|
|
|
|
The format of the client IP blacklist and whitelist file is as follows:
|
|
|
|
|
|
```text
|
|
|
192.168.1.1
|
|
|
192.168.*.*
|
|
|
192.168.1?.*
|
|
|
```
|
|
|
|
|
|
Description:
|
|
|
|
|
|
1. One domain name per domain, domain name writing supports wildcards `*` and `?`, `*` represents any number of characters, `?` represents an arbitrary character.
|
|
|
|
|
|
2.`#` at the beginning of the comment.
|
|
|
|
|
|
### 13. Protocol loading file
|
|
|
|
|
|
There are many places in the proxy's various proxy functions to set a file. For example: --blocked Specifies a domain name list file that goes directly to the upper level. The parameter value is the path of the file.
|
|
|
|
|
|
If the parameter supports the protocol loading file, the file path can be not only the file path, but also:
|
|
|
|
|
|
a. The base64 encoding at the beginning of "base64://" indicates the contents of the above file, for example: base64://ajfpoajsdfa=
|
|
|
|
|
|
b. "str://" at the beginning of the English comma separated multiple, such as: str://xxx, yyy
|
|
|
|
|
|
The proxy's blocked, direct, stop, only, hosts, resolve.rules, rewriter.rules, ip.allow, ip.deny files support protocol loading.
|
|
|
|
|
|
|
|
|
### 14.Concurrent client connections
|
|
|
|
|
|
socks5\sps\http proxies, the parameter that controls the number of concurrent client connections is: `--max-conns-rate`, which controls the maximum number of client connections per second, default: 20, 0 is unlimited
|
|
|
|
|
|
### 15 Listen on multiple ports
|
|
|
|
|
|
"tcp / http / socks / sps" supports listen on multiple ports and range ports.
|
|
|
Under normal circumstances, it is sufficient to listen on one port, but if you need to listen on multiple ports, the -p parameter is supported.
|
|
|
The format is: `-p 0.0.0.0:80,0.0.0.0:443,.0.0.0.0:8000-9000,:5000-6000`, more The bindings can be separated by commas.
|
|
|
|
|
|
## 1.HTTP Proxies
|
|
|
|
|
|
### 1.1. Ordinary level HTTP proxy
|
|
|
|
|
|
|
|
|
|
|
|
`proxy http -t tcp -p "0.0.0.0:38080"`
|
|
|
|
|
|
Listen port argument `-p` can be:
|
|
|
|
|
|
```text
|
|
|
-p ":8081" listen on 8081
|
|
|
-p ":8081,:8082" listen on 8081 and 8082
|
|
|
-p ":8081,:8082,:9000-9999" listen on 8081 and 8082 and 9000 and 9001 to 9999, 1002 total ports
|
|
|
```
|
|
|
|
|
|
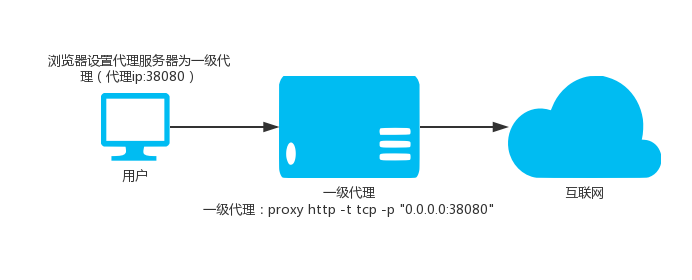
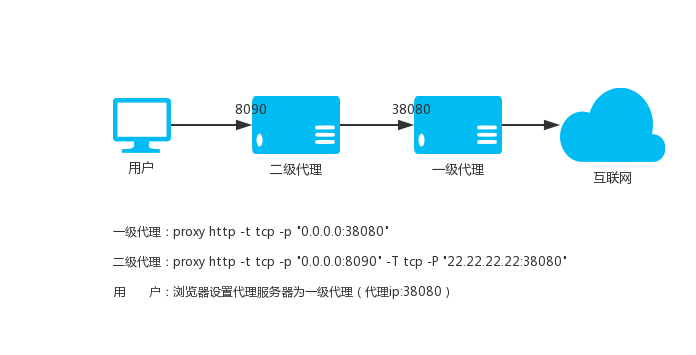
### 1.2. Ordinary secondary HTTP proxy
|
|
|
|
|
|
|
|
|
|
|
|
Use local port 8090, assuming the upstream HTTP proxy is `22.22.22.22:8080`
|
|
|
|
|
|
`proxy http -t tcp -p "0.0.0.0:8090" -T tcp -P "22.22.22.22:8080" `
|
|
|
|
|
|
We can also specify the black and white list file of the website domain name, one domain name per line, the matching rule is the rightmost match, for example: baidu.com, the match is *.*.baidu.com, the blacklist domain name goes directly to the upstream agent, whitelist The domain name does not go to the upstream agent.
|
|
|
|
|
|
`proxy http -p "0.0.0.0:8090" -T tcp -P "22.22.22.22:8080" -b blocked.txt -d direct.txt`
|
|
|
|
|
|
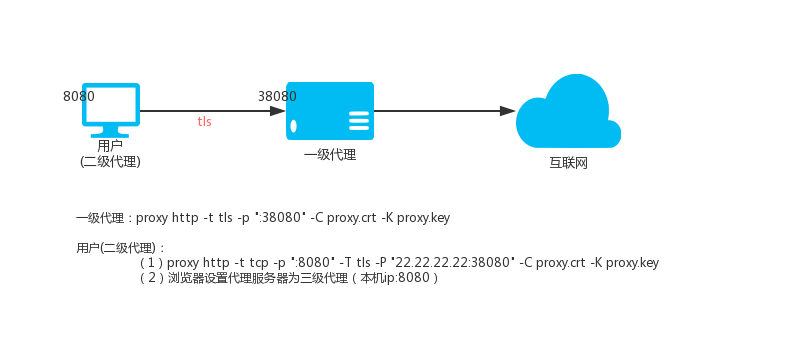
### 1.3.HTTP secondary agent (encryption)
|
|
|
|
|
|
> Note: The `proxy.crt` and `proxy.key` used by the secondary proxy should be consistent with the primary proxy.
|
|
|
|
|
|
|
|
|
Level 1 HTTP proxy (VPS, IP: 22.22.22.22)
|
|
|
`proxy http -t tls -p ":38080" -C proxy.crt -K proxy.key`
|
|
|
|
|
|
Secondary HTTP proxy (local Linux)
|
|
|
`proxy http -t tcp -p ":8080" -T tls -P "22.22.22.22:38080" -C proxy.crt -K proxy.key`
|
|
|
Then access the local port 8080 is to access the proxy port 38080 on the VPS.
|
|
|
|
|
|
Secondary HTTP proxy (local windows)
|
|
|
`proxy.exe http -t tcp -p ":8080" -T tls -P "22.22.22.22:38080" -C proxy.crt -K proxy.key`
|
|
|
Then set your windos system, the proxy that needs to go through the proxy Internet program is http mode, the address is: 127.0.0.1, the port is: 8080, the program can access the Internet through vps through the encrypted channel.
|
|
|
|
|
|
### 1.4.HTTP Level 3 Agent (Encryption)
|
|
|

|
|
|
Level 1 HTTP proxy VPS_01, IP: 22.22.22.22
|
|
|
`proxy http -t tls -p ":38080" -C proxy.crt -K proxy.key`
|
|
|
Secondary HTTP proxy VPS_02, IP: 33.33.33.33
|
|
|
`proxy http -t tls -p ":28080" -T tls -P "22.22.22.22:38080" -C proxy.crt -K proxy.key`
|
|
|
Level 3 HTTP proxy (local)
|
|
|
`proxy http -t tcp -p ":8080" -T tls -P "33.33.33.33:28080" -C proxy.crt -K proxy.key`
|
|
|
Then accessing the local port 8080 is to access the proxy port 38080 on the primary HTTP proxy.
|
|
|
|
|
|
### 1.5.Basic certification
|
|
|
For the proxy HTTP protocol, we can perform Basic authentication. The authenticated username and password can be specified on the command line.
|
|
|
`proxy http -t tcp -p ":33080" -a "user1:pass1" -a "user2:pass2"`
|
|
|
For multiple users, repeat the -a parameter.
|
|
|
It can also be placed in a file in the format of a "username:password" and then specified with -F.
|
|
|
`proxy http -t tcp -p ":33080" -F auth-file.txt`
|
|
|
|
|
|
In addition, the http(s) proxy also integrates external HTTP API authentication. We can specify an http url interface address with the --auth-url parameter.
|
|
|
Then when there is a user connection, the proxy will request the url in GET mode, and bring the following four parameters. If the HTTP status code 204 is returned, the authentication is successful.
|
|
|
In other cases, the authentication failed.
|
|
|
For example:
|
|
|
`proxy http -t tcp -p ":33080" --auth-url "http://test.com/auth.php"`
|
|
|
When the user connects, the proxy will request the url ("http://test.com/auth.php") in GET mode.
|
|
|
Take five parameters: user, pass, ip, local_ip, target:
|
|
|
Http://test.com/auth.php?user={USER}&pass={PASS}&ip={IP}&local_ip={LOCAL_IP}&target={TARGET}
|
|
|
User: username
|
|
|
Pass: password
|
|
|
Ip: User's IP, for example: 192.168.1.200
|
|
|
Local_ip: IP of the server accessed by the user, for example: 3.3.3.3
|
|
|
Target: URL accessed by the user, for example: http://demo.com:80/1.html or https://www.baidu.com:80
|
|
|
|
|
|
If there is no -a or -F or --auth-url parameter, the Basic authentication is turned off.
|
|
|
|
|
|
### 1.6. HTTP proxy traffic is forced to go to the upper HTTP proxy
|
|
|
By default, the proxy will intelligently determine whether a website domain name is inaccessible. If it is not accessible, it will go to the upper level HTTP proxy. With --always, all HTTP proxy traffic can be forced to go to the upper HTTP proxy.
|
|
|
`proxy http --always -t tls -p ":28080" -T tls -P "22.22.22.22:38080" -C proxy.crt -K proxy.key`
|
|
|
|
|
|
### 1.7.HTTP(S) via SSH relay
|
|
|

|
|
|
Description: The principle of ssh transfer is to use the forwarding function of ssh, that is, after you connect to ssh, you can access the target address through ssh proxy.
|
|
|
Suppose there is: vps
|
|
|
- IP is 2.2.2.2, ssh port is 22, ssh username is: user, ssh user password is: demo
|
|
|
- The user's ssh private key name is user.key
|
|
|
|
|
|
#### *1.7.1 How to ssh username and password*
|
|
|
Local HTTP(S) proxy port 28080, executing:
|
|
|
`proxy http -T ssh -P "2.2.2.2:22" -u user -D demo -t tcp -p ":28080"`
|
|
|
#### *1.7.2 How to ssh username and key*
|
|
|
Local HTTP(S) proxy port 28080, executing:
|
|
|
`proxy http -T ssh -P "2.2.2.2:22" -u user -S user.key -t tcp -p ":28080"`
|
|
|
|
|
|
### 1.8.KCP protocol transmission
|
|
|

|
|
|
The KCP protocol requires the --kcp-key parameter to set a password for encrypting and decrypting data.
|
|
|
|
|
|
Level 1 HTTP proxy (VPS, IP: 22.22.22.22)
|
|
|
`proxy http -t kcp -p ":38080" --kcp-key mypassword`
|
|
|
|
|
|
Secondary HTTP proxy (local Linux)
|
|
|
`proxy http -t tcp -p ":8080" -T kcp -P "22.22.22.22:38080" --kcp-key mypassword`
|
|
|
Then access the local port 8080 is to access the proxy port 38080 on the VPS, the data is transmitted through the kcp protocol, note that the kcp is the udp protocol, so the firewall needs to release the 380p udp protocol.
|
|
|
|
|
|
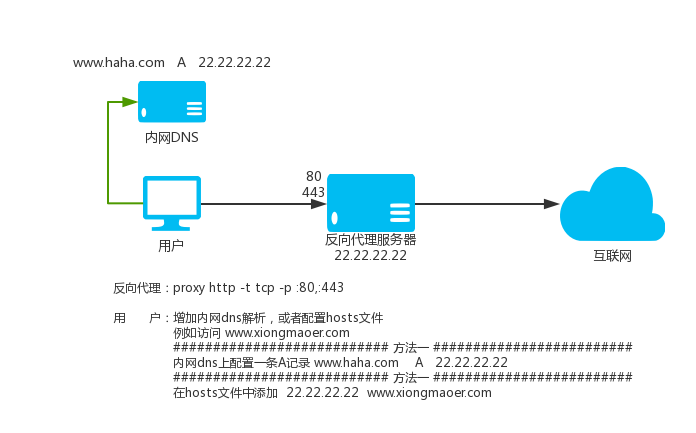
### 1.9 HTTP(S) Reverse Proxy
|
|
|
|
|
|
The proxy not only supports the proxy setting in other software, but also provides proxy services for other software. It also supports directly parsing the requested website domain name to the proxy listening ip, and then the proxy listens to the 80 and 443 ports, then the proxy will automatically You proxy access to the HTTP(S) website you need to access.
|
|
|
|
|
|
How to use:
|
|
|
On the "last level proxy proxy" machine, because the proxy is to be disguised as all websites, the default HTTP port of the website is 80, HTTPS is 443, and the proxy can listen to ports 80 and 443. Parameters -p multiple addresses with commas segmentation.
|
|
|
`proxy http -t tcp -p :80,:443`
|
|
|
|
|
|
This command starts a proxy agent on the machine, and listens to ports 80 and 443 at the same time. It can be used as a normal proxy, or directly resolve the domain name that needs to be proxyed to the IP of this machine.
|
|
|
|
|
|
If there is a upstream agent, then refer to the above tutorial to set the upstream, the use is exactly the same.
|
|
|
`proxy http -t tcp -p :80,:443 -T tls -P "2.2.2.2:33080" -C proxy.crt -K proxy.key`
|
|
|
|
|
|
Note:
|
|
|
The DNS resolution result of the server where the proxy is located cannot be affected by the custom resolution,
|
|
|
otherwise it will be infinite loop. The proxy proxy should specify the `--dns-address 8.8.8.8` parameter.
|
|
|
|
|
|
### 1.10 HTTP(S) Transparent Proxy
|
|
|
This mode needs to have a certain network foundation. If the related concepts are not understood, please search for it yourself.
|
|
|
Assuming the proxy is now running on the router, the startup command is as follows:
|
|
|
`proxy http -t tcp -p :33080 -T tls -P "2.2.2.2:33090" -C proxy.crt -K proxy.key`
|
|
|
|
|
|
Then add the iptables rule, here are the reference rules:
|
|
|
```shell
|
|
|
#Upper proxy server IP address:
|
|
|
Proxy_server_ip=2.2.2.2
|
|
|
|
|
|
#路由器Running port for proxy listening:
|
|
|
Proxy_local_port=33080
|
|
|
|
|
|
#The following does not need to be modified
|
|
|
#create a new chain named PROXY
|
|
|
Iptables -t nat -N PROXY
|
|
|
|
|
|
# Ignore your PROXY server's addresses
|
|
|
# It's very IMPORTANT, just be careful.
|
|
|
|
|
|
Iptables -t nat -A PROXY -d $proxy_server_ip -j RETURN
|
|
|
|
|
|
# Ignore LANs IP address
|
|
|
Iptables -t nat -A PROXY -d 0.0.0.0/8 -j RETURN
|
|
|
Iptables -t nat -A PROXY -d 10.0.0.0/8 -j RETURN
|
|
|
Iptables -t nat -A PROXY -d 127.0.0.0/8 -j RETURN
|
|
|
Iptables -t nat -A PROXY -d 169.254.0.0/16 -j RETURN
|
|
|
Iptables -t nat -A PROXY -d 172.16.0.0/12 -j RETURN
|
|
|
Iptables -t nat -A PROXY -d 192.168.0.0/16 -j RETURN
|
|
|
Iptables -t nat -A PROXY -d 224.0.0.0/4 -j RETURN
|
|
|
Iptables -t nat -A PROXY -d 240.0.0.0/4 -j RETURN
|
|
|
|
|
|
# Anything to port 80 443 should be redirected to PROXY's local port
|
|
|
Iptables -t nat -A PROXY -p tcp --dport 80 -j REDIRECT --to-ports $proxy_local_port
|
|
|
Iptables -t nat -A PROXY -p tcp --dport 443 -j REDIRECT --to-ports $proxy_local_port
|
|
|
|
|
|
# Apply the rules to nat client
|
|
|
Iptables -t nat -A PREROUTING -p tcp -j PROXY
|
|
|
# Apply the rules to localhost
|
|
|
Iptables -t nat -A OUTPUT -p tcp -j PROXY
|
|
|
```
|
|
|
- Clear the entire chain iptables -F Chain names such as iptables -t nat -F PROXY
|
|
|
- Delete the specified user-defined chain iptables -X chain name such as iptables -t nat -X PROXY
|
|
|
- Remove rules from the selected chain iptables -D chain name Rule details such as iptables -t nat -D PROXY -d 223.223.192.0/255.255.240.0 -j RETURN
|
|
|
|
|
|
### 1.11 Custom DNS
|
|
|
--dns-address and --dns-ttl parameters, used to specify the dns (--dns-address) used by the proxy to access the domain name.
|
|
|
And the analysis result cache time (--dns-ttl) seconds, to avoid system dns interference to the proxy, in addition to the cache function can also reduce the dns resolution time to improve access speed.
|
|
|
For example:
|
|
|
`proxy http -p ":33080" --dns-address "8.8.8.8:53" --dns-ttl 300`
|
|
|
|
|
|
`--dns-address` supports multiple dns addresses, load balancing, separated by comma. For example: `--dns-address "1.1.1.1:53,8.8.8.8:53"`
|
|
|
|
|
|
You can also use the parameter `--dns-interface` to specify the bandwidth used for dns resolution,
|
|
|
for example: `--dns-interface eth0`, dns resolution will use the eth0 bandwidth, this parameter must be set to `--dns-address` to be effective.
|
|
|
|
|
|
### 1.12 Custom encryption
|
|
|
The proxy's http(s) proxy can encrypt tcp data via tls standard encryption and kcp protocol on top of tcp, in addition to support customization after tls and kcp.
|
|
|
Encryption, that is to say, custom encryption and tls|kcp can be used in combination. The internal use of AES256 encryption, you only need to define a password when you use it.
|
|
|
Encryption is divided into two parts, one is whether the local (-z) encryption and decryption, and the other is whether the transmission with the upstream (-Z) is encrypted or decrypted.
|
|
|
Custom encryption requires both ends to be proxy. The following two levels and three levels are used as examples:
|
|
|
|
|
|
Secondary instance
|
|
|
|
|
|
Execute on level 1 vps (ip: 2.2.2.2):
|
|
|
`proxy http -t tcp -z demo_password -p :7777`
|
|
|
Local secondary execution:
|
|
|
`proxy http -T tcp -P 2.2.2.2:777 -Z demo_password -t tcp -p :8080`
|
|
|
In this way, when the website is accessed through the local agent 8080, the target website is accessed through encrypted transmission with the upstream.
|
|
|
|
|
|
|
|
|
Three-level instance
|
|
|
|
|
|
Execute on level 1 vps (ip: 2.2.2.2):
|
|
|
`proxy http -t tcp -z demo_password -p :7777`
|
|
|
Execute on the secondary vps (ip: 3.3.3.3):
|
|
|
`proxy http -T tcp -P 2.2.2.2:7777 -Z demo_password -t tcp -z other_password -p :8888`
|
|
|
Local three-level execution:
|
|
|
`proxy http -T tcp -P 3.3.3.3:8888 -Z other_password -t tcp -p :8080`
|
|
|
In this way, when the website is accessed through the local agent 8080, the target website is accessed through encrypted transmission with the upstream.
|
|
|
|
|
|
### 1.13 Compressed transmission
|
|
|
The proxy http(s) proxy can encrypt tcp data through tls standard encryption and kcp protocol on top of tcp, and can also compress data before custom encryption.
|
|
|
That is to say, compression and custom encryption and tls|kcp can be used in combination. Compression is divided into two parts, one part is local (-m) compression transmission.
|
|
|
Part of it is compressed with the upstream (-M) transmission.
|
|
|
Compression requires both sides to be proxy. Compression also protects (encrypted) data to a certain extent. The following uses Level 2 and Level 3 as examples:
|
|
|
|
|
|
Secondary instance
|
|
|
|
|
|
Execute on level 1 vps (ip: 2.2.2.2):
|
|
|
`proxy http -t tcp -m -p :7777`
|
|
|
Local secondary execution:
|
|
|
`proxy http -T tcp -P 2.2.2.2:777 -M -t tcp -p :8080`
|
|
|
In this way, when the website is accessed through the local agent 8080, the target website is accessed through compression with the upstream.
|
|
|
|
|
|
|
|
|
Three-level instance
|
|
|
|
|
|
Execute on level 1 vps (ip: 2.2.2.2):
|
|
|
`proxy http -t tcp -m -p :7777`
|
|
|
Execute on the secondary vps (ip: 3.3.3.3):
|
|
|
`proxy http -T tcp -P 2.2.2.2:7777 -M -t tcp -m -p :8888`
|
|
|
Local three-level execution:
|
|
|
`proxy http -T tcp -P 3.3.3.3:8888 -M -t tcp -p :8080`
|
|
|
In this way, when the website is accessed through the local agent 8080, the target website is accessed through compression with the upstream.
|
|
|
|
|
|
### 1.14 Load Balancing
|
|
|
|
|
|
The HTTP(S) proxy supports upper-level load balancing, and multiple upstream repeat-P parameters can be used.
|
|
|
|
|
|
`proxy http --lb-method=hash -T tcp -P 1.1.1.1:33080 -P 2.1.1.1:33080 -P 3.1.1.1:33080`
|
|
|
|
|
|
### 1.14.1 Setting the retry interval and timeout time
|
|
|
|
|
|
`proxy http --lb-method=leastconn --lb-retrytime 300 --lb-timeout 300 -T tcp -P 1.1.1.1:33080 -P 2.1.1.1:33080 -P 3.1.1.1:33080 -t tcp - p :33080`
|
|
|
|
|
|
### 1.14.2 Setting weights
|
|
|
|
|
|
`proxy http --lb-method=weight -T tcp -P 1.1.1.1:33080?w=1 -P 2.1.1.1:33080?w=2 -P 3.1.1.1:33080?w=1 -t tcp - p :33080`
|
|
|
|
|
|
### 1.14.3 Use the target address to select the upstream
|
|
|
|
|
|
`proxy http --lb-hashtarget --lb-method=hash -T tcp -P 1.1.1.1:33080 -P 2.1.1.1:33080 -P 3.1.1.1:33080 -t tcp -p :33080`
|
|
|
|
|
|
### 1.15 Speed limit
|
|
|
|
|
|
The speed limit is 100K, which can be specified by the `-l` parameter, for example: 100K 2000K 1M . 0 means no limit.
|
|
|
|
|
|
`proxy http -t tcp -p 2.2.2.2:33080 -l 100K`
|
|
|
|
|
|
### 1.16 Specifying Outgoing IP
|
|
|
|
|
|
The `--bind-listen` parameter can be used to open the client connection with the portal IP, and use the portal IP as the outgoing IP to access the target website. If the incorrect IP is bound, the proxy will not work. At this point, the proxy will try to bind the target without binding the IP, and the log will prompt.
|
|
|
|
|
|
`proxy http -t tcp -p 2.2.2.2:33080 --bind-listen`
|
|
|
|
|
|
#### Flexible Outgoing IP
|
|
|
|
|
|
Although the above `--bind-listen` parameter can specify the outgoing IP, the `entry IP` and the `outgoing IP` cannot be referenced artificially. If you want the ingress IP and the egress IP to be different, you can use the `--bind-ip` parameter, format: `IP:port`, for example: `1.1.1.1:8080`, `[2000:0:0:0:0 :0:0:1]:8080`. For multiple binding requirements, the `--bind-ip` parameter can be repeated.
|
|
|
|
|
|
For example, this machine has IP `5.5.5.5`, `6.6.6.6`, and monitors two ports `8888` and `7777`, the command is as follows:
|
|
|
|
|
|
`Proxy tcp -t tcp -p :8888,:7777 --bind-ip 5.5.5.5:7777 --bind-ip 6.6.6.6:8888 -T tcp -P 2.2.2.2:3322`
|
|
|
|
|
|
Then the client access port `7777`, the outgoing IP is `5.5.5.5`, access port `8888`, the outgoing IP is `6.6.6.6`, if both `--bind-ip` and `--bind- are set at the same time listen`,`--bind-ip` has higher priority.
|
|
|
s
|
|
|
In addition, the `IP` part of the `--bind-ip` parameter supports specifying the `network interface name`, `wildcards`, and more than one can be specified. The detailed description is as follows:
|
|
|
|
|
|
- Specify the network interface name, such as: `--bind-ip eth0:7777`, and then the client accesses the `7777` port, and the egress IP is the IP of the eth0 network interface.
|
|
|
- The network interface name supports wildcards, such as: `--bind-ip eth0.*:7777`, then the client accesses the port `7777`, and the egress IP is randomly selected from the IP of the network interface starting with `eth0.`.
|
|
|
- IP supports wildcards, such as: `--bind-ip 192.168.?.*:777`, then the client accesses the `7777` port, the outgoing IP is all the IPs of the machine, and matches the IP of `192.168.?.*` A randomly selected one.
|
|
|
- It can also be several combinations of network interface name and IP, and several selective divisions using half-width, such as: `-bind-ip pppoe??,192.168.?.*:7777`, and then the client accesses the `7777` port , The outgoing IP is the machine's network interface name matching `pppoe??`
|
|
|
It is randomly selected from the IP matching `192.168.?.*` in the machine IP.
|
|
|
- The wildcard character `*` represents 0 to any character, `? `Represents 1 character.
|
|
|
- If the IP of the network interface changes, it will take effect in real time.
|
|
|
- You can use the `--bind-refresh` parameter to specify the interval to refresh the local network interface information, the default is `5`, the unit is second.
|
|
|
|
|
|
### 1.17 Certificate parameters use base64 data
|
|
|
|
|
|
By default, the -C, -K parameter is the path to the crt certificate and the key file.
|
|
|
|
|
|
If it is the beginning of base64://, then the latter data is considered to be base64 encoded and will be used after decoding.
|
|
|
|
|
|
### 1.18 Intelligent mode
|
|
|
Intelligent mode setting, can be one of intelligent|direct|parent.
|
|
|
The default is: parent.
|
|
|
The meaning of each value is as follows:
|
|
|
`--intelligent=direct`, the targets in the blocked are not directly connected.
|
|
|
`--intelligent=parent`, the target that is not in the direct is going to the higher level.
|
|
|
`--intelligent=intelligent`, blocked and direct have no targets, intelligently determine whether to use the upstream access target.
|
|
|
|
|
|
### 1.19 Help
|
|
|
`proxy help http`
|
|
|
|
|
|
## 2.TCP Proxies
|
|
|
|
|
|
### 2.1. Ordinary level TCP proxy
|
|
|
|
|
|
Local execution:
|
|
|
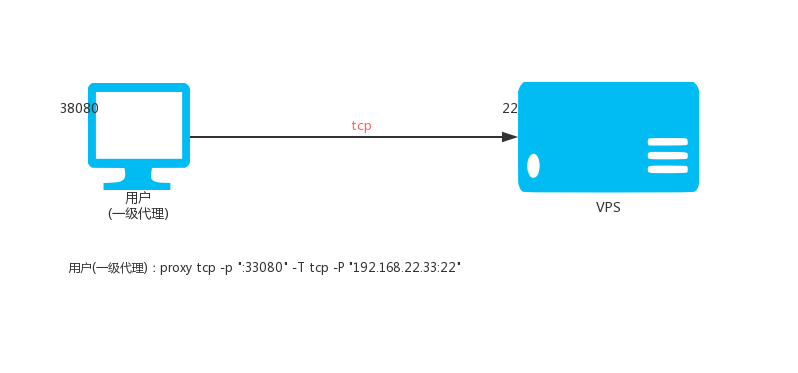
`proxy tcp -p ":33080" -T tcp -P "192.168.22.33:22"`
|
|
|
Then access the local port 33080 is to access port 22 of 192.168.22.33.
|
|
|
|
|
|
The `-p` parameter supports :
|
|
|
|
|
|
```text
|
|
|
-p ":8081" listen on 8081
|
|
|
-p ":8081,:8082" listen on 8081 and 8082
|
|
|
-p ":8081,:8082,:9000-9999" listen on 8081 and 8082 and 9000, 9001 to 9999 for a total of 1002 ports
|
|
|
```
|
|
|
|
|
|
If the number of local listening ports is greater than 1, the corresponding upper port corresponding to the local port will be connected, and the port in `-P` will be ignored.
|
|
|
|
|
|
If you need a connection from all ports, connect to the upper specified port, you can add the parameter `--lock-port`.
|
|
|
|
|
|
such as:
|
|
|
|
|
|
`proxy tcp -p ":33080-33085" -T tcp -P "192.168.22.33:0"`
|
|
|
|
|
|
Then the connection of the `33080` port will connect to the `33080` port of 192.168.22.33, and the other ports are similar. The local and upper ports are the same. At this time, the port in the parameter `-P` uses `0`.
|
|
|
|
|
|
If you want to connect the ports of `33080`, `33081`, etc. to the `22` port of 192.168.22.33, you can add the parameter `--lock-port`.
|
|
|
|
|
|
`proxy tcp -p ":33080-33085" -T tcp -P "192.168.22.33:22" --lock-port`
|
|
|
|
|
|
### 2.2. Ordinary secondary TCP proxy
|
|
|

|
|
|
VPS (IP: 22.22.2.33) is executed:
|
|
|
`proxy tcp -p ":33080" -T tcp -P "127.0.0.1:8080"`
|
|
|
Local execution:
|
|
|
`proxy tcp -p ":23080" -T tcp -P "22.22.22.33:33080"`
|
|
|
Then access the local port 23080 is to access port 8020 of 22.22.22.33.
|
|
|
|
|
|
### 2.3. Ordinary three-level TCP proxy
|
|
|
|
|
|
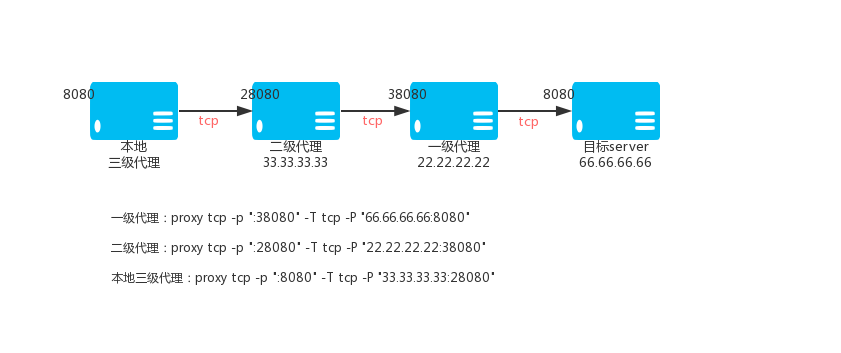
Primary TCP proxy VPS_01, IP: 22.22.22.22
|
|
|
`proxy tcp -p ":38080" -T tcp -P "66.66.66.66:8080"`
|
|
|
Secondary TCP proxy VPS_02, IP: 33.33.33.33
|
|
|
`proxy tcp -p ":28080" -T tcp -P "22.22.22.22:38080"`
|
|
|
Level 3 TCP proxy (local)
|
|
|
`proxy tcp -p ":8080" -T tcp -P "33.33.33.33:28080"`
|
|
|
Then access the local port 8080 is to access the port 8080 of 66.66.66.66 through the encrypted TCP tunnel.
|
|
|
|
|
|
### 2.4. Encrypting secondary TCP proxy
|
|
|
|
|
|
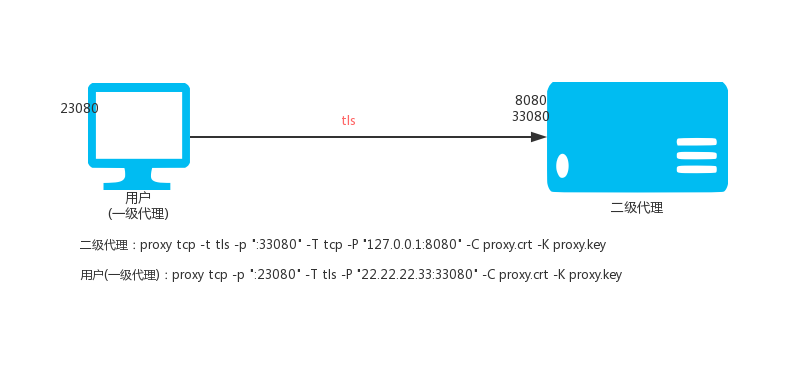
VPS (IP: 22.22.2.33) is executed:
|
|
|
`proxy tcp -t tls -p ":33080" -T tcp -P "127.0.0.1:8080" -C proxy.crt -K proxy.key`
|
|
|
Local execution:
|
|
|
`proxy tcp -p ":23080" -T tls -P "22.22.22.33:33080" -C proxy.crt -K proxy.key`
|
|
|
Then access the local port 23080 is to access the port 8080 of 22.22.22.33 through the encrypted TCP tunnel.
|
|
|
|
|
|
### 2.5.Encrypting Level 3 TCP Agent
|
|
|
|
|
|
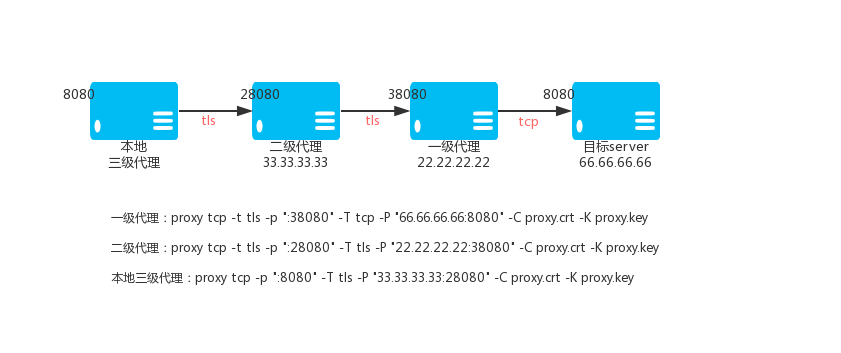
Primary TCP proxy VPS_01, IP: 22.22.22.22
|
|
|
`proxy tcp -t tls -p ":38080" -T tcp -P "66.66.66.66:8080" -C proxy.crt -K proxy.key`
|
|
|
Secondary TCP proxy VPS_02, IP: 33.33.33.33
|
|
|
`proxy tcp -t tls -p ":28080" -T tls -P "22.22.22.22:38080" -C proxy.crt -K proxy.key`
|
|
|
Level 3 TCP proxy (local)
|
|
|
`proxy tcp -p ":8080" -T tls -P "33.33.33.33:28080" -C proxy.crt -K proxy.key`
|
|
|
Then access the local port 8080 is to access the port 8080 of 66.66.66.66 through the encrypted TCP tunnel.
|
|
|
|
|
|
### 2.6 Connecting to a upstream through a proxy
|
|
|
Sometimes the network where the proxy is located cannot directly access the external network. You need to use an https or socks5 proxy to access the Internet. Then this time
|
|
|
The -J parameter can help you to connect the proxy to the peer-P through the https or socks5 proxy when mapping the proxy tcp port, mapping the external port to the local.
|
|
|
The -J parameter format is as follows:
|
|
|
|
|
|
Https proxy writing:
|
|
|
The proxy needs authentication, username: username password: password
|
|
|
Https://username:password@host:port
|
|
|
Agent does not require authentication
|
|
|
Https://host:port
|
|
|
|
|
|
Socks5 proxy writing:
|
|
|
The proxy needs authentication, username: username password: password
|
|
|
Socks5://username:password@host:port
|
|
|
Agent does not require authentication
|
|
|
Socks5://host:port
|
|
|
|
|
|
Host: the IP or domain name of the proxy
|
|
|
Port: the port of the proxy
|
|
|
|
|
|
### 2.7 Specify Outgoing IP
|
|
|
When the TCP proxy is a superior type (parameter: -T) is tcp, it supports the specified outgoing IP. Using
|
|
|
the `--bind-listen` parameter, you can open the client to connect with the portal IP, and use the portal IP as the
|
|
|
outgoing IP to access the target website. If an incorrect IP is bound, the proxy will not work, the proxy will try to
|
|
|
bind the target without binding the IP, and the log will prompt.
|
|
|
|
|
|
`proxy tcp -p ":33080" -T tcp -P" 192.168.22.33:22" -B`
|
|
|
|
|
|
#### Flexible Outgoing IP
|
|
|
|
|
|
Although the above `--bind-listen` parameter can specify the outgoing IP, the `entry IP` and the ` outgoing IP` cannot be referenced artificially. If you want the ingress IP to be different from the egress IP, you can use the `--bind-ip` parameter, format: `IP:port`, for example: `1.1.1.1:8080`
|
|
|
, `[2000:0:0:0:0:0:0:1]:8080`. For multiple binding requirements, you can repeat the `--bind-ip` parameter identification.
|
|
|
|
|
|
For example, this machine has IP `5.5.5.5`, `6.6.6.6`, and monitors two ports `8888` and `7777`, the command is as follows:
|
|
|
|
|
|
`Proxy tcp -t tcp -p :8888,:7777 --bind-ip 5.5.5.5:7777 --bind-ip 6.6.6.6:8888 -T tcp -P 2.2.2.2:3322`
|
|
|
|
|
|
Then the client access port `7777`, the outgoing IP is `5.5.5.5`, access port `8888`, the outgoing IP is `6.6.6.6`, if both `--bind-ip` and `--bind- are set at the same time listen`,`--bind-ip` has higher priority.
|
|
|
|
|
|
In addition, the `IP` part of the `--bind-ip` parameter supports specifying the `network interface name`, `wildcards`, and more than one can be specified. The detailed description is as follows:
|
|
|
|
|
|
- Specify the network interface name, such as: `--bind-ip eth0:7777`, then the client accesses the `7777` port, and the egress IP is the IP of the eth0 network interface.
|
|
|
- The network interface name supports wildcards, for example: `--bind-ip eth0.*:7777`, then the client accesses
|
|
|
the `7777` port, and the egress IP is a randomly selected one of the network interface IPs starting with `eth0.`.
|
|
|
- IP supports wildcards, such as: `--bind-ip 192.168.?.*:7777`, then the client accesses the `7777` port, and the
|
|
|
outgoing IP is all the IPs of the machine, matching the IP of `192.168.?.*` A randomly selected one.
|
|
|
- It can also be multiple combinations of network interface name and IP, separated by half-width commas, such
|
|
|
as: `--bind-ip pppoe??,192.168.?.*:7777`, then the client accesses the port `7777`, The outgoing IP is the machine's
|
|
|
network interface name matching `pppoe??`
|
|
|
It is a randomly selected one among all IPs of the machine that matches `192.168.?.*`.
|
|
|
- The wildcard character `*` represents 0 to any number of characters, and `?` represents 1 character.
|
|
|
- If the IP of the network interface changes, it will take effect in real time.
|
|
|
- You can use the `--bind-refresh` parameter to specify the interval to refresh the local network interface information, the default is `5`, the unit is second.
|
|
|
|
|
|
### 2.8 Speed limit, connections limit
|
|
|
|
|
|
- **Limit count of connections**
|
|
|
The parameter `--max-conns` can limit the maximum number of connections per port.
|
|
|
For example, limit the maximum number of connections per port to 1000:
|
|
|
`proxy tcp -p ":33080" -T tcp -P "192.168.22.33:22" --max-conns 1000`
|
|
|
- **Limit tcp connection rate**
|
|
|
The parameter `--rate-limit` can limit the rate of each tcp connection.
|
|
|
For example, limit the rate of each tcp connection to 100k/s:
|
|
|
`proxy tcp -p ":33080" -T tcp -P "192.168.22.33:22" --rate-limit 100k`
|
|
|
- **Limit client IP total rate**
|
|
|
The parameter `--ip-rate` limit the total rate of each client IP.
|
|
|
For example, limit the total IP rate of each client to 1M/s:
|
|
|
`proxy tcp -p ":33080" -T tcp -P "192.168.22.33:22" --ip-rate 1M`
|
|
|
- **Limit port total rate**
|
|
|
The parameter `--port-rate` limit the total rate of each service port.
|
|
|
For example, limit the total rate of each port to 10M/s:
|
|
|
`proxy tcp -p ":33080" -T tcp -P "192.168.22.33:22" --port-rate 10M`
|
|
|
- **Joint Speed Limit**
|
|
|
`--rate-limit` and (`--ip-rate` or `--port-rate`) can be used together.
|
|
|
Both limit the total rate and limit the rate of a single tcp.
|
|
|
|
|
|
### 2.9 Compressed transmission
|
|
|
|
|
|
`--c` controls whether to compress transmission between local and client, default false;` --C` controls whether to compress transmission between local and upstream, default false.
|
|
|
|
|
|
Examples:
|
|
|
|
|
|
VPS (IP: 22.22.22.33) implementation:
|
|
|
`proxy tcp -t tcp --c -p ":33080" -T tcp -P "127.0.0.1:8080"`
|
|
|
Local execution:
|
|
|
`proxy tcp -t tcp -p ":23080" -T tcp -P "22.22.22.33:33080" --C`
|
|
|
|
|
|
### 2.10 View Help
|
|
|
`proxy help tcp`
|
|
|
|
|
|
## 3.UDP Proxies
|
|
|
|
|
|
### 3.1. Ordinary UDP proxy
|
|
|
|
|
|
Local execution:
|
|
|
`proxy udp -p ":5353" -T udp -P "8.8.8.8:53"`
|
|
|
Then access the local UDP: 5353 port is to access 8.8.8.8 UDP: 53 port.
|
|
|
|
|
|
The `-p` parameter supports :
|
|
|
|
|
|
```text
|
|
|
-p ":8081" listen on 8081
|
|
|
-p ":8081,:8082" listen on 8081 and 8082
|
|
|
-p ":8081,:8082,:9000-9999" listen on 8081 and 8082 and 9000, 9001 to 9999 for a total of 1002 ports
|
|
|
```
|
|
|
|
|
|
If the number of local listening ports is greater than 1, the corresponding upper port corresponding to the local port will be connected, and the port in `-P` will be ignored.
|
|
|
|
|
|
If you need a connection from all ports, connect to the upper specified port, you can add the parameter `--lock-port`.
|
|
|
|
|
|
such as:
|
|
|
|
|
|
`proxy udp -p ":33080-33085" -T udp -P "192.168.22.33:0"`
|
|
|
|
|
|
Then the connection of the `33080` port will connect to the `33080` port of 192.168.22.33, and the other ports are similar. The local and upper ports are the same. At this time, the port in the parameter `-P` uses `0`.
|
|
|
|
|
|
If you want to connect the ports of `33080`, `33081`, etc. to the `2222` port of 192.168.22.33, you can add the parameter `--lock-port`.
|
|
|
|
|
|
`proxy udp -p ":33080-33085" -T udp -P "192.168.22.33:2222" --lock-port`
|
|
|
|
|
|
### 3.2. Ordinary secondary UDP proxy
|
|
|
|
|
|
VPS (IP: 22.22.2.33) is executed:
|
|
|
`proxy tcp -p ":33080" -T udp -P "8.8.8.8:53"`
|
|
|
Local execution:
|
|
|
`proxy udp -p ":5353" -T tcp -P "22.22.22.33:33080"`
|
|
|
Then access the local UDP: 5353 port is through the TCP tunnel, through the VPS access 8.8.8.8 UDP: 53 port.
|
|
|
|
|
|
### 3.3. Ordinary three-level UDP proxy
|
|
|
|
|
|
Primary TCP proxy VPS_01, IP: 22.22.22.22
|
|
|
`proxy tcp -p ":38080" -T udp -P "8.8.8.8:53"`
|
|
|
Secondary TCP proxy VPS_02, IP: 33.33.33.33
|
|
|
`proxy tcp -p ":28080" -T tcp -P "22.22.22.22:38080"`
|
|
|
Level 3 TCP proxy (local)
|
|
|
`proxy udp -p ":5353" -T tcp -P "33.33.33.33:28080"`
|
|
|
Then access to the local 5353 port is through the TCP tunnel, through the VPS to access port 8.8.8.8.
|
|
|
|
|
|
### 3.4. Encrypting secondary UDP proxy
|
|
|
|
|
|
VPS (IP: 22.22.2.33) is executed:
|
|
|
`proxy tcp -t tls -p ":33080" -T udp -P "8.8.8.8:53" -C proxy.crt -K proxy.key`
|
|
|
Local execution:
|
|
|
`proxy udp -p ":5353" -T tls -P "22.22.22.33:33080" -C proxy.crt -K proxy.key`
|
|
|
Then access the local UDP: 5353 port is through the encrypted TCP tunnel, through the VPS access 8.8.8.8 UDP: 53 port.
|
|
|
|
|
|
### 3.5. Encryption Level 3 UDP Agent
|
|
|
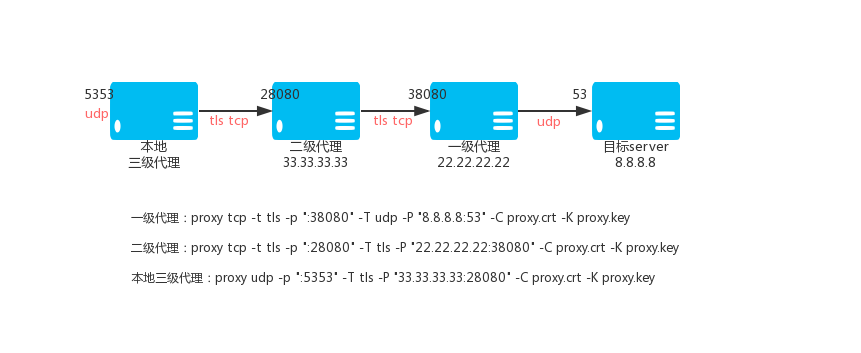
|
|
|
Primary TCP proxy VPS_01, IP: 22.22.22.22
|
|
|
`proxy tcp -t tls -p ":38080" -T udp -P "8.8.8.8:53" -C proxy.crt -K proxy.key`
|
|
|
Secondary TCP proxy VPS_02, IP: 33.33.33.33
|
|
|
`proxy tcp -t tls -p ":28080" -T tls -P "22.22.22.22:38080" -C proxy.crt -K proxy.key`
|
|
|
Level 3 TCP proxy (local)
|
|
|
`proxy udp -p ":5353" -T tls -P "33.33.33.33:28080" -C proxy.crt -K proxy.key`
|
|
|
Then access the local 5353 port is to access the 8.8.8.8 port 53 through VPS_01 through the encrypted TCP tunnel.
|
|
|
|
|
|
### 3.6 Specify Outgoing IP
|
|
|
When the UDP upstream proxies (parameter: -T) is udp, it supports the specified outgoing IP. Using the `--bind-listen` parameter, you can open the client to connect with the server IP, and use the server IP as the outgoing IP to access the target. If an incorrect IP is bound, the proxy will not work.
|
|
|
|
|
|
`proxy udp -p ":33080" -T udp -P "192.168.22.33:2222" -B`
|
|
|
|
|
|
### 3.7 Help
|
|
|
`proxy help udp`
|
|
|
|
|
|
## 4. Expose Intranet
|
|
|
|
|
|
### 4.1 principle description
|
|
|
Intranet penetration, divided into two versions, "multi-link version" and "multiplexed version", generally like a web service, this service is not a long-term connection, it is recommended to use "multi-link version", if it is to keep long The time connection suggests using a "multiplexed version."
|
|
|
1. Multi-link version, the corresponding sub-command is tserver, tclient, tbridge.
|
|
|
1. Multiplexed version, the corresponding subcommand is server, client, bridge.
|
|
|
1. The parameters of the multi-link version and the multiplex version are exactly the same.
|
|
|
1. The multiplexed version of the server, client can open the compressed transmission, the parameter is --c.
|
|
|
1. server, client either open compression, or not open, can not open only one.
|
|
|
|
|
|
The following tutorial uses the "multiplexed version" as an example to illustrate how to use it.
|
|
|
The intranet penetration consists of three parts: client, server, and bridge; client and server actively connect to the bridge for bridging.
|
|
|
|
|
|
### 4.2 TCP common usage
|
|
|
Background:
|
|
|
- Company Machine A provides web service port 80
|
|
|
- There is a VPS, public network IP: 22.22.22.22
|
|
|
|
|
|
Demand:
|
|
|
At home, you can access the port 80 of company machine A by accessing port 28080 of the VPS.
|
|
|
|
|
|
Steps:
|
|
|
Execute on vps
|
|
|
`proxy bridge -p ":33080" -C proxy.crt -K proxy.key`
|
|
|
`proxy server -r ":28080@:80" -P "127.0.0.1:33080" -C proxy.crt -K proxy.key`
|
|
|
|
|
|
1. Execute on company machine A
|
|
|
`proxy client -P "22.22.22.22:33080" -C proxy.crt -K proxy.key`
|
|
|
|
|
|
Complete
|
|
|
|
|
|
### 4.3 WeChat interface local development
|
|
|
Background:
|
|
|
- Your own notebook provides nginx service port 80
|
|
|
- There is a VPS, public network IP: 22.22.22.22
|
|
|
|
|
|
Demand:
|
|
|
Fill in the address in the webpage callback interface configuration of WeChat's development account: http://22.22.22.22/calback.php
|
|
|
Then you can access the calback.php under the 80 port of the notebook. If you need to bind the domain name, you can use your own domain name.
|
|
|
For example: wx-dev.xxx.com resolves to 22.22.22.22, and then in your own notebook nginx
|
|
|
Configure the domain name wx-dev.xxx.com to the specific directory.
|
|
|
|
|
|
|
|
|
Steps:
|
|
|
1. Execute on vps to ensure that port 80 of vps is not occupied by other programs.
|
|
|
`proxy bridge -p ":33080" -C proxy.crt -K proxy.key`
|
|
|
`proxy server -r ":80@:80" -P "22.22.22.22:33080" -C proxy.crt -K proxy.key`
|
|
|
|
|
|
1. Execute on your laptop
|
|
|
`proxy client -P "22.22.22.22:33080" -C proxy.crt -K proxy.key`
|
|
|
|
|
|
Complete
|
|
|
|
|
|
### 4.4 UDP common usage
|
|
|
Background:
|
|
|
- Company Machine A provides DNS resolution service, UDP: port 53
|
|
|
- There is a VPS, public network IP: 22.22.22.22
|
|
|
|
|
|
Demand:
|
|
|
At home, you can use the company machine A to perform domain name resolution services by setting the local dns to 22.22.22.22.
|
|
|
|
|
|
Steps:
|
|
|
Execute on vps
|
|
|
`proxy bridge -p ":33080" -C proxy.crt -K proxy.key`
|
|
|
`proxy server --udp -r ":53@:53" -P "127.0.0.1:33080" -C proxy.crt -K proxy.key`
|
|
|
|
|
|
1. Execute on company machine A
|
|
|
`proxy client -P "22.22.22.22:33080" -C proxy.crt -K proxy.key`
|
|
|
|
|
|
Complete
|
|
|
|
|
|
### 4.5 advanced usage one
|
|
|
Background:
|
|
|
- Company Machine A provides web service port 80
|
|
|
- There is a VPS, public network IP: 22.22.22.22
|
|
|
|
|
|
Demand:
|
|
|
In order to be safe, I don't want to have access to the company machine A on the VPS, and I can access the port 28080 of the machine at home.
|
|
|
Access to port 80 of company machine A via an encrypted tunnel.
|
|
|
|
|
|
Steps:
|
|
|
Execute on vps
|
|
|
`proxy bridge -p ":33080" -C proxy.crt -K proxy.key`
|
|
|
|
|
|
1. Execute on company machine A
|
|
|
`proxy client -P "22.22.22.22:33080" -C proxy.crt -K proxy.key`
|
|
|
|
|
|
1. Execute on your home computer
|
|
|
`proxy server -r ":28080@:80" -P "22.22.22.22:33080" -C proxy.crt -K proxy.key`
|
|
|
|
|
|
Complete
|
|
|
|
|
|
### 4.6 Advanced Usage II
|
|
|
Tip:
|
|
|
If multiple clients are connected to the same bridge at the same time, you need to specify a different key, which can be set by the --k parameter, and --k can be any unique string.
|
|
|
Just be the only one on the same bridge.
|
|
|
When the server is connected to the bridge, if there are multiple clients connecting to the same bridge at the same time, you need to use the --k parameter to select the client.
|
|
|
Expose multiple ports by repeating the -r parameter. The format of -r is: "local IP: local port @clientHOST:client port".
|
|
|
|
|
|
Background:
|
|
|
- Company Machine A provides web service port 80, ftp service port 21
|
|
|
- There is a VPS, public network IP: 22.22.22.22
|
|
|
|
|
|
Demand:
|
|
|
At home, you can access the port 80 of company machine A by accessing port 28080 of the VPS.
|
|
|
At home, I can access the 21 port of company machine A by accessing port 29090 of the VPS.
|
|
|
|
|
|
Steps:
|
|
|
Execute on vps
|
|
|
`proxy bridge -p ":33080" -C proxy.crt -K proxy.key`
|
|
|
`proxy server -r ":28080@:80" -r ":29090@:21" --k test -P "127.0.0.1:33080" -C proxy.crt -K proxy.key`
|
|
|
|
|
|
1. Execute on company machine A
|
|
|
`proxy client --k test -P "22.22.22.22:33080" -C proxy.crt -K proxy.key`
|
|
|
|
|
|
Complete
|
|
|
|
|
|
### 4.7.server -r parameter
|
|
|
The full format of -r is: `PROTOCOL://LOCAL_IP:LOCAL_PORT@[CLIENT_KEY]CLIENT_LOCAL_HOST:CLIENT_LOCAL_PORT`
|
|
|
|
|
|
4.7.1. Protocol PROTOCOL: tcp or udp.
|
|
|
For example: `-r "udp://:10053@:53" -r "tcp://:10800@:1080" -r ":8080@:80"`
|
|
|
If the --udp parameter is specified, PROTOCOL defaults to udp, then:`-r ":8080@:80"` defaults to udp;
|
|
|
If the --udp parameter is not specified, PROTOCOL defaults to tcp, then: `-r ":8080@:80"` defaults to tcp;
|
|
|
|
|
|
4.7.2. CLIENT_KEY: The default is default.
|
|
|
For example: -r "udp://:10053@[test1]:53" -r "tcp://:10800@[test2]:1080" -r ":8080@:80"
|
|
|
If the --k parameter is specified, such as --k test, then: `-r ":8080@:80"`CLIENT_KEY defaults to test;
|
|
|
If the --k parameter is not specified, then: `-r ":8080@:80"`CLIENT_KEY defaults to default;
|
|
|
|
|
|
4.7.3. LOCAL_IP is empty. The default is: `0.0.0.0`, CLIENT_LOCAL_HOST is empty. The default is: `127.0.0.1`;
|
|
|
|
|
|
### 4.8.server and client connect bridge through proxy
|
|
|
Sometimes the network where the server or client is located cannot directly access the external network. You need to use an https or socks5 proxy to access the Internet. Then this time
|
|
|
The -J parameter can help you to connect the server or client to the bridge via https or socks5.
|
|
|
The -J parameter format is as follows:
|
|
|
|
|
|
Https proxy writing:
|
|
|
The proxy needs authentication, username: username password: password
|
|
|
Https://username:password@host:port
|
|
|
Agent does not require authentication
|
|
|
Https://host:port
|
|
|
|
|
|
Socks5 proxy writing:
|
|
|
The proxy needs authentication, username: username password: password
|
|
|
Socks5://username:password@host:port
|
|
|
Agent does not require authentication
|
|
|
Socks5://host:port
|
|
|
|
|
|
Host: the IP or domain name of the proxy
|
|
|
Port: the port of the proxy
|
|
|
|
|
|
### 4.9. Expose HTTP service
|
|
|
|
|
|
Usually the HTTP request client will use the server's ip and port to set the HOST field, but it is not the same as the expected backend actual HOST, which causes tcp to be passed.However, the backend relies on the HOST field to locate the virtual host and it will not work. Now use the `--http-host` parameter to force the HOST field value of the http header to be the actual value of the backend.Domain names and ports can be easily solved. After using the `--http-host` parameter, two headers will be added to the header of each HTTP request. The `X-Forwarded-For` and `X-Real-IP` values are the client IP, so the backend http service can easily obtain the real IP address of the client.
|
|
|
|
|
|
The format of the `server`-http-host parameter is as follows:
|
|
|
|
|
|
`--http-host www.test.com:80@2200`, if the server listens to multiple ports, just repeat the `--http-host` parameter to set the HOST for each port.
|
|
|
|
|
|
Example:
|
|
|
|
|
|
For example, the client local nginx, 127.0.0.1:80 provides a web service, which is bound to a domain name `local.com`.
|
|
|
|
|
|
Then the server startup parameters can be as follows:
|
|
|
|
|
|
`proxy server -P :30000 -r :2500@127.0.0.1:80 --http-host local.com@2500`
|
|
|
|
|
|
Explanation:
|
|
|
|
|
|
`-r :2500@127.0.0.1:80` and `--http-host local.com:80@2500` The 2500 port is the port that the server listens locally.
|
|
|
|
|
|
When the http protocol is used to request the ip:2500 port of the server, the header HOST field of http will be set to `local.com`.
|
|
|
|
|
|
### 4.10 About traffic statistics
|
|
|
If you start a server docking peer separately, it is the proxy-admin control panel. You need to create a new mapping in the upper-level control panel to obtain the ID of the mapping rule.
|
|
|
|
|
|
Then start the server and add the parameter --server-id=the ID of the mapping rule to count the traffic.
|
|
|
|
|
|
### 4.11 About p2p
|
|
|
Intranet penetration support When the server and client network conditions are met, the server and client are directly connected through p2p. The opening method is:
|
|
|
|
|
|
When starting the bridge, server, client, add the `--p2p` parameter. The server's -r parameter can be used to enable p2p (ptcp and pudp) for the port.
|
|
|
|
|
|
If the p2p hole fails between the server and the client, the bridge transfer data is automatically switched.
|
|
|
|
|
|
### 4.12 Client key whitelist
|
|
|
The intranet penetrating bridge can set the client key whitelist. The parameter is --client-keys. The format can be:
|
|
|
|
|
|
a. File name, file content One client key can only contain the alphanumeric underscore, which is the value of the client startup parameter --k. Only the client key can connect to the whitelist client. The line starting with # is a comment.
|
|
|
|
|
|
b. The base64 encoding at the beginning of "base64://" is the content of the file described in a above, for example: base64://ajfpoajsdfa=
|
|
|
|
|
|
c. "str://" multiple keywords separated by a comma at the beginning, such as: str://default,company,school
|
|
|
|
|
|
The default is empty, allowing all keys.
|
|
|
|
|
|
### 4.13 Network NAT Type Judgment
|
|
|
|
|
|
Senat type judgment, easy to check whether the network supports p2p, you can execute: `proxy tools -a nattype`
|
|
|
|
|
|
### 4.14 Help
|
|
|
`proxy help bridge`
|
|
|
`proxy help server`
|
|
|
`proxy help client`
|
|
|
|
|
|
## 5.SOCKS5 Proxies
|
|
|
prompt:
|
|
|
|
|
|
SOCKS5 proxy, support CONNECT, UDP protocol, does not support BIND, supports username and password authentication.
|
|
|
|
|
|
***The udp function of socks5 is turned off by default, and can be turned on by `--udp`. The default is a random port for handshake, and performance can be improved by fixing a port.
|
|
|
Set by parameter `--udp-port 0`, `0` represents a free port is randomly selected, or you can manually specify a specific port. ***
|
|
|
|
|
|
### 5.1. Ordinary SOCKS5 Agent
|
|
|
`proxy socks -t tcp -p "0.0.0.0:38080"`
|
|
|
|
|
|
Listen port argument `-p` can be:
|
|
|
|
|
|
```text
|
|
|
-p ":8081" listen on 8081
|
|
|
-p ":8081,:8082" listen on 8081 and 8082
|
|
|
-p ":8081,:8082,:9000-9999" listen on 8081 and 8082 and 9000 and 9001 to 9999, 1002 total ports
|
|
|
```
|
|
|
|
|
|
### 5.2. Ordinary secondary SOCKS5 agent
|
|
|
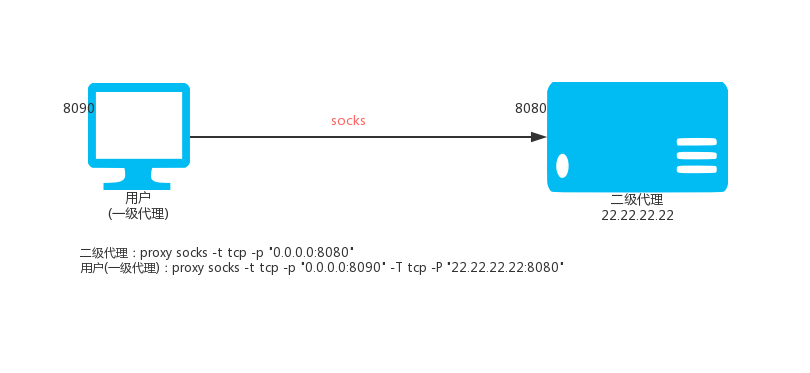
|
|
|
Use local port 8090, assuming the upstream SOCKS5 proxy is `22.22.22.22:8080`
|
|
|
`proxy socks -t tcp -p "0.0.0.0:8090" -T tcp -P "22.22.22.22:8080" `
|
|
|
We can also specify the black and white list file of the website domain name, one domain name and one domain name, the matching rule is the rightmost match, for example: baidu.com, the match is *.*.baidu.com, the blacklist domain name domain name goes directly to the upstream agent, white The domain name of the list does not go to the upstream agent; if the domain name is in the blacklist and in the whitelist, the blacklist works.
|
|
|
`proxy socks -p "0.0.0.0:8090" -T tcp -P "22.22.22.22:8080" -b blocked.txt -d direct.txt`
|
|
|
|
|
|
### 5.3. SOCKS Level 2 Agent (Encryption)
|
|
|

|
|
|
Level 1 SOCKS proxy (VPS, IP: 22.22.22.22)
|
|
|
`proxy socks -t tls -p ":38080" -C proxy.crt -K proxy.key`
|
|
|
|
|
|
Secondary SOCKS proxy (local Linux)
|
|
|
`proxy socks -t tcp -p ":8080" -T tls -P "22.22.22.22:38080" -C proxy.crt -K proxy.key`
|
|
|
Then access the local port 8080 is to access the proxy port 38080 on the VPS.
|
|
|
|
|
|
Secondary SOCKS proxy (local windows)
|
|
|
`proxy.exe socks -t tcp -p ":8080" -T tls -P "22.22.22.22:38080" -C proxy.crt -K proxy.key`
|
|
|
Then set your windos system, the proxy that needs to go through the proxy Internet program is the socks5 mode, the address is: 127.0.0.1, the port is: 8080, the program can access the Internet through vps through the encrypted channel.
|
|
|
|
|
|
### 5.4. SOCKS Level 3 Agent (Encryption)
|
|
|
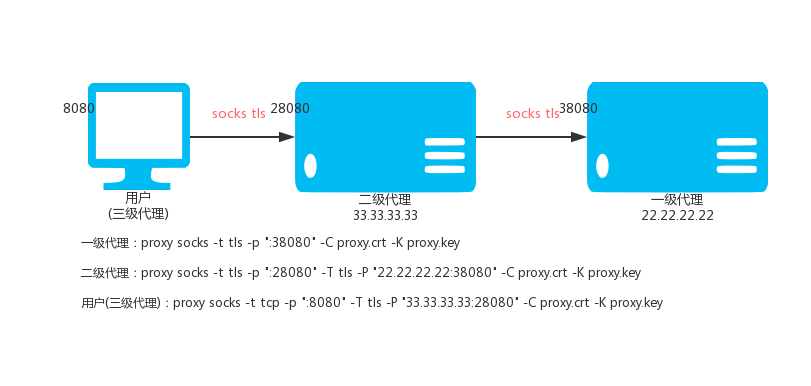
|
|
|
Level 1 SOCKS proxy VPS_01, IP: 22.22.22.22
|
|
|
`proxy socks -t tls -p ":38080" -C proxy.crt -K proxy.key`
|
|
|
Secondary SOCKS proxy VPS_02, IP: 33.33.33.33
|
|
|
`proxy socks -t tls -p ":28080" -T tls -P "22.22.22.22:38080" -C proxy.crt -K proxy.key`
|
|
|
Level 3 SOCKS proxy (local)
|
|
|
`proxy socks -t tcp -p ":8080" -T tls -P "33.33.33.33:28080" -C proxy.crt -K proxy.key`
|
|
|
Then accessing the local port 8080 is to access the proxy port 38080 on the first-level SOCKS proxy.
|
|
|
|
|
|
### 5.5. SOCKS proxy traffic is forced to go to the upper level SOCKS proxy
|
|
|
By default, the proxy will intelligently determine whether a website domain name is inaccessible. If it is not accessible, it will go to the upstream SOCKS proxy. With --always, all SOCKS proxy traffic can be forced to go to the upper SOCKS proxy.
|
|
|
`proxy socks --always -t tls -p ":28080" -T tls -P "22.22.22.22:38080" -C proxy.crt -K proxy.key`
|
|
|
|
|
|
### 5.6. SOCKS via SSH relay
|
|
|
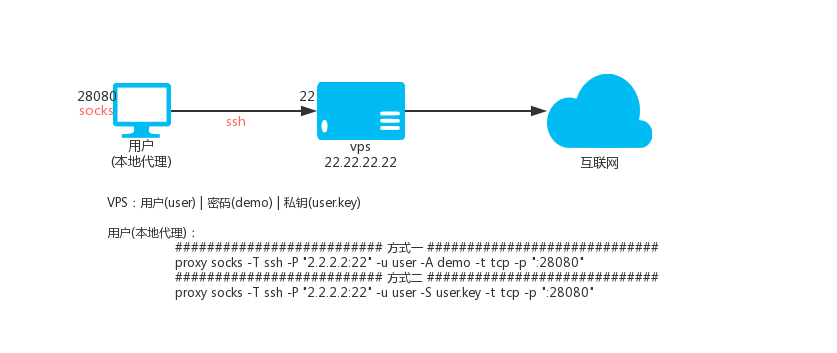
|
|
|
Description: The principle of ssh transfer is to use the forwarding function of ssh, that is, after you connect to ssh, you can access the target address through ssh proxy.
|
|
|
Suppose there is: vps
|
|
|
- IP is 2.2.2.2, ssh port is 22, ssh username is: user, ssh user password is: demo
|
|
|
- The user's ssh private key name is user.key
|
|
|
|
|
|
#### *5.6.1 How to ssh username and password*
|
|
|
Local SOCKS5 proxy port 28080, execute:
|
|
|
`proxy socks -T ssh -P "2.2.2.2:22" -u user -D demo -t tcp -p ":28080"`
|
|
|
#### *5.6.2 How to ssh username and key*
|
|
|
Local SOCKS5 proxy port 28080, execute:
|
|
|
`proxy socks -T ssh -P "2.2.2.2:22" -u user -S user.key -t tcp -p ":28080"`
|
|
|
|
|
|
Then access the local port 28080 is to access the target address through the VPS.
|
|
|
|
|
|
### 5.7. Certification
|
|
|
For the socks5 proxy protocol, we can perform username and password authentication. The authenticated username and password can be specified on the command line.
|
|
|
`proxy socks -t tcp -p ":33080" -a "user1:pass1" -a "user2:pass2"`
|
|
|
For multiple users, repeat the -a parameter.
|
|
|
It can also be placed in a file in the format of a "username:password" and then specified with -F.
|
|
|
`proxy socks -t tcp -p ":33080" -F auth-file.txt`
|
|
|
|
|
|
In addition, the socks5 agent also integrates external HTTP API authentication. We can specify an http url interface address with the --auth-url parameter.
|
|
|
Then when there is a user connection, the proxy will request the url in GET mode, with the following three parameters. If the HTTP status code 204 is returned, the authentication is successful.
|
|
|
In other cases, the authentication failed.
|
|
|
For example:
|
|
|
`proxy socks -t tcp -p ":33080" --auth-url "http://test.com/auth.php"`
|
|
|
When the user connects, the proxy will request the url ("http://test.com/auth.php") in GET mode.
|
|
|
Bring four parameters: user, pass, ip, local_ip:
|
|
|
Http://test.com/auth.php?user={USER}&pass={PASS}&ip={IP}&local_ip={LOCAL_IP}
|
|
|
User: username
|
|
|
Pass: password
|
|
|
Ip: User's IP, for example: 192.168.1.200
|
|
|
Local_ip: IP of the server accessed by the user, for example: 3.3.3.3
|
|
|
|
|
|
If there is no -a or -F or --auth-url parameter, the authentication is turned off.
|
|
|
|
|
|
### 5.8.KCP protocol transmission
|
|
|
The KCP protocol requires the --kcp-key parameter to set a password for encrypting and decrypting data.
|
|
|
|
|
|
Level 1 HTTP proxy (VPS, IP: 22.22.22.22)
|
|
|
`proxy socks -t kcp -p ":38080" --kcp-key mypassword`
|
|
|
|
|
|
Secondary HTTP proxy (local Linux)
|
|
|
`proxy socks -t tcp -p ":8080" -T kcp -P "22.22.22.22:38080" --kcp-key mypassword`
|
|
|
Then access the local port 8080 is to access the proxy port 38080 on the VPS, the data is transmitted through the kcp protocol.
|
|
|
|
|
|
### 5.9. Custom DNS
|
|
|
--dns-address and --dns-ttl parameters, used to specify the dns (--dns-address) used by the proxy to access the domain name.
|
|
|
And the analysis result cache time (--dns-ttl) seconds, to avoid system dns interference to the proxy, in addition to the cache function can also reduce the dns resolution time to improve access speed.
|
|
|
For example:
|
|
|
`proxy socks -p ":33080" --dns-address "8.8.8.8:53" --dns-ttl 300`
|
|
|
|
|
|
You can also use the parameter `--dns-interface` to specify the bandwidth used for dns resolution,
|
|
|
for example: `--dns-interface eth0`, dns resolution will use the eth0 bandwidth, this parameter must be set to `--dns-address` to be effective.
|
|
|
|
|
|
### 5.10 Custom Encryption
|
|
|
The proxy's socks proxy can encrypt tcp data through tls standard encryption and kcp protocol on top of tcp. In addition, it supports custom encryption after tls and kcp, which means that custom encryption and tls|kcp can be used together. The internal use of AES256 encryption, you only need to define a password when you use it.
|
|
|
Encryption is divided into two parts, one is whether the local (-z) encryption and decryption, and the other is whether the transmission with the upstream (-Z) is encrypted or decrypted.
|
|
|
|
|
|
Custom encryption requires both sides to be proxy.
|
|
|
|
|
|
The following two levels, three levels for example:
|
|
|
|
|
|
Secondary instance
|
|
|
Execute on level 1 vps (ip: 2.2.2.2):
|
|
|
`proxy socks -t tcp -z demo_password -p :7777`
|
|
|
Local secondary execution:
|
|
|
`proxy socks -T tcp -P 2.2.2.2:777 -Z demo_password -t tcp -p :8080`
|
|
|
In this way, when the website is accessed through the local agent 8080, the target website is accessed through encrypted transmission with the upstream.
|
|
|
|
|
|
|
|
|
Three-level instance
|
|
|
Execute on level 1 vps (ip: 2.2.2.2):
|
|
|
`proxy socks -t tcp -z demo_password -p :7777`
|
|
|
Execute on the secondary vps (ip: 3.3.3.3):
|
|
|
`proxy socks -T tcp -P 2.2.2.2:7777 -Z demo_password -t tcp -z other_password -p :8888`
|
|
|
Local three-level execution:
|
|
|
`proxy socks -T tcp -P 3.3.3.3:8888 -Z other_password -t tcp -p :8080`
|
|
|
In this way, when the website is accessed through the local agent 8080, the target website is accessed through encrypted transmission with the upstream.
|
|
|
|
|
|
### 5.11 Compressed transmission
|
|
|
The proxy's socks proxy can encrypt tcp data through custom encryption and tls standard encryption and kcp protocol on top of tcp. It can also be used before custom encryption.
|
|
|
Compress the data, that is, the compression function and the custom encryption and tls|kcp can be used in combination, and the compression is divided into two parts.
|
|
|
Part of it is local (-m) compression transmission, and part is whether the transmission with the upstream (-M) is compressed.
|
|
|
|
|
|
Compression requires both sides to be proxy, and compression also protects (encrypts) data to some extent.
|
|
|
|
|
|
The following two levels, three levels for example:
|
|
|
|
|
|
Secondary instance
|
|
|
|
|
|
Execute on level 1 vps (ip: 2.2.2.2):
|
|
|
`proxy socks -t tcp -m -p :7777`
|
|
|
Local secondary execution:
|
|
|
`proxy socks -T tcp -P 2.2.2.2:777 -M -t tcp -p :8080`
|
|
|
In this way, when the website is accessed through the local agent 8080, the target website is accessed through compression with the upstream.
|
|
|
|
|
|
|
|
|
Three-level instance
|
|
|
|
|
|
Execute on level 1 vps (ip: 2.2.2.2):
|
|
|
`proxy socks -t tcp -m -p :7777`
|
|
|
Execute on the secondary vps (ip: 3.3.3.3):
|
|
|
`proxy socks -T tcp -P 2.2.2.2:7777 -M -t tcp -m -p :8888`
|
|
|
Local three-level execution:
|
|
|
`proxy socks -T tcp -P 3.3.3.3:8888 -M -t tcp -p :8080`
|
|
|
In this way, when the website is accessed through the local agent 8080, the target website is accessed through compression with the upstream.
|
|
|
|
|
|
|
|
|
### 5.12 Load Balancing
|
|
|
|
|
|
The SOCKS proxy supports the upper-level load balancing, and multiple upstream repeat-P parameters can be used.
|
|
|
|
|
|
`proxy socks --lb-method=hash -T tcp -P 1.1.1.1:33080 -P 2.1.1.1:33080 -P 3.1.1.1:33080 -p :33080 -t tcp`
|
|
|
|
|
|
### 5.12.1 Setting the retry interval and timeout time
|
|
|
|
|
|
`proxy socks --lb-method=leastconn --lb-retrytime 300 --lb-timeout 300 -T tcp -P 1.1.1.1:33080 -P 2.1.1.1:33080 -P 3.1.1.1:33080 -p :33080 -t tcp`
|
|
|
|
|
|
### 5.12.2 Setting weights
|
|
|
|
|
|
`proxy socks --lb-method=weight -T tcp -P 1.1.1.1:33080?w=1 -P 2.1.1.1:33080?w=2 -P 3.1.1.1:33080?w=1 -p :33080 -t tcp`
|
|
|
|
|
|
### 5.12.3 Use the target address to select the upstream
|
|
|
|
|
|
`proxy socks --lb-hashtarget --lb-method=hash -T tcp -P 1.1.1.1:33080 -P 2.1.1.1:33080 -P 3.1.1.1:33080 -p :33080 -t tcp`
|
|
|
|
|
|
### 5.13 Speed limit
|
|
|
|
|
|
The speed limit is 100K, which can be specified by the `-l` parameter, for example: 100K 2000K 1M . 0 means no limit.
|
|
|
|
|
|
`proxy socks -t tcp -p 2.2.2.2:33080 -l 100K`
|
|
|
|
|
|
### 5.14 Specifying Outgoing IP
|
|
|
|
|
|
The `--bind-listen` parameter can be used to open the client connection with the portal IP, and use the portal IP as the outgoing IP to access the target website. If the ingress IP is an intranet IP, the egress IP does not use the ingress IP.
|
|
|
|
|
|
`proxy socks -t tcp -p 2.2.2.2:33080 --bind-listen`
|
|
|
|
|
|
#### Flexible Outgoing IP
|
|
|
|
|
|
Although the above `--bind-listen` parameter can specify the outgoing IP, the `entry IP` and ` outgoing IP` cannot be interfered by humans. If you want the ingress IP to be different from the egress IP, you can use the `--bind-ip` parameter, format: `IP:port`, for example: `1.1.1.1:8080`
|
|
|
, `[2000:0:0:0:0:0:0:1]:8080`. For multiple binding requirements, you can repeat the `--bind-ip` parameter.
|
|
|
|
|
|
For example, the machine has IP `5.5.5.5`, `6.6.6.6`, and monitors two ports `8888` and `7777`, the command is as follows:
|
|
|
|
|
|
`proxy socks -t tcp -p :8888,:7777 --bind-ip 5.5.5.5:7777 --bind-ip 6.6.6.6:8888`
|
|
|
|
|
|
Then the client access port `7777`, the outgoing IP is `5.5.5.5`, access port `8888`, the outgoing IP is `6.6.6.6`, if both `--bind-ip` and `--bind- are set at the same time listen`,`--bind-ip` has higher priority.
|
|
|
|
|
|
In addition, the `IP` part of the `--bind-ip` parameter supports specifying the `network interface name`, `wildcards`, and more than one. The details are as follows:
|
|
|
|
|
|
- Specify the network interface name, such as: `--bind-ip eth0:7777`, then the client accesses the `7777` port, and the egress IP is the IP of the eth0 network interface.
|
|
|
- The network interface name supports wildcards, for example: `--bind-ip eth0.*:7777`, then the client accesses
|
|
|
the `7777` port, and the egress IP is a randomly selected one of the network interface IPs starting with `eth0.`.
|
|
|
- IP supports wildcards, such as: `--bind-ip 192.168.?.*:7777`, then the client accesses the `7777` port, and the
|
|
|
outgoing IP is all the IPs of the machine, matching the IP of `192.168.?.*` A randomly selected one.
|
|
|
- It can also be multiple combinations of network interface name and IP, separated by half-width commas, such
|
|
|
as: `--bind-ip pppoe??,192.168.?.*:7777`, then the client accesses the port `7777`, The outgoing IP is the machine's
|
|
|
network interface name matching `pppoe??`
|
|
|
It is a randomly selected one among all IPs of the machine that matches `192.168.?.*`.
|
|
|
- The wildcard character `*` represents 0 to any number of characters, and `?` represents 1 character.
|
|
|
- If the IP of the network interface changes, it will take effect in real time.
|
|
|
- You can use the `--bind-refresh` parameter to specify the interval to refresh the local network interface information, the default is `5`, the unit is second.
|
|
|
|
|
|
### 5.15 Cascade Certification
|
|
|
|
|
|
SOCKS5 supports cascading authentication, and -A can set upstream authentication information.
|
|
|
|
|
|
upstream:
|
|
|
|
|
|
`proxy socks -t tcp -p 2.2.2.2:33080 -a user:pass`
|
|
|
|
|
|
local:
|
|
|
|
|
|
`proxy socks -T tcp -P 2.2.2.2:33080 -A user:pass -t tcp -p :33080`
|
|
|
|
|
|
### 5.16 Certificate parameters use base64 data
|
|
|
|
|
|
By default, the -C, -K parameter is the path to the crt certificate and the key file.
|
|
|
|
|
|
If it is the beginning of base64://, then the latter data is considered to be base64 encoded and will be used after decoding.
|
|
|
|
|
|
|
|
|
### 5.17 Intelligent mode
|
|
|
Intelligent mode setting, can be one of intelligent|direct|parent.
|
|
|
The default is: parent.
|
|
|
The meaning of each value is as follows:
|
|
|
`--intelligent=direct`, the targets in the blocked are not directly connected.
|
|
|
`--intelligent=parent`, the target that is not in the direct is going to the higher level.
|
|
|
`--intelligent=intelligent`, blocked and direct have no targets, intelligently determine whether to use the upstream
|
|
|
access target.
|
|
|
|
|
|
### 5.18 Fixed UDP PORT
|
|
|
|
|
|
By default, the port number of the UDP function of socks5, the proxy is installed in the `rfc1982 draft` request, which
|
|
|
is randomly specified during the protocol handshake process and does not need to be specified in advance.
|
|
|
|
|
|
However, in some cases, you need to fix the UDP function port. You can use the parameter `--udp-port port number` to fix
|
|
|
the port number of the UDP function. For example:
|
|
|
|
|
|
`proxy socks -t tcp -p "0.0.0.0:38080" --udp-port 38080`
|
|
|
|
|
|
### 5.19 UDP Compatibility Mode
|
|
|
|
|
|
By default, the UDP functionality of the SOCKS5 proxy in the proxy operates in accordance with the SOCKS5 RFC 1928
|
|
|
specification. However, there are certain SOCKS5 clients that do not adhere to the specified rules. To ensure
|
|
|
compatibility with such clients, the `--udp-compat` parameter can be added to activate the compatibility mode for SOCKS5
|
|
|
UDP functionality.
|
|
|
|
|
|
Additionally, the `-udp-gc` parameter can be utilized to set the maximum idle time for UDP. When this time threshold is
|
|
|
exceeded, UDP connections will be released.
|
|
|
|
|
|
### 5.20 Help
|
|
|
|
|
|
`proxy help socks`
|
|
|
|
|
|
## 6.SPS Protocol Convert
|
|
|
|
|
|
### 6.1 Function introduction
|
|
|
|
|
|
The proxy protocol conversion uses the sps subcommand. The sps itself does not provide the proxy function. It only
|
|
|
accepts the proxy request to "convert and forward" to the existing http(s) proxy or the socks5 proxy or ss proxy; the
|
|
|
sps can put the existing http(s) proxy or socks5 proxy or ss proxy is converted to a port that supports both http(s) and
|
|
|
socks5 and ss proxies, and the http(s) proxy supports forward proxy and reverse proxy (SNI), converted SOCKS5 proxy, UDP
|
|
|
function is still supported when the upper level is SOCKS5 or SS; in addition, for the existing http(s) proxy or socks5
|
|
|
proxy, three modes of tls, tcp, and kcp are supported, and chain connection is supported, that is, multiple sps node
|
|
|
levels can be supported. The connection builds an encrypted channel.
|
|
|
|
|
|
The encryption methods supported by the `ss` function are: aes-128-cfb, aes-128-ctr, aes-128-gcm, aes-192-cfb,
|
|
|
aes-192-ctr, aes-192-gcm, aes-256- Cfb , aes-256-ctr , aes-256-gcm , bf-cfb , cast5-cfb , chacha20 , chacha20-ietf ,
|
|
|
chacha20-ietf-poly1305 , des-cfb , rc4-md5 , rc4-md5-6 , salsa20 , Xchacha20
|
|
|
|
|
|
Listen port argument `-p` can be:
|
|
|
|
|
|
```text
|
|
|
-p ":8081" listen on 8081
|
|
|
-p ":8081,:8082" listen on 8081 and 8082
|
|
|
-p ":8081,:8082,:9000-9999" listen on 8081 and 8082 and 9000 and 9001 to 9999, 1002 total ports
|
|
|
```
|
|
|
|
|
|
The udp function of ss is turned off by default and can be turned on by `--ssudp`. The udp function of socks5 is turned off by default and can be turned on by `--udp`, The default is a random port for handshake, and performance can be improved by fixing a port.
|
|
|
Set by parameter `--udp-port 0`, `0` represents a free port is randomly selected, or you can manually specify a specific port.
|
|
|
|
|
|
### 6.2 HTTP(S) to HTTP(S)+SOCKS5+SS
|
|
|
Suppose there is already a normal http(s) proxy: 127.0.0.1:8080. Now we turn it into a common proxy that supports both http(s) and socks5 and ss. The converted local port is 18080, ss encryption: Aes-192-cfb, ss password: pass.
|
|
|
The command is as follows:
|
|
|
`proxy sps -S http -T tcp -P 127.0.0.1:8080 -t tcp -p :18080 -h aes-192-cfb -j pass`
|
|
|
|
|
|
Suppose there is already a tls http(s) proxy: 127.0.0.1:8080. Now we turn it into a normal proxy that supports both http(s) and socks5 and ss. The converted local port is 18080, and tls requires a certificate file. , ss encryption: aes-192-cfb, ss password: pass.
|
|
|
The command is as follows:
|
|
|
`proxy sps -S http -T tls -P 127.0.0.1:8080 -t tcp -p :18080 -C proxy.crt -K proxy.key -h aes-192-cfb -j pass`
|
|
|
|
|
|
Suppose there is already a kcp http(s) proxy (password is: demo123): 127.0.0.1:8080, now we turn it into a normal proxy that supports both http(s) and socks5 and ss. The converted local port is 18080, ss encryption: aes-192-cfb, ss password: pass.
|
|
|
The command is as follows:
|
|
|
`proxy sps -S http -T kcp -P 127.0.0.1:8080 -t tcp -p :18080 --kcp-key demo123 -h aes-192-cfb -j pass`
|
|
|
|
|
|
### 6.3 SOCKS5 to HTTP(S)+SOCKS5+SS
|
|
|
Suppose there is already a normal socks5 proxy: 127.0.0.1:8080, now we turn it into a common proxy that supports both http(s) and socks5 and ss. The converted local port is 18080, ss encryption: aes-192 -cfb, ss password: pass.
|
|
|
The command is as follows:
|
|
|
`proxy sps -S socks -T tcp -P 127.0.0.1:8080 -t tcp -p :18080 -h aes-192-cfb -j pass`
|
|
|
|
|
|
Suppose there is already a tls socks5 proxy: 127.0.0.1:8080, now we turn it into a common proxy that supports both http(s) and socks5 and ss. The converted local port is 18080, tls requires certificate file, ss encryption Mode: aes-192-cfb, ss password: pass.
|
|
|
The command is as follows:
|
|
|
`proxy sps -S socks -T tls -P 127.0.0.1:8080 -t tcp -p :18080 -C proxy.crt -K proxy.key -h aes-192-cfb -j pass`
|
|
|
|
|
|
Suppose there is already a kcp socks5 proxy (password: demo123): 127.0.0.1:8080, now we turn it into a common proxy that supports both http(s) and socks5 and ss. The converted local port is 18080, ss Encryption method: aes-192-cfb, ss password: pass.
|
|
|
The command is as follows:
|
|
|
`proxy sps -S socks -T kcp -P 127.0.0.1:8080 -t tcp -p :18080 --kcp-key demo123 -h aes-192-cfb -j pass`
|
|
|
|
|
|
### 6.4 SS to HTTP(S)+SOCKS5+SS
|
|
|
SPS upstream and local support ss protocol, the upstream can be SPS or standard ss service.
|
|
|
SPS locally provides HTTP(S)\SOCKS5\SPS three defaults. When the upstream is SOCKS5, the converted SOCKS5 and SS support UDP.
|
|
|
Suppose there is already a normal SS or SPS proxy (ss is enabled, encryption: aes-256-cfb, password: demo): 127.0.0.1:8080, now we turn it to support both http(s) and socks5 and The ordinary proxy of ss, the converted local port is 18080, the converted ss encryption mode: aes-192-cfb, ss password: pass.
|
|
|
The command is as follows:
|
|
|
`proxy sps -S ss -H aes-256-cfb -J pass -T tcp -P 127.0.0.1:8080 -t tcp -p :18080 -h aes-192-cfb -j pass`.
|
|
|
|
|
|
### 6.5 Chained connection
|
|
|

|
|
|
The above mentioned multiple sps nodes can be connected to build encrypted channels in a hierarchical connection, assuming the following vps and the home PC.
|
|
|
Vps01:2.2.2.2
|
|
|
Vps02:3.3.3.3
|
|
|
Now we want to use pc and vps01 and vps02 to build an encrypted channel. This example uses tls encryption or kcp. Accessing local 18080 port on the PC is to access the local 8080 port of vps01.
|
|
|
First on vps01 (2.2.2.2) we run a locally accessible http(s) proxy and execute:
|
|
|
`proxy http -t tcp -p 127.0.0.1:8080`
|
|
|
|
|
|
Then run a sps node on vps01 (2.2.2.2) and execute:
|
|
|
`proxy sps -S http -T tcp -P 127.0.0.1:8080 -t tls -p :8081 -C proxy.crt -K proxy.key`
|
|
|
|
|
|
Then run a sps node on vps02 (3.3.3.3) and execute:
|
|
|
`proxy sps -S http -T tls -P 2.2.2.2:8081 -t tls -p :8082 -C proxy.crt -K proxy.key`
|
|
|
|
|
|
Then run a sps node on the pc and execute:
|
|
|
`proxy sps -S http -T tls -P 3.3.3.3:8082 -t tcp -p :18080 -C proxy.crt -K proxy.key`
|
|
|
|
|
|
carry out.
|
|
|
|
|
|
### 6.6 Authentication
|
|
|
Sps supports http(s)\socks5 proxy authentication, which can be cascaded and has four important pieces of information:
|
|
|
1: The user sends the authentication information `user-auth`.
|
|
|
2: Set the local authentication information `local-auth`.
|
|
|
3: Set the connection authentication information 'parent-auth` used by the upstream.
|
|
|
4: The authentication information `auth-info-to-parent` that is finally sent to the upstream.
|
|
|
Their situation is as follows:
|
|
|
|
|
|
| User-auth | local-auth | parent-auth | auth-info-to-paren |
|
|
|
|-----------|------------|-------------|--------------------|
|
|
|
| Yes / No | Yes | Yes | From parent-auth |
|
|
|
| Yes / No | No | Yes | From parent-auth |
|
|
|
| Yes / No | Yes | No | No |
|
|
|
| No | No | No | No |
|
|
|
| Yes | No | No | From user-auth |
|
|
|
|
|
|
For the sps proxy we can perform username and password authentication. The authenticated username and password can be specified on the command line.
|
|
|
`proxy sps -S http -T tcp -P 127.0.0.1:8080 -t tcp -p ":33080" -a "user1:pass1:0:0:" -a "user2:pass2:0:0: "`
|
|
|
For multiple users, repeat the -a parameter.
|
|
|
Can also be placed in a file, the format is one line a `username: password: number of connections: rate: upstream`, and then specified with -F.
|
|
|
`proxy sps -S http -T tcp -P 127.0.0.1:8080 -t tcp -p ":33080" -F auth-file.txt`
|
|
|
|
|
|
If the upstream has authentication, the lower level can set the authentication information with the -A parameter, for example:
|
|
|
upstream: `proxy sps -S http -T tcp -P 127.0.0.1:8080 -t tcp -p ":33080" -a "user1:pass1:0:0:" -a "user2:pass2:0: 0:"`
|
|
|
Subordinate: `proxy sps -S http -T tcp -P 127.0.0.1:8080 -A "user1:pass1" -t tcp -p ":33080" `
|
|
|
|
|
|
For more details on certification, please refer to `9.API Certification` and `10.Local Certification`
|
|
|
|
|
|
### 6.7 Multiple Upstream
|
|
|
|
|
|
If there are multiple upstreams, they can be specified by multiple -Ps.
|
|
|
|
|
|
such as:
|
|
|
|
|
|
`proxy sps -P http://127.0.0.1:3100 -P socks5://127.0.0.1:3200`
|
|
|
|
|
|
The complete format of `-P` is as follows:
|
|
|
|
|
|
`protocol://a:b@2.2.2.2:33080#1`
|
|
|
|
|
|
Each section is explained below:
|
|
|
|
|
|
`protocol://` is the protocol type, possible types and contains the following:
|
|
|
|
|
|
```text
|
|
|
Http is equivalent to -S http -T tcp
|
|
|
Https is equivalent to -S http -T tls --parent-tls-single , which is http(s) proxy over TLS
|
|
|
Https2 is equivalent to -S http -T tls
|
|
|
Socks5 is equivalent to -S socks -T tcp
|
|
|
Socks5s is equivalent to -S socks -T tls --parent-tls-single , which is socks over TLS
|
|
|
Socks5s2 is equivalent to -S socks -T tls
|
|
|
Ss is equivalent to -S ss -T tcp
|
|
|
Httpws is equivalent to -S http -T ws
|
|
|
Httpwss is equivalent to -S http -T wss
|
|
|
Socks5ws is equivalent to -S socks -T ws
|
|
|
Socks5wss is equivalent to -S socks -T wss
|
|
|
```
|
|
|
|
|
|
`a:b` is the username and password of the proxy authentication. If it is ss, `a` is the encryption method, `b` is the password, and no username password can be left blank, for example: `http://2.2.2.2:33080` If the username and password are protected, special symbols can be encoded using urlencode.
|
|
|
|
|
|
`2.2.2.2:33080` is the upstream address, the format is: `IP (or domain name): port `, if the underlying is ws/wss protocol can also bring the path, such as: `2.2.2.2: 33080/ws`;
|
|
|
You can also set the `encryption method` and `password` of `ws\wss` by appending the query parameters `m` and `k`, for example: `2.2.2.2:33080/ws?m=aes-192-cfb&k=password`
|
|
|
|
|
|
`#1` When multiple upper-level load balancing is a weighting strategy, the weights are rarely used.
|
|
|
|
|
|
### 6.8 Custom Encryption
|
|
|
The proxy sps proxy can encrypt tcp data through tls standard encryption and kcp protocol on top of tcp, in addition to support after tls and kcp
|
|
|
Custom encryption, that is, custom encryption and tls|kcp can be used in combination, internally using AES256 encryption, only need to define it when using
|
|
|
A password can be used, the encryption is divided into two parts, one part is whether the local (-z) encryption and decryption, and the part is the encryption and decryption with the upstream (-Z) transmission.
|
|
|
|
|
|
Custom encryption requires both sides to be proxy.
|
|
|
|
|
|
The following two levels, three levels for example:
|
|
|
|
|
|
Suppose there is already an http(s) proxy: `6.6.6.6:6666`
|
|
|
|
|
|
Secondary instance
|
|
|
|
|
|
Execute on level 1 vps (ip: 2.2.2.2):
|
|
|
`proxy sps -S http -T tcp -P 6.6.6.6:6666 -t tcp -z demo_password -p :7777`
|
|
|
Local secondary execution:
|
|
|
`proxy sps -T tcp -P 2.2.2.2:777 -Z demo_password -t tcp -p :8080`
|
|
|
In this way, when the website is accessed through the local agent 8080, the target website is accessed through encrypted transmission with the upstream.
|
|
|
|
|
|
|
|
|
Three-level instance
|
|
|
|
|
|
Execute on level 1 vps (ip: 2.2.2.2):
|
|
|
`proxy sps -S http -T tcp -P 6.6.6.6:6666 -t tcp -z demo_password -p :7777`
|
|
|
Execute on the secondary vps (ip: 3.3.3.3):
|
|
|
`proxy sps -T tcp -P 2.2.2.2:7777 -Z demo_password -t tcp -z other_password -p :8888`
|
|
|
Local three-level execution:
|
|
|
`proxy sps -T tcp -P 3.3.3.3:8888 -Z other_password -t tcp -p :8080`
|
|
|
In this way, when the website is accessed through the local agent 8080, the target website is accessed through encrypted transmission with the upstream.
|
|
|
|
|
|
### 6.9 Compressed transmission
|
|
|
The proxy sps proxy can encrypt tcp data through custom encryption and tls standard encryption and kcp protocol on top of tcp. It can also be used before custom encryption.
|
|
|
Compress the data, that is, the compression function and the custom encryption and tls|kcp can be used in combination, and the compression is divided into two parts.
|
|
|
Part of it is local (-m) compression transmission, and part is whether the transmission with the upstream (-M) is compressed.
|
|
|
|
|
|
Compression requires both sides to be proxy, and compression also protects (encrypts) data to some extent.
|
|
|
|
|
|
The following two levels, three levels for example:
|
|
|
|
|
|
Secondary instance
|
|
|
|
|
|
Execute on level 1 vps (ip: 2.2.2.2):
|
|
|
`proxy sps -t tcp -m -p :7777`
|
|
|
Local secondary execution:
|
|
|
`proxy sps -T tcp -P 2.2.2.2:777 -M -t tcp -p :8080`
|
|
|
In this way, when the website is accessed through the local agent 8080, the target website is accessed through compression with the upstream.
|
|
|
|
|
|
|
|
|
Three-level instance
|
|
|
|
|
|
Execute on level 1 vps (ip: 2.2.2.2):
|
|
|
`proxy sps -t tcp -m -p :7777`
|
|
|
Execute on the secondary vps (ip: 3.3.3.3):
|
|
|
`proxy sps -T tcp -P 2.2.2.2:7777 -M -t tcp -m -p :8888`
|
|
|
Local three-level execution:
|
|
|
`proxy sps -T tcp -P 3.3.3.3:8888 -M -t tcp -p :8080`
|
|
|
In this way, when the website is accessed through the local agent 8080, the target website is accessed through compression with the upstream.
|
|
|
|
|
|
### 6.10 Disabling the protocol
|
|
|
By default, SPS supports http(s) and socks5 two proxy protocols. We can disable a protocol by parameter.
|
|
|
For example:
|
|
|
1. Disable the HTTP(S) proxy function to retain only the SOCKS5 proxy function, parameter: `--disable-http`.
|
|
|
`proxy sps -T tcp -P 3.3.3.3:8888 -M -t tcp -p :8080 --disable-http`
|
|
|
|
|
|
1. Disable the SOCKS5 proxy function to retain only the HTTP(S) proxy function, parameter: `--disable-socks`.
|
|
|
`proxy sps -T tcp -P 3.3.3.3:8888 -M -t tcp -p :8080 --disable-socks`
|
|
|
|
|
|
### 6.11 Speed limit
|
|
|
|
|
|
Suppose there is a SOCKS5 upstream:
|
|
|
|
|
|
`proxy socks -p 2.2.2.2:33080 -z password -t tcp`
|
|
|
|
|
|
SPS lower level, speed limit 100K
|
|
|
|
|
|
`proxy sps -S socks -P 2.2.2.2:33080 -T tcp -Z password -l 100K -t tcp -p :33080`
|
|
|
|
|
|
It can be specified by the `-l` parameter, for example: 100K 2000K 1M . 0 means no limit.
|
|
|
|
|
|
### 6.12 Specifying Outgoing IP
|
|
|
|
|
|
The `--bind-listen` parameter can be used to open the client connection with the portal IP, and use the portal IP as the outgoing IP to access the target website. If the ingress IP is an intranet IP, the egress IP does not use the ingress IP.
|
|
|
|
|
|
`proxy sps -S socks -P 2.2.2.2:33080 -T tcp -Z password -l 100K -t tcp --bind-listen -p :33080`
|
|
|
|
|
|
#### Flexible Outgoing IP
|
|
|
|
|
|
Although the above `--bind-listen` parameter can specify the outgoing IP, the `entry IP` and ` outgoing IP` cannot be interfered by humans. If you want the ingress IP to be different from the egress IP, you can use the `--bind-ip` parameter, format: `IP:port`, for example: `1.1.1.1:8080`
|
|
|
, `[2000:0:0:0:0:0:0:1]:8080`. For multiple binding requirements, you can repeat the `--bind-ip` parameter.
|
|
|
|
|
|
For example, the machine has IP `5.5.5.5`, `6.6.6.6`, and monitors two ports `8888` and `7777`, the command is as follows:
|
|
|
|
|
|
`proxy sps -t tcp -p :8888,:7777 --bind-ip 5.5.5.5:7777 --bind-ip 6.6.6.6:8888`
|
|
|
|
|
|
Then the client access port `7777`, the outgoing IP is `5.5.5.5`, access port `8888`, the outgoing IP is `6.6.6.6`, if both `--bind-ip` and `--bind- are set at the same time listen`,`--bind-ip` has higher priority.
|
|
|
|
|
|
In addition, the `IP` part of the `--bind-ip` parameter supports specifying the `network interface name`, `wildcards`, and more than one. The details are as follows:
|
|
|
|
|
|
- Specify the network interface name, such as: `--bind-ip eth0:7777`, then the client accesses the `7777` port, and the egress IP is the IP of the eth0 network interface.
|
|
|
- The network interface name supports wildcards, for example: `--bind-ip eth0.*:7777`, then the client accesses
|
|
|
the `7777` port, and the egress IP is a randomly selected one of the network interface IPs starting with `eth0.`.
|
|
|
- IP supports wildcards, such as: `--bind-ip 192.168.?.*:7777`, then the client accesses the `7777` port, and the
|
|
|
outgoing IP is all the IPs of the machine, matching the IP of `192.168.?.*` A randomly selected one.
|
|
|
- It can also be multiple combinations of network interface name and IP, separated by half-width commas, such
|
|
|
as: `--bind-ip pppoe??,192.168.?.*:7777`, then the client accesses the port `7777`, The outgoing IP is the machine's
|
|
|
network interface name matching `pppoe??`
|
|
|
It is a randomly selected one among all IPs of the machine that matches `192.168.?.*`.
|
|
|
- The wildcard character `*` represents 0 to any number of characters, and `?` represents 1 character.
|
|
|
- If the IP of the network interface changes, it will take effect in real time.
|
|
|
- You can use the `--bind-refresh` parameter to specify the interval to refresh the local network interface information, the default is `5`, the unit is second.
|
|
|
|
|
|
### 6.13 Certificate parameters use base64 data
|
|
|
|
|
|
By default, the -C, -K parameter is the path to the crt certificate and the key file.
|
|
|
|
|
|
If it is the beginning of base64://, then the latter data is considered to be base64 encoded and will be used after decoding.
|
|
|
|
|
|
### 6.14 Independent Service
|
|
|
A sps port can complete the full-featured proxy `http\socks\ss` function.
|
|
|
The following command is to open the http(s)\ss\socks service with one click, and enable the udp of socks5 and the udp of ss at the same time.
|
|
|
`proxy sps -p: 33080 --ssudp --udp --udp-port 0`
|
|
|
|
|
|
### 6.15 Target Redirection
|
|
|
The https(s)\socks5\ss proxy function provided by the sps function, the client connects to the specified "target" through the sps proxy. This "target" is generally a website or an arbitrary tcp address.
|
|
|
The website "target" is generally foo.com: 80, foo.com: 443, sps supports the use of the --rewrite parameter to specify a "target" redirection rule file, redirect the target, the client is non-perceived,
|
|
|
For example, if you redirect to "target": demo.com:80 to 192.168.0.12:80, then the client visits the website demo.com, in fact, the website service provided by 192.168.0.12.
|
|
|
Example of a "target" redirection rule file:
|
|
|
|
|
|
```text
|
|
|
# example
|
|
|
Www.a.com:80 10.0.0.2:8080
|
|
|
**.b.com:80 10.0.0.2:80
|
|
|
192.168.0.11:80 10.0.0.2:8080
|
|
|
```
|
|
|
|
|
|
When sps is an independent service, an additional local socks5 service will be opened to occupy a random port. Now the parameter `--self-port` can be manually specified when needed. The default is 0 to use random.
|
|
|
|
|
|
### 6.16 Fixed UDP PORT
|
|
|
|
|
|
By default, the port number of the UDP function of ss's socks5 is specified by the `rfc1982 draft`. It is randomly specified during the protocol handshake process and does not need to be specified in advance.
|
|
|
|
|
|
However, in some cases, you need to fix the UDP function port. You can fix the port number of the UDP function by the parameter `--udp-port port_number`, for example:
|
|
|
|
|
|
`proxy sps -t tcp -p "0.0.0.0:38080" --udp-port 38081`
|
|
|
|
|
|
It should be noted that the ss function of sps also has UDP function, and the UDP port of ss is the same as the tcp port, so avoid the conflict between the UDP port of socks5 and the UDP port of ss.
|
|
|
|
|
|
To specify a port that is different from the tcp port.
|
|
|
|
|
|
### 6.17 Iptables Transparent Proxy
|
|
|
The sps mode supports the iptables transparent forwarding support of the Linux system, which is commonly referred to as the iptables transparent proxy. If a iptables transparent proxy is performed on the gateway device, the device that is connected through the gateway can realize a non-aware proxy.
|
|
|
|
|
|
Example start command:
|
|
|
|
|
|
`proxy sps --redir -p :8888 -P httpws: //1.1.1.1:33080`
|
|
|
|
|
|
Here it is assumed that there is an http superior proxy 1.1.1.1:33080, which uses ws to transmit data.
|
|
|
|
|
|
Then add iptables rules, here are the reference rules:
|
|
|
|
|
|
```shell
|
|
|
#upstream proxy server IP address:
|
|
|
proxy_server_ip = 1.1.1.1
|
|
|
|
|
|
#Router running proxy listening port:
|
|
|
proxy_local_port = 33080
|
|
|
|
|
|
#There is no need to modify the following
|
|
|
#create a new chain named PROXY
|
|
|
iptables -t nat -N PROXY
|
|
|
|
|
|
#Ignore your PROXY server's addresses
|
|
|
#It's very IMPORTANT, just be careful。
|
|
|
|
|
|
iptables -t nat -A PROXY -d $proxy_server_ip -j RETURN
|
|
|
|
|
|
#Ignore LANs IP address
|
|
|
iptables -t nat -A PROXY -d 0.0.0.0/8 -j RETURN
|
|
|
iptables -t nat -A PROXY -d 10.0.0.0/8 -j RETURN
|
|
|
iptables -t nat -A PROXY -d 127.0.0.0/8 -j RETURN
|
|
|
iptables -t nat -A PROXY -d 169.254.0.0/16 -j RETURN
|
|
|
iptables -t nat -A PROXY -d 172.16.0.0/12 -j RETURN
|
|
|
iptables -t nat -A PROXY -d 192.168.0.0/16 -j RETURN
|
|
|
iptables -t nat -A PROXY -d 224.0.0.0/4 -j RETURN
|
|
|
iptables -t nat -A PROXY -d 240.0.0.0/4 -j RETURN
|
|
|
|
|
|
#Anything to port 80 443 should be redirected to PROXY's local port
|
|
|
iptables -t nat -A PROXY -p tcp -j REDIRECT --to-ports $proxy_local_port
|
|
|
#Apply the rules to nat client
|
|
|
iptables -t nat -A PREROUTING -p tcp -j PROXY
|
|
|
#Apply the rules to localhost
|
|
|
iptables -t nat -A OUTPUT -p tcp -j PROXY
|
|
|
```
|
|
|
|
|
|
- Clear the entire chain iptables -F chain name such as iptables -t nat -F PROXY
|
|
|
- Delete the specified user-defined chain iptables -X chain name e.g. iptables -t nat -X PROXY
|
|
|
- Delete rule from selected chain iptables -D chain name rule details e.g. iptables -t nat -D PROXY -d
|
|
|
223.223.192.0/255.255.240.0 -j RETURN
|
|
|
|
|
|
### 6.19 UDP Compatibility Mode
|
|
|
|
|
|
By default, the UDP functionality of the SOCKS5 proxy in the proxy operates in accordance with the SOCKS5 RFC 1928
|
|
|
specification. However, there are certain SOCKS5 clients that do not adhere to the specified rules. To ensure
|
|
|
compatibility with such clients, the `--udp-compat` parameter can be added to activate the compatibility mode for SOCKS5
|
|
|
UDP functionality.
|
|
|
|
|
|
Additionally, the `-udp-gc` parameter can be utilized to set the maximum idle time for UDP. When this time threshold is
|
|
|
exceeded, UDP connections will be released.
|
|
|
|
|
|
### 6.20 Custom DNS
|
|
|
|
|
|
The `--dns-address` and `--dns-ttl` parameters are used to specify the dns used by the proxy to access the domain name (`--dns-address`)
|
|
|
As well as the number of seconds for caching the parsing results (--dns-ttl) to avoid the interference of the system dns on the proxy.
|
|
|
The additional caching function can also reduce the dns parsing time and improve the access speed.
|
|
|
Translation:
|
|
|
`Agent sps -p ":33080" --dns-address "8.8.8.8:53" --dns-ttl 300`
|
|
|
|
|
|
You can also use the parameter `--dns-interface` to specify the bandwidth used for dns resolution,
|
|
|
for example: `--dns-interface eth0`, dns resolution will use the eth0 bandwidth, this parameter must be set to `--dns-address` to be effective.
|
|
|
|
|
|
### 6.21 Help
|
|
|
|
|
|
`proxy help sps`
|
|
|
|
|
|
## 7.KCP Configuration
|
|
|
|
|
|
### 7.1 Configuration Introduction
|
|
|
|
|
|
Many functions of the proxy support the kcp protocol. Any function that uses the kcp protocol supports the configuration
|
|
|
parameters described here.
|
|
|
Therefore, the KCP configuration parameters are introduced here.
|
|
|
|
|
|
### 7.2 Detailed configuration
|
|
|
There are a total of 17 KCP configuration parameters, you can not set them, they have default values, if for the best effect,
|
|
|
You need to configure the parameters according to your own network conditions. Because the kcp configuration is complex, it requires a certain network basics.
|
|
|
If you want to get more detailed configuration and explanation of kcp parameters, please search for yourself. The command line name for each parameter, along with the default values and simple function descriptions are as follows:
|
|
|
```
|
|
|
--kcp-key="secrect" pre-shared secret between client and server
|
|
|
--kcp-method="aes" encrypt/decrypt method, can be: aes, aes-128, aes-192, salsa20, blowfish,
|
|
|
Twofish, cast5, 3des, tea, xtea, xor, sm4, none
|
|
|
--kcp-mode="fast" profiles: fast3, fast2, fast, normal, manual
|
|
|
--kcp-mtu=1350 set maximum transmission unit for UDP packets
|
|
|
--kcp-sndwnd=1024 set send window size(num of packets)
|
|
|
--kcp-rcvwnd=1024 set receive window size(num of packets)
|
|
|
--kcp-ds=10 set reed-solomon erasure coding - datashard
|
|
|
--kcp-ps=3 set reed-solomon erasure coding - parityshard
|
|
|
--kcp-dscp=0 set DSCP(6bit)
|
|
|
--kcp-nocomp disable compression
|
|
|
--kcp-acknodelay be carefull! flush ack immediately when a packet is received
|
|
|
--kcp-nodelay=0 be carefull!
|
|
|
--kcp-interval=50 be carefull!
|
|
|
--kcp-resend=0 be carefull!
|
|
|
--kcp-nc=0 be carefull! no congestion
|
|
|
--kcp-sockbuf=4194304 be carefull!
|
|
|
--kcp-keepalive=10 be carefull!
|
|
|
```
|
|
|
Tip:
|
|
|
Parameters: -- four fast3, fast2, fast, normal modes in kcp-mode,
|
|
|
Equivalent to setting the following four parameters:
|
|
|
Normal:`--nodelay=0 --interval=40 --resend=2 --nc=1`
|
|
|
Fast :`--nodelay=0 --interval=30 --resend=2 --nc=1`
|
|
|
Fast2:`--nodelay=1 --interval=20 --resend=2 --nc=1`
|
|
|
Fast3:`--nodelay=1 --interval=10 --resend=2 --nc=1`
|
|
|
|
|
|
## 8. Security DNS
|
|
|
|
|
|
### 8.1 Introduction
|
|
|
DNS is known as the service provided by UDP port 53, but with the development of the network, some well-known DNS servers also support TCP mode dns query, such as Google's 8.8.8.8, the DNS anti-pollution server principle of the proxy is to start a proxy DNS proxy locally. Server, which uses TCP to perform dns query through the upstream agent. If it communicates with the upstream agent, it can perform secure and pollution-free DNS resolution. It also supports independent services, concurrent parsing, and enhanced enhanced hosts file function to support flexible concurrent parsing and forwarding.
|
|
|
|
|
|
Dns resolution order:
|
|
|
1. Use the parameter --hosts to parse.
|
|
|
2. If the domain name to be resolved is not found in 1, it is parsed using the parameter --forward rule.
|
|
|
3. The domain name to be resolved is not found in 1 and 2, and the default --default parsing is used. The default default behavior parameter values are three: proxy, direct, and system.
|
|
|
The three parameter values are explained as follows:
|
|
|
Proxy: The domain name is resolved by the dns server specified by the -q parameter.
|
|
|
Direct: Connect to the dns server specified by the -q parameter to resolve the domain name through the local network.
|
|
|
System: resolves the domain name through the system dns.
|
|
|
|
|
|
Tip:
|
|
|
The host file format specified by the --hosts parameter is the same as the system hosts file, and the domain name supports wildcards. You can refer to the hosts file.
|
|
|
The parsing forwarding rule file specified by the --forward parameter can be referenced to the resolve.rules file. The domain name supports wildcards. It supports multiple dns servers for each domain name to be parsed concurrently. Whoever resolves the fastest resolution will use the resolution result.
|
|
|
The -q parameter can specify multiple remote dns servers to perform concurrent parsing. Whoever resolves the fastest parsing success, the default is: 1.1.1.1, 8.8.8.8, 9.9.9.9, multiple comma-separated,
|
|
|
For example, you can also bring ports: 1.1.1.1, 8.8.8.8#53, 9.9.9.9
|
|
|
|
|
|
If you are a standalone service, you don't need a upstream:
|
|
|
Can perform:
|
|
|
`proxy dns --default system -p :5353`
|
|
|
Or
|
|
|
`proxy dns --default direct -p :5353`
|
|
|
|
|
|
### 8.2 Example of use
|
|
|
|
|
|
#### 8.2.1 Normal HTTP(S) upstream agent
|
|
|
|
|
|
Suppose there is a upstream agent: 2.2.2.2:33080
|
|
|
Local execution:
|
|
|
`proxy dns -S http -T tcp -P 2.2.2.2:33080 -p :53`
|
|
|
Then the local UDP port 53 provides DNS resolution.
|
|
|
|
|
|
#### 8.2.2 Ordinary SOCKS5 upstream agent
|
|
|
|
|
|
Suppose there is a upstream agent: 2.2.2.2:33080
|
|
|
Local execution:
|
|
|
`proxy dns -S socks -T tcp -P 2.2.2.2:33080 -p :53`
|
|
|
Then the local UDP port 53 provides DNS resolution.
|
|
|
|
|
|
#### 8.2.3 TLS encrypted HTTP(S) upstream agent
|
|
|
|
|
|
Suppose there is a upstream agent: 2.2.2.2:33080
|
|
|
The commands executed by the upstream agent are:
|
|
|
`proxy http -t tls -C proxy.crt -K proxy.key -p :33080`
|
|
|
Local execution:
|
|
|
`proxy dns -S http -T tls -P 2.2.2.2:33080 -C proxy.crt -K proxy.key -p :53`
|
|
|
Then the local UDP port 53 provides a secure anti-pollution DNS resolution function.
|
|
|
|
|
|
#### 8.2.4 TLS-encrypted SOCKS5 upstream agent
|
|
|
|
|
|
Suppose there is a upstream agent: 2.2.2.2:33080
|
|
|
The commands executed by the upstream agent are:
|
|
|
`proxy socks -t tls -C proxy.crt -K proxy.key -p :33080`
|
|
|
Local execution:
|
|
|
`proxy dns -S socks -T tls -P 2.2.2.2:33080 -C proxy.crt -K proxy.key -p :53`
|
|
|
Then the local UDP port 53 provides a secure anti-pollution DNS resolution function.
|
|
|
|
|
|
#### 8.2.5 KCP encrypted HTTP(S) upstream agent
|
|
|
|
|
|
Suppose there is a upstream agent: 2.2.2.2:33080
|
|
|
The commands executed by the upstream agent are:
|
|
|
`proxy http -t kcp -p :33080`
|
|
|
Local execution:
|
|
|
`proxy dns -S http -T kcp -P 2.2.2.2:33080 -p :53`
|
|
|
Then the local UDP port 53 provides a secure anti-pollution DNS resolution function.
|
|
|
|
|
|
#### 8.2.6 KCP encrypted SOCKS5 upstream agent
|
|
|
|
|
|
Suppose there is a upstream agent: 2.2.2.2:33080
|
|
|
The commands executed by the upstream agent are:
|
|
|
`proxy socks -t kcp -p :33080`
|
|
|
Local execution:
|
|
|
`proxy dns -S socks -T kcp -P 2.2.2.2:33080 -p :53`
|
|
|
Then the local UDP port 53 provides a secure anti-pollution DNS resolution function.
|
|
|
|
|
|
#### 8.2.7 Custom encrypted HTTP(S) upstream agent
|
|
|
|
|
|
Suppose there is a upstream agent: 2.2.2.2:33080
|
|
|
The commands executed by the upstream agent are:
|
|
|
`proxy http -t tcp -p :33080 -z password`
|
|
|
Local execution:
|
|
|
`proxy dns -S http -T tcp -Z password -P 2.2.2.2:33080 -p :53`
|
|
|
Then the local UDP port 53 provides a secure anti-pollution DNS resolution function.
|
|
|
|
|
|
#### 8.2.8 Custom encrypted SOCKS5 upstream agent
|
|
|
Suppose there is a upstream agent: 2.2.2.2:33080
|
|
|
The commands executed by the upstream agent are:
|
|
|
`proxy socks -t kcp -p :33080 -z password`
|
|
|
Local execution:
|
|
|
`proxy dns -S socks -T tcp -Z password -P 2.2.2.2:33080 -p :53`
|
|
|
Then the local UDP port 53 provides a secure anti-pollution DNS resolution function.
|
|
|
|
|
|
## 9.API Authentication
|
|
|
|
|
|
The proxy's http(s)/socks5/sps proxy function supports user-to-agent access via the API.
|
|
|
|
|
|
### What can I do through the API?
|
|
|
|
|
|
- User dimension, which controls the single connection rate and controls the maximum number of connections, max connections count per seconds (QPS).
|
|
|
- IP dimension, which controls the single connection rate and controls the maximum number of connections, max connections count per seconds (QPS).
|
|
|
- Dynamic upstream, can dynamically obtain its upstream from the API according to the user or client IP, and support http(s)/socks5/ss upstream.
|
|
|
- Authenticate every connection, regardless of whether client authentication is required.
|
|
|
- Cache authentication results, time can be set to reduce API pressure.
|
|
|
- Limit the total bandwidth speed by `user` or `client ip` or `server port`.
|
|
|
|
|
|
#### Specific use
|
|
|
The proxy's http(s)/socks5/sps proxy API function is controlled by three parameters: `--auth-url` and `--auth-nouser` and `--auth-cache`.
|
|
|
The parameter `--auth-url` is the HTTP API interface address. When the client connects, the proxy will request the url in GET mode, with the following parameters. If the HTTP status code 204 is returned, the authentication is successful. In other cases, the authentication fails.
|
|
|
|
|
|
An example of a complete request API:
|
|
|
`http://test.com/auth.php?user=a&pass=b&client_addr=127.0.0.1:49892&local_addr=127.0.0.1:8100&target=http%3A%2F%2Fwww.baidu.com&service=http&sps=0`
|
|
|
|
|
|
#### Parameter Description
|
|
|
`user and pass` When the proxy turns on authentication, here is the username and password provided by the client.
|
|
|
`client_addr` The address used by the client to access the proxy, format IP: port.
|
|
|
`local_addr` The proxy address accessed by the client, format IP: port.
|
|
|
`service` Proxy type, divided into: http, socks.
|
|
|
Whether the `sps` proxy is provided by sps, 1: yes, 0: no.
|
|
|
`target` The target to be accessed by the client. If it is an http(s) proxy, the target is the specific url accessed; if it is a socks5 proxy, the target is empty.
|
|
|
|
|
|
#### Example
|
|
|
Suppose --auth-url http://127.0.0.1:333/auth.php points to a php interface address.
|
|
|
The contents of auth.php are as follows:
|
|
|
|
|
|
```php
|
|
|
<?php
|
|
|
#all users and password
|
|
|
$alluser=[
|
|
|
"user1"=>"pass1",
|
|
|
"user2"=>"pass2",
|
|
|
"user3"=>"pass3",
|
|
|
"user4"=>"pass4",
|
|
|
];
|
|
|
$proxy_ip=$_GET['local_addr'];
|
|
|
$user_ip=$_GET['client_addr'];
|
|
|
$service=$_GET['service'];
|
|
|
$is_sps=$_GET['sps']=='1';
|
|
|
$user=$_GET['user'];
|
|
|
$pass=$_GET['pass'];
|
|
|
$target=$_GET['target'];
|
|
|
|
|
|
//business checking
|
|
|
//....
|
|
|
$ok=false;
|
|
|
foreach ($alluser as $dbuser => $dbpass) {
|
|
|
if ($user==$dbuser&&$pass==$dbpass){
|
|
|
$ok=true;
|
|
|
break;
|
|
|
}
|
|
|
}
|
|
|
|
|
|
//set the authentication result
|
|
|
if($ok){
|
|
|
header("userconns:1000");
|
|
|
header("ipconns:2000");
|
|
|
header("userrate:3000");
|
|
|
header("iprate:8000");
|
|
|
header("userqps:5");
|
|
|
header("ipqps:2");
|
|
|
header("upstream:http://127.0.0.1:3500?parent-type=tcp");
|
|
|
header("outgoing:1.1.1.1");
|
|
|
header("userTotalRate:1024000");
|
|
|
//header("ipTotalRate:10240");
|
|
|
//header("portTotalRate:10240");
|
|
|
//header("RotationTime:60");
|
|
|
header("HTTP/1.1 204 No Content");
|
|
|
}
|
|
|
```
|
|
|
|
|
|
#### HTTP HEADER Explanation
|
|
|
|
|
|
`userconns`: The maximum number of connections for the user, not limited to 0 or not set this header.
|
|
|
`ipconns`: The maximum number of connections for the user IP, not limited to 0 or not set this header.
|
|
|
`userrate`: User's single TCP connection rate limit, in bytes/second, is not limited to 0 or does not set this header.
|
|
|
`iprate`: The single TCP connection rate limit of the client IP, in bytes/second, not limited to 0 or not set this
|
|
|
header.
|
|
|
`userqps`: The maximum number of connections per second (QPS) for the user, not limited to 0 or not set this header.
|
|
|
`ipqps`: The maximum number of connections per second (QPS) for the client IP, not limited to 0 or not set this
|
|
|
header.
|
|
|
`upstream`: The upstream used, not empty, or not set this header.
|
|
|
`outgoing`: The outgoing IP used. This setting is only effective when the upstream is empty.
|
|
|
The IP set here must be owned by the machine where the proxy is located, otherwise, the proxy will not function
|
|
|
properly.
|
|
|
Starting from version `v13.2`, `outgoing` supports multiple subnet formats separated by commas. The proxy will randomly
|
|
|
select an IP from the subnet as the outgoing IP. This randomness will also be keep when authentication cache is
|
|
|
enabled.
|
|
|
The following formats are supported for subnets:
|
|
|
|
|
|
1. Format: `192.168.1.1`, Description: Single IP, IPv4
|
|
|
1. Format: `3001:cb2::`, Description: Single IP, IPv6
|
|
|
1. Format: `192.168.1.1/24`, Description: CIDR format subnet, IPv4
|
|
|
1. Format: `3001:cb2::/126`, Description: CIDR format subnet, IPv6
|
|
|
1. Format: `192.168.1.1-192.168.1.200`, Description: IP range, IPv4
|
|
|
1. Format: `2311:ca2::-2311:ca2::10`, Description: IP range, IPv6
|
|
|
|
|
|
Example: `192.16.1.1,192.161.1.2,192.168.1.2-192.168.1.255`
|
|
|
|
|
|
`userTotalRate`: Limit the `user` total bandwidth speed (bytes per second), unit is byte, not limited to 0 or not set
|
|
|
this header.
|
|
|
`ipTotalRate`:Limit the `client ip` total bandwidth speed (bytes per second), unit is byte, not limited to 0 or not set
|
|
|
this header.
|
|
|
`portTotalRate`:Limit the `server port` total bandwidth speed (bytes per second), unit is byte, not limited to 0 or not
|
|
|
set this header.
|
|
|
`RotationTime`: `(requires version >= v13.2)` Controls the time interval, in seconds, for randomly selecting the
|
|
|
outgoing IP.
|
|
|
Leave it blank or unset this header if not needed.When the outgoing returned by the API is a subnet, and if you don't
|
|
|
want the proxy
|
|
|
to randomly select a new IP for each client connection, you can use this parameter to control the time interval for
|
|
|
random IP selection.
|
|
|
If within the interval period, the previously selected IP will be used. If the API does not return the `RotationTime`
|
|
|
header
|
|
|
or if `RotationTime` is set to 0, the proxy will randomly select an IP from the outgoing subnet as the outgoing IP for
|
|
|
each client connection.
|
|
|
|
|
|
#### Details of total bandwidth speed limitation
|
|
|
1. `userrate`、`iprate` and `userTotalRate`、`ipTotalRate`、`portTotalRate` can be set at same time,
|
|
|
for example: set `userrate` with 1024000 to limit the user's total bandwidth speed to 1M/s of user's all tcp connections. And set `userrate` with 102400 to limit the user one tcp connection speed to 100K/s.
|
|
|
2. if `userTotalRate`、`ipTotalRate` 、`portTotalRate` set at same time, the valid order is : `userTotalRate` -> `ipTotalRate` -> `portTotalRate`
|
|
|
3. if `userTotalRate`、`portTotalRate` set at same time, and set `--auth-nouser`,all clients that not send username will be as an "empty username" user,they are using a same limiter.
|
|
|
|
|
|
#### Tips
|
|
|
1. By default, `--auth-url` is required to provide the user name and password. If you do not need the client to provide the username and password, and authenticate, you can add `--auth-nouser`. The visit will still access the authentication address `--auth-url` for authentication. Only the $user authentication username and the $pass authentication password received in the php interface are empty when client didn't send username and password.
|
|
|
2. Connection limit priority: User authentication file limit - "File ip.limit limit -" API user limit - "API IP limit -" command line global connection limit.
|
|
|
3. Rate Limit Priority: User Authentication File Rate Limit - "File ip.limit Rate Limit -" API User Rate Limit - "API IP Rate Limit - "Command Line Global Rate Limit.
|
|
|
4. The upstream obtains the priority: the upstream of the user authentication file - the file ip.limit upstream-"API
|
|
|
upstream-" command line specifies the upstream.
|
|
|
5. `--auth-cache` authentication cache, cache the authentication result for a certain period of time, improve
|
|
|
performance, reduce the pressure on the authentication interface, --auth-cache unit seconds, default 0, set 0 to
|
|
|
close the cache.
|
|
|
6. By default, `--auth-cache` only caches the results of successful authentication and does not cache the results of
|
|
|
failed authentication. If you need to cache the failed authentication results for a certain period of time,
|
|
|
It can be set through the parameter `-auth-fail-cache` to improve performance and reduce the pressure on the
|
|
|
authentication interface. The unit of --auth-fail-cache is seconds. The default is 0. Setting 0 turns off the cache.
|
|
|
|
|
|
#### upstream detailed description
|
|
|
|
|
|
1. When the parameter `sps` is 0.
|
|
|
When the service is http, upstream only supports http(s) proxy, and does not support authentication.
|
|
|
If authentication is required, it can be replaced by sps. Format:
|
|
|
`http://127.0.0.1:3100?argk=argv`
|
|
|
When the service is a socks, the upstream only supports the socks5 proxy. The format is:
|
|
|
`socks5://127.0.0.1:3100?argk=argv`
|
|
|
|
|
|
Explanation: `http://`,`socks5://` is fixed, `127.0.0.1:3100` is the address of the upstream
|
|
|
|
|
|
2. When `sps` is 1.
|
|
|
Upstream supports socks5, http(s) proxy, support authentication, format: `protocol://a:b@2.2.2.2:33080?argk=argv`, please refer to SPS chapter for details, **multiple upstreams** , the description of the `-P` parameter.
|
|
|
3. Parameters, `?` followed by `argk=argv` are parameters: parameter name = parameter value, multiple parameters are connected with `&`.
|
|
|
All the supported parameters are as follows, and the meaning of the command line with the same name is the same.
|
|
|
|
|
|
1. parent-type : upper-level transport type, support tcp, tls, ws, wss
|
|
|
2. parent-ws-method: The encryption method of the upper-level ws transmission type, the supported value is the same as the value range supported by the command line.
|
|
|
3. parent-ws-password: The upper-level ws transmission type encryption password, the alphanumeric password
|
|
|
4. parent-tls-single : Whether the upper-level tls transport type is a one-way tls, which can be: true | false
|
|
|
5. timeout : timeout for establishing tcp connection, number, in milliseconds
|
|
|
6. ca : The base64-encoded string of the upper-level tls transport type ca certificate file.
|
|
|
7. cert : The base64 encoded string of the higher level tls transport type certificate file.
|
|
|
8. key : The base64 encoded string of the higher-level tls transport type certificate key file.
|
|
|
9. luminati:if upstram is luminati proxies,value can be: true or false。
|
|
|
|
|
|
4.Upstream supports multiple instances, regardless of whether SPS is 1 or 0, and they are separated by semicolons ;.
|
|
|
When connecting to an upstream, by default, one upstream is randomly chosen. However, it supports setting the weight
|
|
|
parameter for each upstream.
|
|
|
If the weight is set for any upstream, all upstreams must have the weight parameter set. The weight must be greater than
|
|
|
0;
|
|
|
otherwise, the weight is considered invalid, and random selection is applied.
|
|
|
This selection logic is also working after the authentication cache is enabled.
|
|
|
|
|
|
Examples of multiple upstreams:
|
|
|
|
|
|
1. Example without weight settings: `http://127.0.0.1:3100?argk=argv;http://127.0.0.2:3100?argk=argv`
|
|
|
2. Example with weight settings: `http://127.0.0.1:3100?argk=argv&weight=10;http://127.0.0.2:3100?argk=argv&weight=20`
|
|
|
|
|
|
Weight selection logic:
|
|
|
When a weight is set for an upstream, it divides the total weight among the upstreams based on their order.
|
|
|
For example, if there are two upstreams with weights 10 and 20 respectively, the total weight is 30.
|
|
|
The first upstream's weight range is 1-10, and the second upstream's weight range is 11-30.
|
|
|
This logic extends to more upstreams. Each time, a random number within the total weight range is chosen,
|
|
|
and the corresponding upstream is selected based on this number's range.
|
|
|
|
|
|
### Traffic report / Traffic limit / Traffic statistics
|
|
|
|
|
|
The proxy's http (s) / socks5 / sps / tcp / udp proxy function supports traffic reporting. You can set an http interface address through the parameter `--traffic-url`.
|
|
|
The proxy will report the traffic used for this connection to this address.Specifically, the proxy sends an HTTP to GET request to the HTTP URL address set by `--traffic-url`.
|
|
|
There are two reporting modes, which can be specified by the `--traffic-mode` parameter. It can be reported in the normal mode or in the fast mode.
|
|
|
|
|
|
1. Report in `normal` normal mode
|
|
|
When the connection is released, the proxy will report the traffic used for this connection to this `--traffic-url`
|
|
|
address.
|
|
|
|
|
|
2. Report in `fast` mode
|
|
|
For each connection that has been established, the proxy will `timely` report the traffic generated by this
|
|
|
connection to this` --traffic-url` address.
|
|
|
`Timing` defaults to 5 seconds, and you can modify` Timing` to the appropriate number of seconds via the
|
|
|
parameter `--traffic-interval`.
|
|
|
|
|
|
3. Report in `fast` global mode
|
|
|
By default, if the API can't handle high concurrency report access, you can use the fast global mode,
|
|
|
Use the parameter `--fast-global` to open, this parameter is only valid when `--traffic-mode=fast`. In fast global
|
|
|
mode, for a `--traffic-url`,
|
|
|
no matter how many concurrent connections there are, only have one reporter, and the reporting interval is 5 seconds.
|
|
|
In this mode, the reporting request method is `POST`, `Content-Type` is `application/json`, the post body data
|
|
|
is `JSON Array`, example: `[{},{}]`, the keys of object in the array are same with the
|
|
|
following `Reqeust parameter description`.
|
|
|
4. The traffic reporting function combined with the above API authentication function can control the user's traffic
|
|
|
usage in real time. The traffic is reported to the interface. The interface writes the traffic data to the database,
|
|
|
and then the authentication API queries the database to determine the traffic usage and determine whether the user
|
|
|
can be successfully authenticated.
|
|
|
|
|
|
The following is a complete URL request example:
|
|
|
|
|
|
`http://127.0.0.1:33088/user/traffic?bytes=337&client_addr=127.0.0.1%3A51035&id=http&server_addr =127.0.0.1%3A33088&target_addr=myip.ipip.net%3A80&username=a`
|
|
|
|
|
|
**Request parameter description:**
|
|
|
`id`: service id flag.
|
|
|
`server_addr`: proxies's address requested by the client, format: IP: port.
|
|
|
`client_addr`: client address, format: IP: port.
|
|
|
`target_addr`: target address, format: "IP: port", when tcp / udp proxy, this is empty.
|
|
|
`username`: proxy authentication user name, this is empty when tcp / udp proxy.
|
|
|
`bytes`: the number of traffic bytes used by the user.
|
|
|
`out_local_addr`: outgoing tcp connection's local address,format: IP: port.
|
|
|
`out_remote_addr`: outgoing tcp connection's remote address,format: IP: port.
|
|
|
`upstream`: upstream used by outgoing tcp connection, if none upstream be used, it's empty.
|
|
|
|
|
|
#### Tips
|
|
|
|
|
|
The `--traffic-url` URL must response the HTTP status code` 204`. Only when the traffic is reported will the report be considered successful, and if it response other status codes, it will be considered that the reported traffic failed, and the log will be output.
|
|
|
|
|
|
#### traffic flow
|
|
|
|
|
|
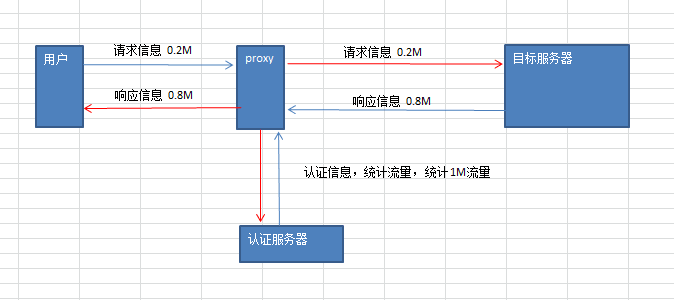
|
|
|
|
|
|
|
|
|
### Disconnect the user's connection
|
|
|
|
|
|
The proxy's http (s) / socks5 / sps proxy function supports a control interface, which can be specified by the parameter --control-url http interface address,
|
|
|
Then the proxy will interval send all the usernames or client IPs currently connected to the proxy to this URL. Specifically, the proxy sends an HTTP to POST request to the HTTP URL address set by --control-url.
|
|
|
|
|
|
`interval` defaults to 30 seconds, this value can be modified via the --control-sleep parameter.
|
|
|
|
|
|
When the user expires, or the user's traffic has been used up, the authentication API can only control the user cannot create a new connection, but the connection with the proxy has been established and the connection cannot be immediately disconnected.
|
|
|
Then this problem can be solved through the control interface. The control interface will return the content through the control interface in the slowest `interval` time, and the end is invalid when the user establishes the connection.
|
|
|
|
|
|
#### Request Description
|
|
|
|
|
|
An HTTP POST request will be sent to the control. The interface `form` has three fields: interface, ip, conns, and the `conns` field requires a user whose proxy version is greater than proxy `12.2`.
|
|
|
|
|
|
`user` The username currently connected to the agent, multiple separated by commas, for example: user1, user2
|
|
|
|
|
|
`ip` The client IP is connected to the proxy, and multiple clients using English are split addresses, for example: 1.1.1.1, 2.2.2.2
|
|
|
|
|
|
`conns` The tcp connection information currently connecting to the proxy port to transmit data. The conns value is a json string, the format is a sequence of connections, the element is an object, the object contains the details of the connection,
|
|
|
conns format: `[{"id":"ab7bf1f10501d6f7","client":"127.0.0.1:62112","server":"127.0.0.1:9092","user":""}]`
|
|
|
Object field description: id: connection id, client: client's unique IP address and port, server: client's IP and no port access, user's connection authentication (null if any)
|
|
|
|
|
|
#### Response Data Description
|
|
|
|
|
|
The data returned by the control interface is invalid user and IP or connection. The format is a json object data. There are three fields user, ip, and conns. The `conns` field requires the proxy version greater than or equal to `12.2`.
|
|
|
Format: `{"user":"a,b","ip":"",conns:["ab7bf1f10501d6f7","cb7bf1f10501d6f7"]}`
|
|
|
|
|
|
`user`: The username currently connected to the proxy, multiple separated by commas, not left blank, for example: user1, user2
|
|
|
|
|
|
`ip`: The ip address of the client currently connected to the proxy, multiple separated by commas, not left blank, for example: 1.1.1.1, 2.2.2.2
|
|
|
|
|
|
`conns`: is an array, the element is a connection id, this id is the id field of the connection object in conns in the above `Request Description`.
|
|
|
|
|
|
Introduce:
|
|
|
- The connection established by the returned user and ip will be disconnected by the proxy.
|
|
|
- Connections matching the returned conns will be disconnected by the proxy.
|
|
|
- If the returned data contains both: user or ip, and conns, then the user or ip will be ignored, and only the connection matching conns will be disconnected.
|
|
|
- When the connection is closed, if the authentication cache is enabled, the `user` or `IP` authentication cache will be cleared.
|
|
|
|
|
|
#### Example
|
|
|
Suppose --control-url `http://127.0.0.1:33088/user/control.php` points to a PHP interface address.
|
|
|
The content of control.php is as follows:
|
|
|
|
|
|
```php
|
|
|
<?php
|
|
|
#revcieve proxy post data
|
|
|
$userArr=explode(",",$_POST['user']);
|
|
|
$ipArr=$_GET['ip'];
|
|
|
|
|
|
//invalid users array
|
|
|
$badUsers=[];
|
|
|
|
|
|
foreach ($userArr as $user) {
|
|
|
//logic business, push invalid user into $badUsers
|
|
|
$badUsers[]=$user;
|
|
|
}
|
|
|
$data=["user"=>implode(","$badUsers),"ip"=>"","conns"=>[]];
|
|
|
|
|
|
echo json_encode($data);
|
|
|
```
|
|
|
|
|
|
|
|
|
## 10. Authentication
|
|
|
|
|
|
The proxy http(s)/socks5/sps proxy function supports the user to access the proxy pair through the configuration file, and supports the http(s) proxy ``Proxy Basic proxy authentication` and the socks5 proxy authentication.
|
|
|
|
|
|
### start using
|
|
|
The proxy's http(s)/socks5/sps proxy function can pass
|
|
|
`--auth-file`, `--max-conns`, `--ip-limit`, `--rate-limit`, `-a` These five parameters control.
|
|
|
|
|
|
#### Detailed explanation of parameters
|
|
|
|
|
|
##### `--auth-file`
|
|
|
The authenticated user name and password file. This parameter specifies a file, one line per rule, in the format: "username: password: number of connections: rate: upstream".
|
|
|
`Connection number` is the maximum number of connections for the user. The 'rate' is the maximum speed of each tcp connection of the user. The unit is: byte/second. The upper level is the upper level used by the user.
|
|
|
Not only can the authenticated user be set by `--auth-file`, but also the `-a` parameter can be set directly. Multiple users can repeat multiple `-a` parameters.
|
|
|
For example: `proxy http -a a:b:0:0: -a c:d:0:0:`
|
|
|
|
|
|
Example explanation:
|
|
|
For example: `user:pass:100:10240:http://192.168.1.1:3100`
|
|
|
`user` is the authentication username
|
|
|
`pass` is the authentication user password (cannot contain a colon:)
|
|
|
`100` is the maximum number of connections for this user, not limited to write 0
|
|
|
`10240` is the rate limit of this user's single tcp connection, the unit is: byte / sec, no limit write 0
|
|
|
`http://192.168.1.1:3100` is the upstream used by this user, no space is left blank
|
|
|
|
|
|
##### `--max-conns`
|
|
|
Limit the maximum number of global connections for the proxy service, a number, 0 is unrestricted, default is 0.
|
|
|
|
|
|
##### `--ip-limit`
|
|
|
Controls the number of connections and connection rate of the client IP. This parameter specifies a file, one rule per line, and the beginning of # is gaze.
|
|
|
The sample file ip.limit, the rule format is as follows:
|
|
|
`127.0.0.1:100:10240:http://192.168.1.1:3100`
|
|
|
Rule interpretation:
|
|
|
`127.0.0.1` is the IP to be restricted
|
|
|
`100` is the maximum number of connections for this IP, not limited to write 0
|
|
|
`10240` is the rate limit of IP single tcp connection, the unit is: byte / s, no limit write 0
|
|
|
`http://192.168.1.1:3100` is the upstream used by this IP, and it is not left blank.
|
|
|
|
|
|
##### `--rate-limit`
|
|
|
Limit the speed of each tcp connection of the service, for example: 100K 2000K 1M . 0 means unlimited, default 0.
|
|
|
|
|
|
## 11. Cluster
|
|
|
|
|
|
The proxy supports the cluster management. The proxy is installed on each machine node as an agent, with the control panel [`proxyadmin cluster edition`] (https://github.com/snail007/proxy-admin-cluster) Unified management of proxy services on massive machines.
|
|
|
|
|
|
If the proxy is to be run as an agent, assume that the cluster port address of the control panel is: `1.1.1.1: 55333`.
|
|
|
|
|
|
The command example is as follows:
|
|
|
|
|
|
`proxy agent -k xxx -c 1.1.1.1:55333 -i test`
|
|
|
|
|
|
Command explanation:
|
|
|
|
|
|
agent: is a function parameter, which means running agent mode.
|
|
|
|
|
|
-k : The encryption and decryption key for communication with `proxyadmin cluster edition`. This key is set in the configuration file of` proxyadmin cluster edition`.
|
|
|
|
|
|
-c : The cluster port address of `proxyadmin cluster edition`, format: IP:port.
|
|
|
|
|
|
-i : The unique identifier of the agent ensures that each agent is different. The "unique identifier" specified here is used when adding a node to the control panel. The IP is filled with this "unique identifier".
|
|
|
If -i is not specified, the default is empty, and the control panel adds the IP field to fill in: the agent's internet IP.
|
|
|
|
|
|
-u: proxy parameter, empty by default. You can specify an agent, and the agent will communicate with the cluster through this agent.
|
|
|
The format is the same as that of `--jumper`. For details, please refer to the `--jumper` part of the manual.
|
|
|
|
|
|
notice:
|
|
|
|
|
|
When the client service is configured in the control panel, all nodes use the same key, which leads to only one client working. To solve this problem,
|
|
|
Client service parameters can use placeholders: `{AGENT_ID}` to refer to the agent’s id as the client’s key, so as to ensure that each client has a unique key.
|
|
|
|
|
|
For example, client service parameters:
|
|
|
|
|
|
`client -T tcp -P 1.1.1.1:30000 --k {AGENT_ID}`
|
|
|
|
|
|
## 12. http, https website reverse proxy
|
|
|
|
|
|
The proxy can reverse proxy http and https websites.
|
|
|
|
|
|
The supported features are as follows:
|
|
|
- http and https are converted to each other.
|
|
|
- multiple upstream.
|
|
|
- upstream load balance.
|
|
|
- upstream high available.
|
|
|
- path mapping.
|
|
|
- path protection.
|
|
|
- alias names of bindings.
|
|
|
|
|
|
Example, configure file:`rhttp.toml`。
|
|
|
|
|
|
```shell
|
|
|
proxy rhttp -c rhttp.toml
|
|
|
```
|
|
|
|
|
|
For detail usage, please refer to the configuration file [rhttp.toml](https://github.com/snail007/goproxy/blob/master/rhttp.toml), which has a complete configuration description. |