|
|
5 years ago | |
|---|---|---|
| .githooks | 5 years ago | |
| 01_wait_forever | 5 years ago | |
| 02_runtime_init | 5 years ago | |
| 03_hacky_hello_world | 5 years ago | |
| doc | 5 years ago | |
| docker | 5 years ago | |
| utils | 5 years ago | |
| .gitignore | 5 years ago | |
| LICENSE | 5 years ago | |
| README.md | 5 years ago | |
| contributor_setup.sh | 6 years ago | |
README.md
Bare-metal and Operating System development tutorials in Rust on the Raspberry Pi 3
Notice
This is a work-in-progress rewrite started on September 2019. I will first add code, and later write accompanying prose.
The rewrite also supports both, the Raspberry Pi 3 and the Raspberry Pi 4!
Cheers, Andre
Prerequisites
Before you can start, you'll need a suitable Rust toolchain.
Please browse to the rustup components history and note the date of the most recent
build that shows clippy as present.
Then, proceed to install this nightly using your noted date:
curl https://sh.rustup.rs -sSf | sh -s -- --default-toolchain nightly-YOUR_DATE_HERE
# For example:
# curl https://sh.rustup.rs -sSf | sh -s -- --default-toolchain nightly-2019-09-05

rustup component add rust-src llvm-tools-preview clippy
cargo install cargo-xbuild cargo-binutils
Additionally, a Micro SD card with firmware files on a FAT filesystem is needed.
I recommend to get a Micro SD card USB adapter (many manufacturers ship SD cards with such an adapter), so that you can connect the card to any desktop computer just like an USB stick, no special card reader interface required (although many laptops have those these days).
You can create an MBR partitioning scheme on the SD card with an LBA FAT32 (type
0x0C) partition, format it and copy bootcode.bin, start.elf and fixup.dat
onto it. Delete all other files or booting might not work. Alternatively,
you can download a raspbian image, dd it to the SD card, mount it and delete
the unnecessary .img files. Whichever you prefer. What's important, you'll
create kernel8.img with these tutorials which must be copied to the root
directory on the SD card, and no other .img files should exists there.
I'd also recommend to get an USB serial debug cable. You connect it to the GPIO pins 14/15.
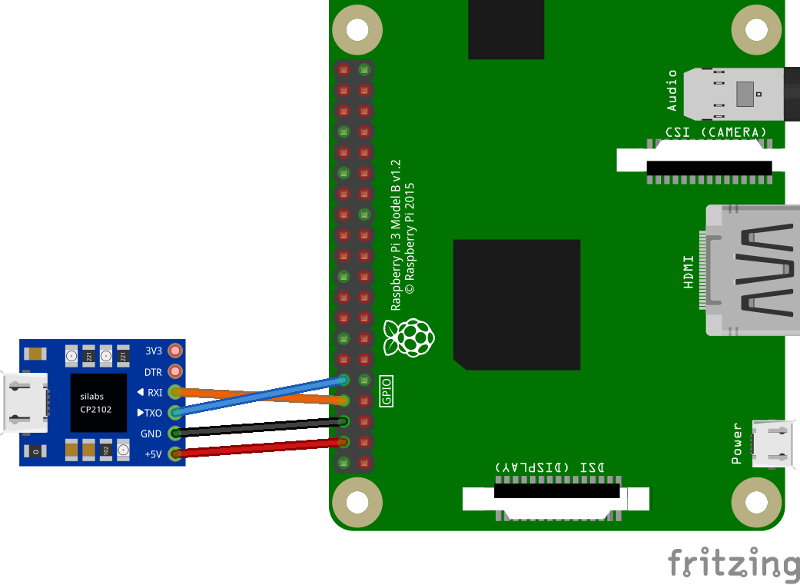
Then, run screen on your desktop computer like
sudo screen /dev/ttyUSB0 115200
Exit screen again by pressing ctrl-a ctrl-d
License
Licensed under the MIT license (LICENSE-MIT or http://opensource.org/licenses/MIT).