|
|
6 years ago | |
|---|---|---|
| .0A_pcscreenfont | 6 years ago | |
| .0B_readsector | 6 years ago | |
| .0C_directory | 6 years ago | |
| .0D_readfile | 6 years ago | |
| .0E_initrd | 6 years ago | |
| .0F_executionlevel | 6 years ago | |
| .00_crosscompiler | 6 years ago | |
| .01_bareminimum | 6 years ago | |
| .02_multicorec | 6 years ago | |
| .06_random | 6 years ago | |
| .07_delays | 6 years ago | |
| .08_power | 6 years ago | |
| .09_framebuffer | 6 years ago | |
| .10_virtualmemory | 6 years ago | |
| .11_exceptions | 6 years ago | |
| .12_printf | 6 years ago | |
| .13_debugger | 6 years ago | |
| .14_raspbootin64 | 6 years ago | |
| 03_uart1 | 6 years ago | |
| 04_mailboxes | 6 years ago | |
| 05_uart0 | 6 years ago | |
| doc | 6 years ago | |
| LICENSE | 7 years ago | |
| README.md | 6 years ago | |
README.md
Bare Metal Rust Programming on Raspberry Pi 3
About this repository
Hi all. This repository aims to provide easy reference code for programming bare metal on the Raspberry Pi 3 in the Rust systems programming language. The repo is basically a combination of two awesome resources that are available on the web.
- First of all, it is a fork of Zoltan Baldaszti's awesome tutorial on bare metal programming on RPi3 in C. Rust code is and will be translated based on his files, and READMEs are adapted were needed. Credits to this guy plz!
- The second props go to Jorge Aparicio for "The Embedonomicon", from which the glue code is taken.
This repo follows two main principles:
- Most importantly: No toolchain hassles. Users eager to try the code should not be bothered with complicated toolchain installation/compilation steps. This is achieved by trying to use the standard Rust toolchain as much as possible, and where not possible, using Docker containers. Please install Docker for your distro.
- Compiler and linker can be used from Rust nightly.
- QEMU will be used for emulation, but RPi3 support in QEMU is very fresh and has not landed in most of the pre-packaged versions of popular distributions. This container will provide it ready to go.
- aarch64 toolchain binaries that are not provided by Rust, like
objcopy, will be provided with a container from the dockcross project, which does an awesome job of curating various toolchains in containers.
- Use as little assembler as possible. Do as much as possible in Rust.
Please notice that you won't need to download or prepare the containers upfront. As long as you have docker installed, they will be pulled automatically the first time the Makefile needs them.
For now, only a few basic tutorials are ready, but more will be ported over time.
Introduction
This tutorial series are made for those who would like to compile their own bare metal application for the Raspberry Pi.
The target audience is hobby OS developers, who are new to this hardware. I'll give you examples on how to do the basic things, like writing to the serial console, reading keystrokes from it, setting screen resolution and draw to the linear frame buffer. I'm also going to show you how to get the hardware's serial number, a hardware-backed random number, and how to read files from the boot partition.
This is not a tutorial on how to write an OS. I won't cover topics like memory management and virtual file systems, or how to implement multi-tasking. If you plan to write your own OS for the Raspberry Pi, I suggest to do some research before you continue. This tutorial is strickly about interfacing with the hardware, and not about OS theory.
I assume you have a fair GNU/Linux knowledge on how to compile programs and create disk and file system images. I won't cover those in detail, although I'll give you a few hints about how to set up a cross-compiler for this architecture.
Why Raspberry Pi 3?
I've choosen this board for several reasons: first of all, it's cheap and easy to get. Second, it's a 64 bit machine. I gave up programming for 32 bit long long time ago. The 64 bit is so much more interesting, as it's address space is increadibly huge, bigger than the storage capacity which allows us to use some interesting new solutions. Third, uses only MMIO which makes it easy to program.
For 32 bit tutorials, I'd recommend:
Cambridge tutorials (ASM and 32 bit only),
David Welch's tutorials (mostly C, with some 64 bit examples),
Peter Lemon's tutorials (ASM only, also for 64 bit) and
Leon de Boer's tutorials (C and ASM, also for 64 bit, more complex examples like USB and OpenGL).
Prerequisites
Before you can start, you'll need a suitable Rust toolchain.
curl https://sh.rustup.rs -sSf | sh -s -- --default-toolchain nightly
rustup component add rust-src
cargo install xargo
Additionally, a Micro SD card with firmware files on a FAT filesystem.
I recommend to get a Micro SD card USB adapter (many manufacturers ship SD cards with such an adapter), so that you can connect the card to any desktop computer just like an USB stick, no special card reader interface required (although many laptops have those these days).
You can create an MBR partitioning scheme on the SD card with an LBA FAT32 (type 0x0C) partition, format it
and copy bootcode.bin, start.elf and fixup.dat onto it. Delete all other files or booting might not work. Or alternatively you can download a raspbian image,
dd it to the SD card, mount it and delete the unnecessary .img files. Whichever you prefer. What's important, you'll
create kernel8.img with these tutorials which must be copied to the root directory on the SD card, and no other .img
files should exists there.
I'd also recommend to get an USB serial debug cable. You connect it to the GPIO pins 14/15.
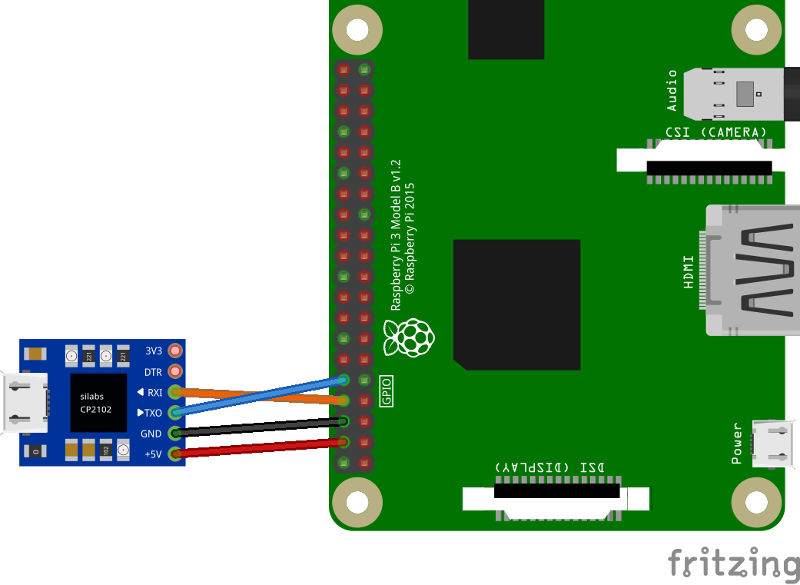
Then, run screen on your desktop computer like
sudo screen /dev/ttyUSB0 115200
Exit screen again by pressing ctrl-a ctrl-d
Emulation
QEMU currently only emulates UART0, so only the tutorials 05 and above will work, as UART1 is not redirected by default.
For that, you would have to add something like -chardev socket,host=localhost,port=1111,id=aux -serial chardev:aux (thanks
@godmar for the info).
!!!WARNING!!! Qemu emulation is rudimentary, only the most common peripherals are emulated! !!!WARNING!!!
About the hardware
There are lots of pages on the internet describing the Raspberry Pi 3 hardware in detail, so I'll be brief and cover only the basics.
The board is shipped with a BCM2837 SoC chip. That includes a
- VideoCore GPU
- ARM-Cortex-A53 CPU (ARMv8)
- Some MMIO mapped pheripherals.
Interestingly the CPU is not the main processor on the board. When it's powered up, first GPU runs. When it's
finished with the initialization by executing the code in bootcode.bin, it will load and execute the start.elf executable.
That's not an ARM executable, but compiled for the GPU. What interests us is that start.elf looks for different
ARM executables, all starting with kernel and ending in .img. As we're going to program the CPU in AArch64 mode,
we'll need kernel8.img only, which is the last to look for. Once it's loaded, the GPU triggers the reset line on
the ARM processor, which starts executing code at address 0x80000 (or more precisely at 0, but the GPU puts an ARM
jump code there first).
The RAM (1G for the Raspberry Pi 3) is shared among the CPU and the GPU, meaning one can read what the other has written into memory. To avoid confusion, a well defined, so called mailbox interface is established. The CPU writes a message into the mailbox, and tells the GPU to read it. The GPU (knowing that the message is entirely in memory) interprets it, and places a response message at the same address. The CPU has to poll the memory to know when the GPU is finished, and then it can read the response.
Similarily, all peripherals communicates in memory with the CPU. Each has it's dedicated memory address starting from 0x3F000000, but it's not in real RAM (called Memory Mapped IO). Now there's no mailbox for peripherals, instead each device has it's own protocol. What's common for these devices that their memory must be read and written in 32 bit units at 4 bytes aligned addresses (so called words), and each has control/status and data words. Unfortunately Broadcom (the manufacturer of the SoC chip) is legendary bad at documenting their products. The best we've got is the BCM2835 documentation, which is close enough.
There's also a Memory Management Unit in the CPU which allows creating virtual address spaces. This can be programmed by specific CPU registers, and care must be taken when you map these MMIO addresses into a virtual address space.
Some of the more interesting MMIO addresses are:
0x3F003000 - System Timer
0x3F00B000 - Interrupt controller
0x3F00B880 - VideoCore mailbox
0x3F100000 - Power management
0x3F104000 - Random Number Generator
0x3F200000 - General Purpose IO controller
0x3F201000 - UART0 (serial port, PL011)
0x3F215000 - UART1 (serial port, AUX mini UART)
0x3F300000 - External Mass Media Controller (SD card reader)
0x3F980000 - Universal Serial Bus controller
For more information, see Raspberry Pi firmware wiki and documentation on github.
https://github.com/raspberrypi
Good luck and enjoy hacking with your Raspberry! :-)
bzt