| README.md | ||
| screen1.png | ||
| v0.png | ||
| v0usbcap.png | ||
| v2.png | ||
DIY IP-KVM with Web-UI based on Raspberry Pi
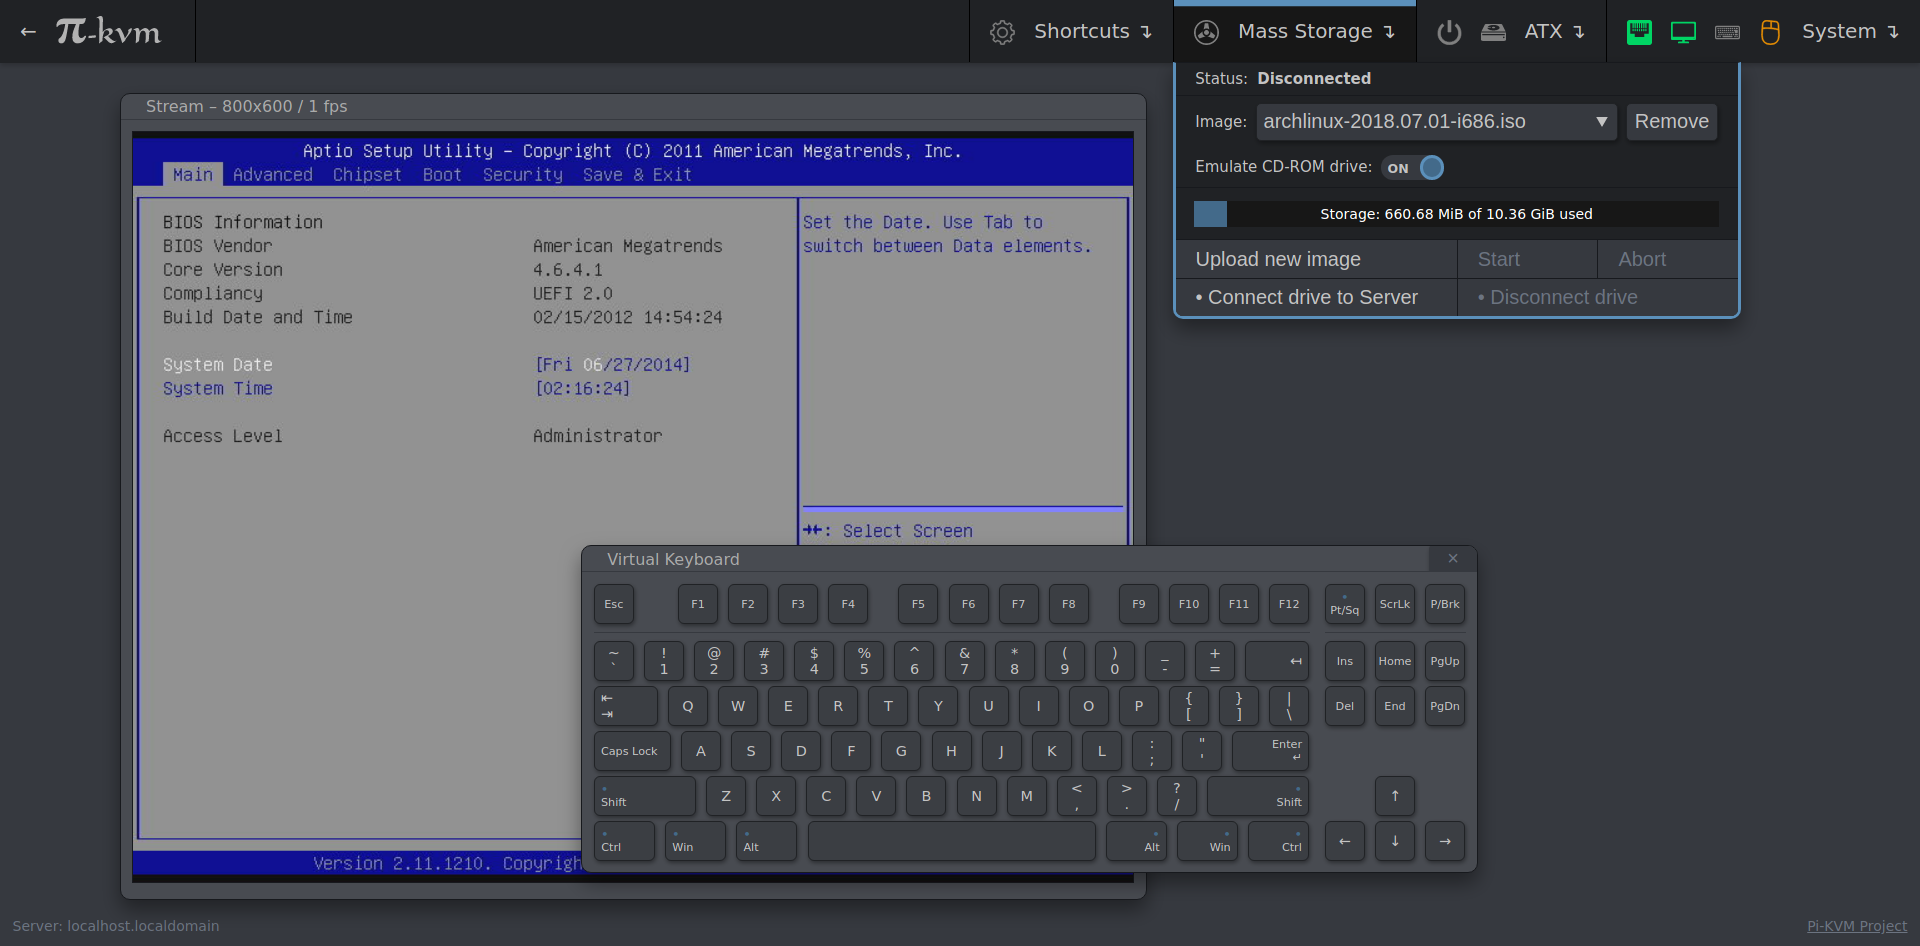
Stand-alone IP KVM device with a web interface with various video capture options and a bunch of features like keyboard/mouse control, ATX control (power/reset/HDD activity), Mass-Storage Device emulation and more.
Features
- Extra-lightweight and fancy Web-UI.
- Advanced HID emulator based on OTG (RPi4 and ZeroW) or using one Arduino board (RPi2 and RPi3). Mouse supported; keyboard works perfectly in BIOS.
- Control the power of the server through the ATX button connectors on the motherboard and get the status of the power LEDs and hard drive activity.
- Mass-storage device based on OTG (only for RPi4 and ZeroW)
- The ability to use any video capture device (include HDMI-to-CSI2 bridge).
- Own MJPG streamer written on C with support for multi-threading and GPU video encoding. It can change the resolution in real time for an HDMI source, report statistics about the video and much more (see README for detalis).
- IPMI BMC support. You can use
ipmitoolfor power management in your existing network infrastructure. - Extensible authorization methods - you can configure multiple KVMs so that they use a common authorization service.
- Microservice architecture - the system consists of separated parts that each perform a strictly defined task.
- Plugin architecture to support a variety of hardware.
- Backend with clear API that can be used for scripts and alternative UI (for example, you can make a desktop application);
- A ready-to-use operating system that can be assembled just using
make buildand installed to a memory card usingmake install.
Required hardware
We support a variety of implementation choices of hardware (we call it platform). The two main are called v0 and v2.
- v0 platform is designed to work with raspberry Pi that do not have OTG (Raspberry Pi 2 and 3), and requires a little more spare parts for the basic implementation. Also there does not work mass-storage device.
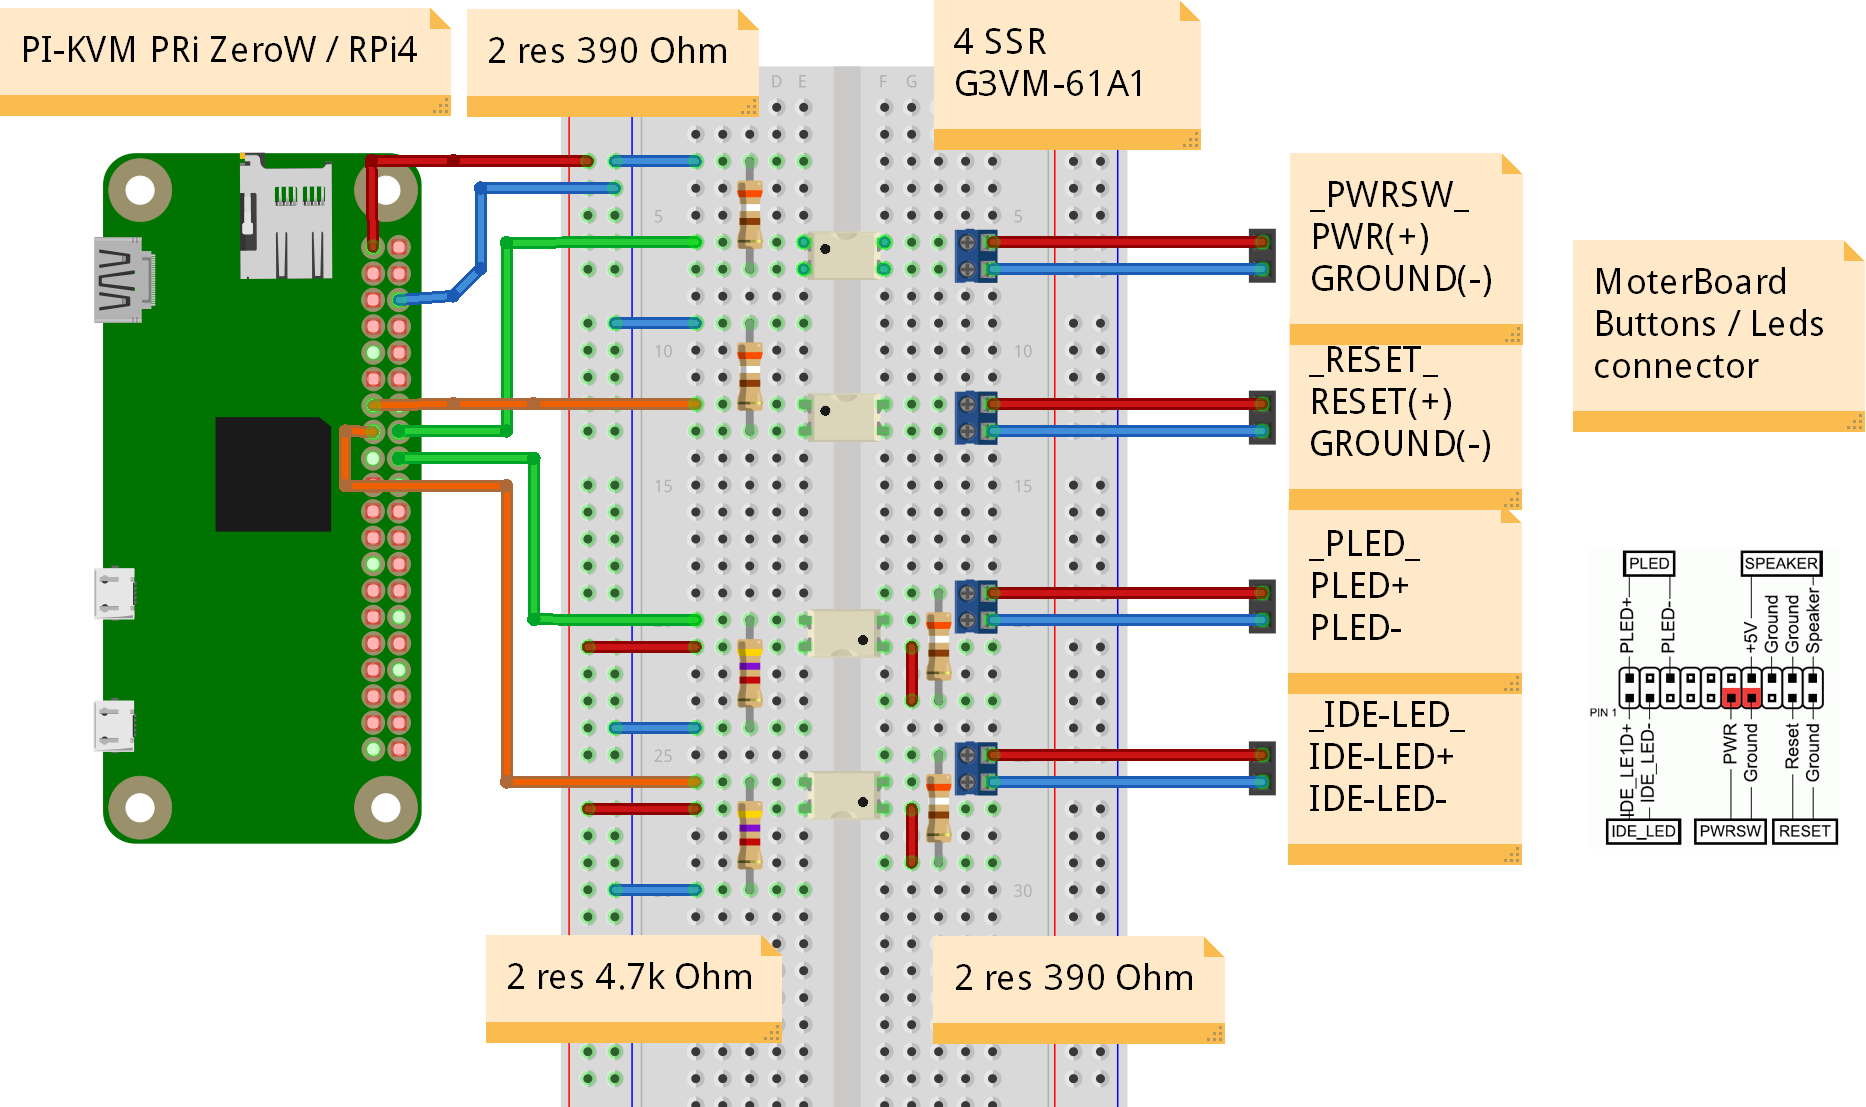
- v2 platform is the most modern implementation supporting all the features of Pi-KVM. It is designed to work with Raspberry Pi 4 and ZeroW (but we recommend using 4 because ZeroW is very slow).
Basic hardware
- Raspberry Pi 2 or 3
- MicroSD card
- Raspberry Pi power supply 3A
Video capture side for lowcost S-Video (only for v0 platform)
- Easycap UTV007 device
- HDMI to S-Video converter (not all options work, but these three has been tested) (1 (for PCB (see bellow)) or 2 or 3)
Video capture side for HDMI (for v0 and v2 platforms)
- HDMI to CSI-2 Bridge board (Original Auvidea B101 or any analog based Toshiba TC358743 chip like Lusya bridge).
HID Subsystem and ATX control
- Only for v0: Arduino Pro Micro (ATMega32u4) with hardware USB for HID sub-system
- GPIO cables for connections (Dupont or identical, suitable for PLS pins and breadboards; for example https://www.amazon.com/gp/product/B01BV2A54G)
- Logic level converter module https://www.sparkfun.com/products/12009
- 4x MOSFET relay OMRON G3VM-61A1
- NPN transistor for HID reset (almost any NPN transistor: 2n2222 or similar)
- Constant resistors, for transistor/relay (to Raspberry Pi) 220Ohm-1kOhm, those from ATX to relay need to be matched for your motherboard (supposedly 330-470 Ohm)
Setting up the hardware
Here is a diagram of how you connect all of the pieces (click to full size):
v0 Diagram
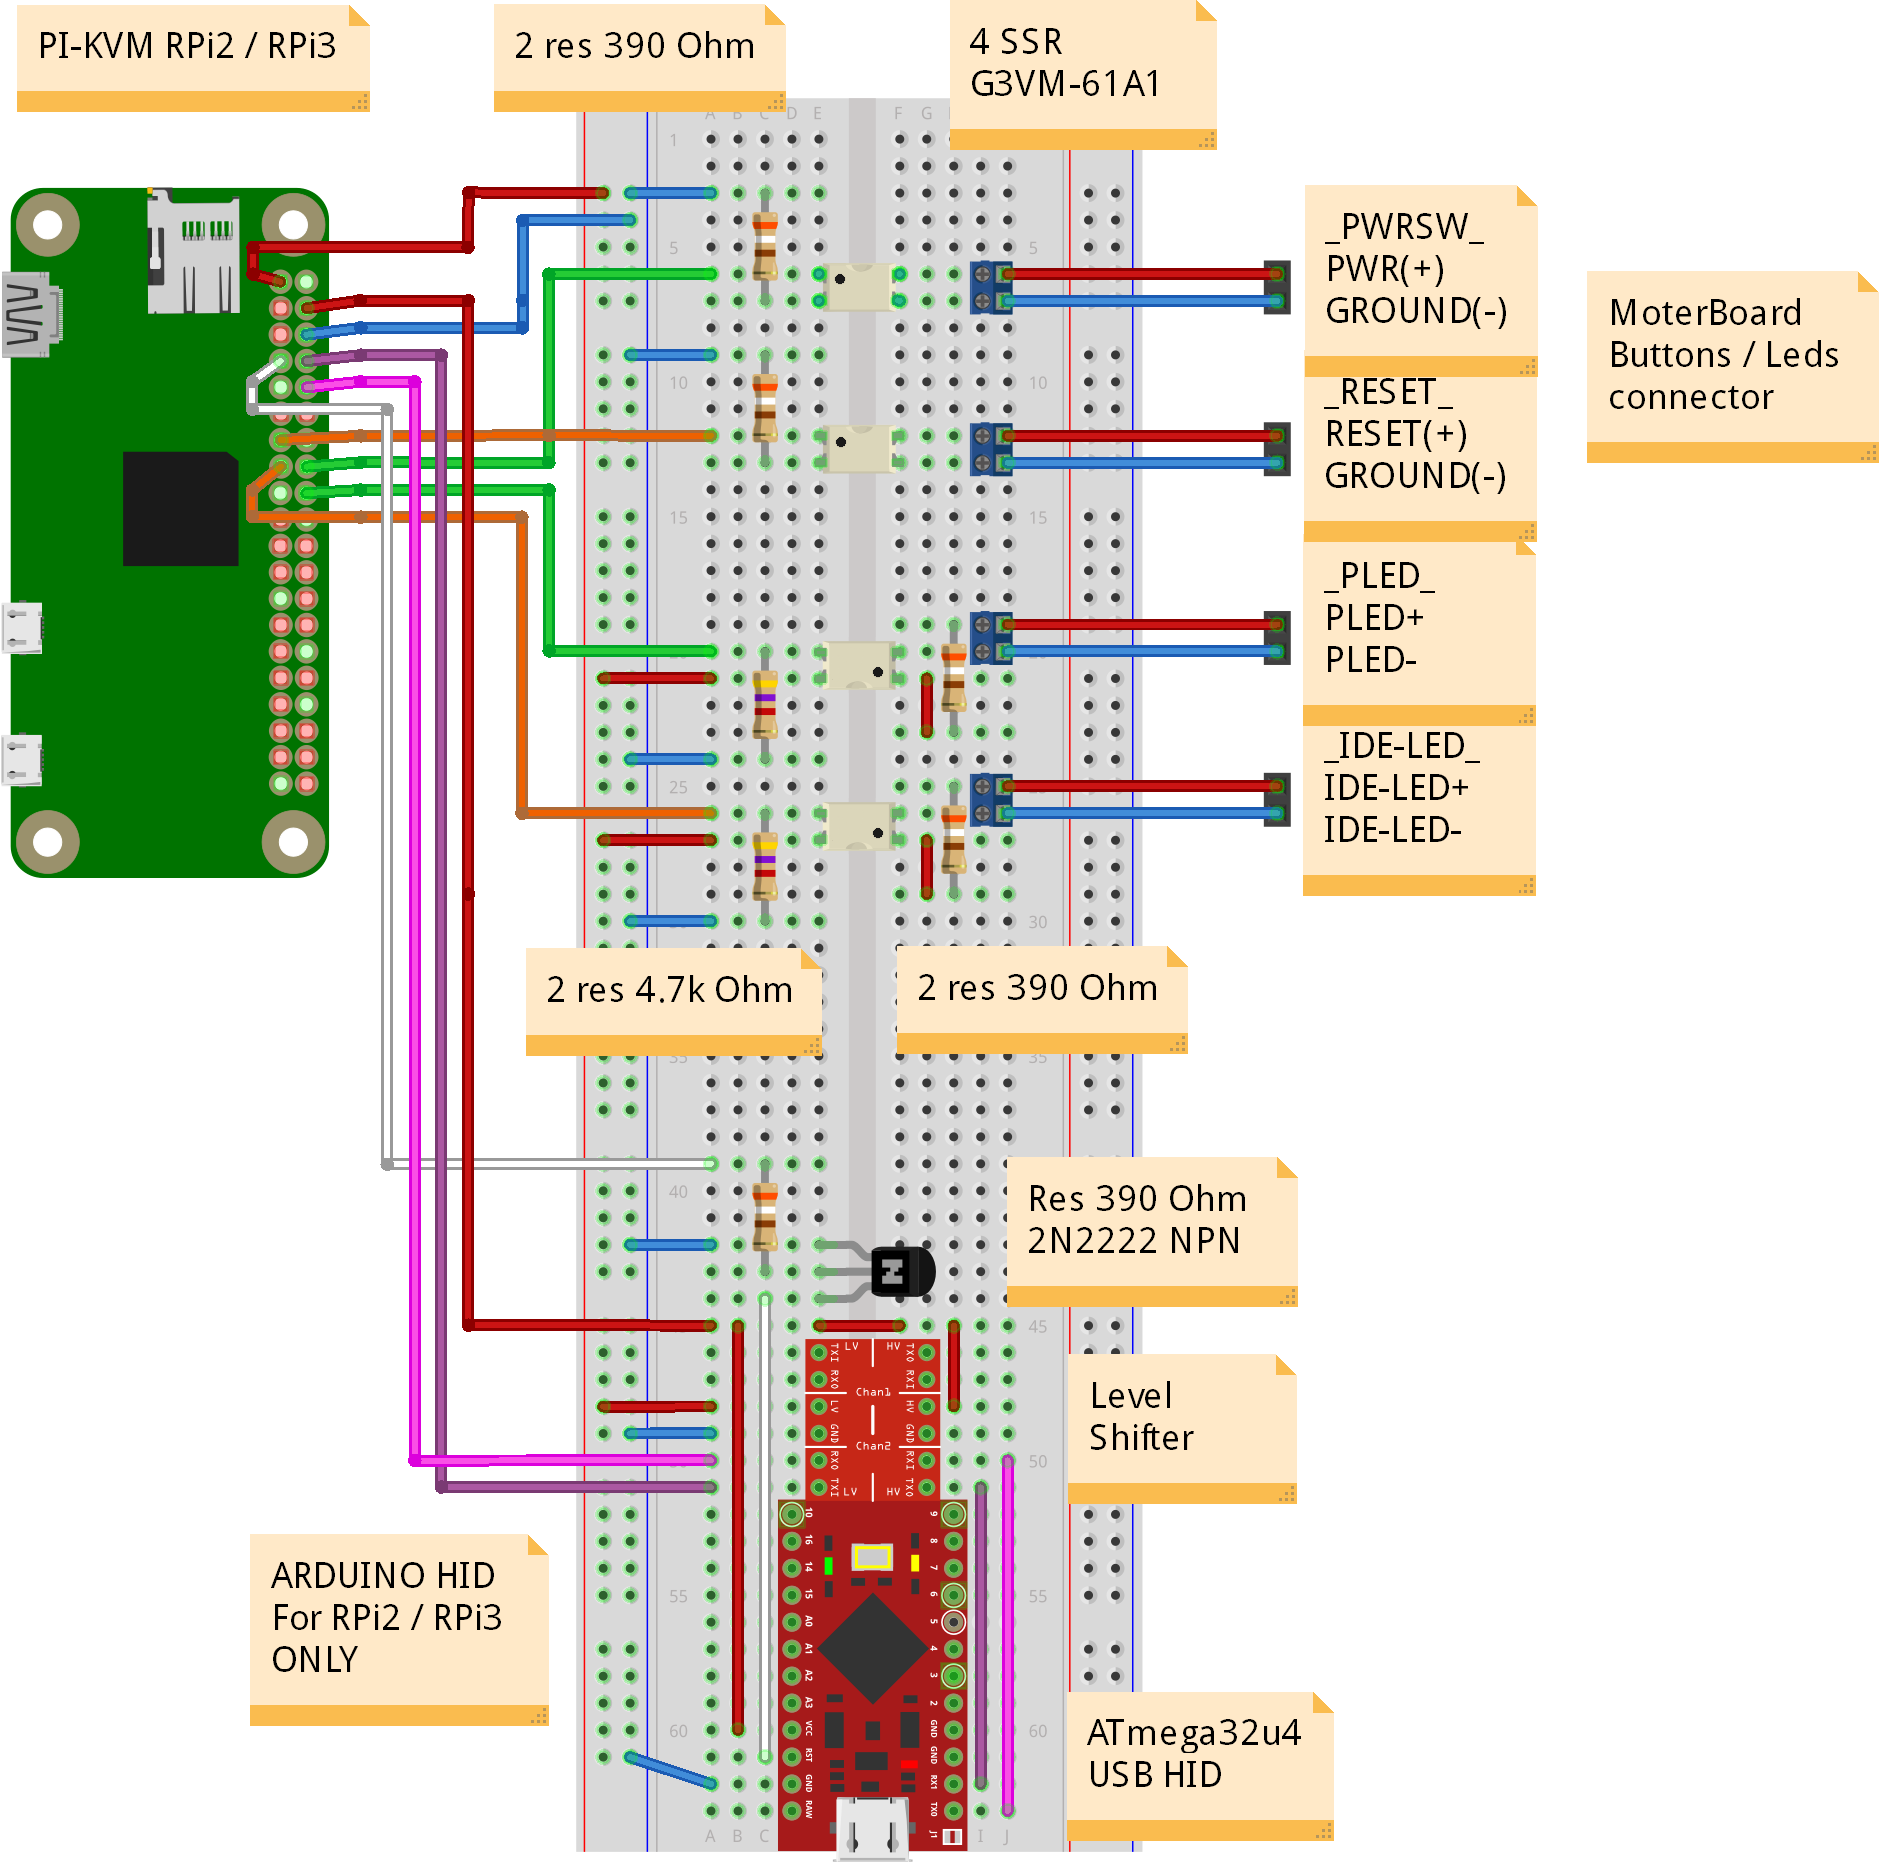
ATTENTION!
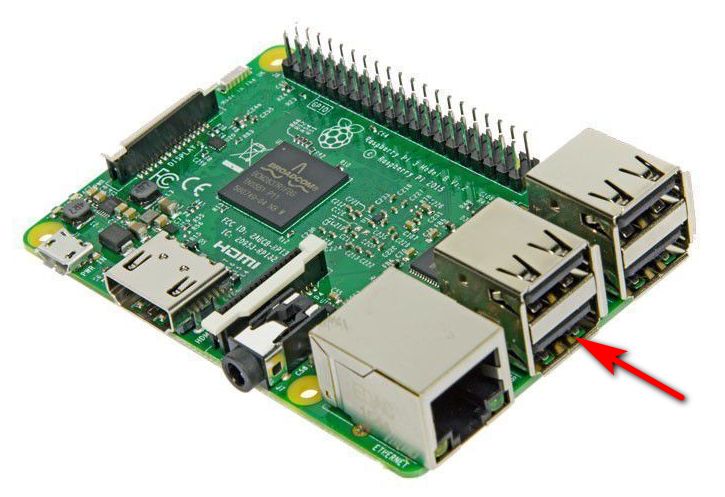
The Zero board is drawn here just to show which pins to connect your circuit to. Also S-video capture device must be connected to the USB port shown, not anything else. It is bound in software.
v2 Diagram
Building OS
Pi-KVM OS is based on Arch Linux ARM and contains all required packages and configs to work. To build the OS you will need any Linux machine with a fresh version of Docker (we recommand >= 1:19) with privileged mode (for fdisk and some other commands, check Makefiles if you don't trust us :) )
-
For a clean OS (Like Ubuntu 18) you need to install and configure docker (after adding user in the docker group a relogin is needed), as well as git and make.
[user@localhost ~]$ sudo apt-get install git make curl binutils -y [user@localhost ~]$ curl -fsSL https://get.docker.com -o get-docker.sh [user@localhost ~]$ sudo sh get-docker.sh [user@localhost ~]$ sudo usermod -aG docker user -
Checkout build toolchain:
[user@localhost ~]$ git clone https://github.com/pikvm/os [user@localhost ~]$ cd os -
Determine the target hardware configuration (platform). If you are using an analog VGA video capture device, choose
PLATFORM=v0-vga. If you want to use HDMI with Auvidea B101, choosePLATFORM=v0-hdmi. Both options work with boardsBOARD=rpi2andBOARD=rpi3. For Raspberry Pi 4 or ZeroW you can choosePLATFORM=v2-hdmionly andBOARD=rpi4orBOARD=zerow. Other options are for specialized Pi-KVM boards (WIP). -
Create config file
config.mkfor the target system. You must specify the path to the SD card on your local computer (this will be used to format and install the system) and the version of your Raspberry Pi and platform. You can change other parameters as you wish:[user@localhost os]$ cat config.mk # rpi3 for Raspberry Pi 3; rpi2 for the version 2, zerow for ZeroW BOARD = rpi4 # Hardware configuration PLATFORM = v2-hdmi # Target hostname HOSTNAME = pikvm # ru_RU, etc. UTF-8 only LOCALE = en_US # See /usr/share/zoneinfo TIMEZONE = Europe/Moscow # For SSH root user ROOT_PASSWD = root # Web UI credentials: user=admin, password=<this> WEBUI_ADMIN_PASSWD = admin # IPMI credentials: user=admin, password=<this> IPMI_ADMIN_PASSWD = admin # SD card device CARD = /dev/mmcblk0 -
Build OS. It may take about an hour depending on your Internet connection:
[user@localhost os]$ make os -
Put SD card into card reader and install OS:
[user@localhost os]$ make install -
After installation remove the SD card and insert it into your RPi. Turn on the power. RPi will try to get ad IP address using DHCP on your LAN. It will be available via SSH.
-
If you can't find the device's address, try using the following command:
[user@localhost os]$ make scan -
Only for v0. Now you need to flash Arduino. This can be done using your RPi. Before starting this operation, disconnect the RESET wire from Arduino, otherwise the firmware will not be uploaded. Connect the Arduino and RPi with a suitable USB cable. Log in to RPi and upload the firmware. Then connect RESET wire back, disconnect USB and reboot RPi.
[user@localhost os]$ ssh root@<addr> [root@pikvm ~]# rw [root@pikvm ~]# systemctl stop kvmd [root@pikvm ~]# cp -r /usr/share/kvmd/hid ~ [root@pikvm ~]# cd ~/hid [root@pikvm ~]# make [root@pikvm ~]# make install [root@pikvm ~]# reboot -
Congratulations! Your Pi-KVM will be available via SSH (
ssh root@<addr>) and HTTPS (try to open it in a browser athttps://<addr>). For HTTPS a self-signed certificate is used by default.
Tips
...
Troubleshooting
-
In step 8 (
make install), you may encounter the following error:/root/.platformio/packages/tool-avrdude/avrdude: error while loading shared libraries: libtinfo.so.5: cannot open shared object file: No such file or directoryCreate a symlink for this library:
[root@pikvm ~]# ln -s /usr/lib/libtinfo.so.6 /usr/lib/libtinfo.so.5And run
make installagain. -
If you have any problems or questions, you can contact us using Discord: https://discord.gg/bpmXfz5