|
|
4 years ago | |
|---|---|---|
| .github | 4 years ago | |
| README.md | 4 years ago | |
| bios_glitch.png | 4 years ago | |
| no_relays.png | 4 years ago | |
| screen1.png | 4 years ago | |
| v0.png | 5 years ago | |
| v0_usbcap.png | 5 years ago | |
| v2.png | 5 years ago | |
| v2_splitter.png | 5 years ago | |
README.md
Open and cheap DIY IP-KVM based on Raspberry Pi

A very simple and fully functional IP-KVM based on Raspberry Pi that you can make with your own hands. This device will help you to manage your server or workstation remotely, regardless of the operating system's health. You can fix remotely any, configure the BIOS and even reinstall the OS using the CD-ROM and Flash Drive emulator.
Full-featured and modern IP-KVM
- Cheaper, but not worse than commercial solutions You will spend between from $30 to $100 depending on what you want. Even the most expensive configuration will be cheaper than a commercial IP-KVM for $500.
- The widest hardware support
There are many ways to build KVM. You can use the video capture device with CSI-2 or USB interface; the Raspberry Pi of different models: 2, 3, 4 or Zero W. Any build is supported, and Pi-KVM implements its maximum possible set of features. - Low latency
~100 milliseconds of video latency. This is the smallest delay of all existing solutions. - Easy to build
A ready-to-use OS that can be assembled just usingmake buildand installed to SD-card usingmake install. - Extra lightweight and fancy Web-UI
No weird proprietary Windows-only clients. No ugly Java applets. Just use your favorite browser to connect to Pi-KVM. Oh, and no flash plugin either! - Keyboard and mouse
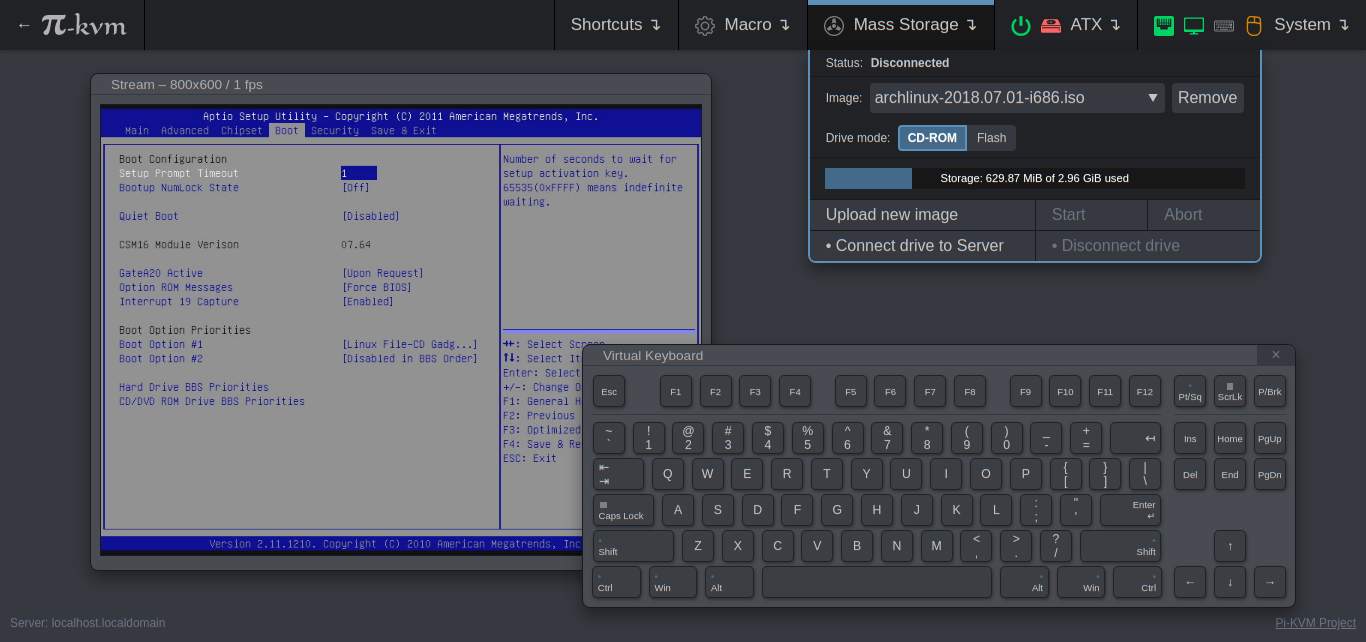
The mouse works directly in the browser. And the keyboard emulator supports displaying the key LEDs state. - Mass Storage Drive
On the Raspberry Pi 4 and Zero Pi-KVM can emulate virtual CD-ROM or Flash Drive. You can upload a live ISO or drive image and boot your server from it. - Power management
With a very simple circuit that can be assembled on a breadboard you can control the power of your server using the buttons and ATX LEDs on the motherboard. - Authorization
You can put Pi-KVM on the Internet and be sure that no one will get access to your server without permission. SSL encryption protects your traffic from being intercepted by third parties. - Local monitoring
The system monitors the health of the Raspberry Pi and will tell you if it's too hot or not enough power.
Production-ready
- Linux-based embedded OS
The Pi-KVM OS is based on Arch Linux ARM. It can be customized for any needs. You can use thousands of binary packages that have already been built, our own repository, and AUR. Update with a single command! - Read-only filesystem
By default, the OS runs in read-only mode, as an embedded system should. You don't have to worry about the memory card being damaged due to a sudden power outage. - VNC server
The managed server can be accessed using a regular VNC client that supports JPEG compression. - IPMI BMC
Useipmitool,ipmiutilor any thing in your network infrastructure that supports IPMI to monitor and manage server's power. - Extensible authorization methods
Multiple Pi-KVMs can be configured to use a common authorization service. You can also use PAM and its rich authorization mechanisms to integrate Pi-KVM into your existing infrastructure. - Macro scripts
If you need to perform repetitive actions on your server (or on different servers), you can record the macro and then play it back many times.
100% Open Source
- GPL
All software components are fully open - PR welcome! - Extensible
Pi-KVM is designed as a set of microservices with a plug-in architecture. It's very easy to fix and modify. - uStreamer
We created our own MJPG video server written on C with multi-threading and GPU video encoding. It can change the resolution in real time by signal from HDMI source, report statistics about the stream and much more. This is the fastest streaming solution available.
Disclaimer
This project is developed on a non-commercial basis by Open Source enthusiasts. The goal is to create a cheap and functional alternative to expensive closed IP-KVM devices. As part of this project, a full stack of software required for KVM is being developed: the operating system based on Arch Linux ARM, the fast video server, the VNC server, Web UI, and much more. We also provide assistance and support for Pi-KVM users via Discord chat.
If you found Pi-KVM useful or it saved you from a long trip to a dead computer, you can support the main developer by donating a few bucks via Patreon or PayPal. With this money, he will be able to buy new hardware (Raspberry Pi and other things) to support and test various configurations of Pi-KVM, and generally devote much more time to this project. At the bottom of this page are listed the names of all the people who helped this project develop with their donations. Our gratitude knows no bounds!
If you want to use Pi-KVM in production, we are ready to accept an order for modification for your needs and implementation of various features specifically for you. Contact us via live chat or email of the main developer: mdevaev@gmail.com
Q: What is the status of this project?
A: Although this documentation page is rarely updated, the project is maintained and developed. You can verify it by checking the activity in other repositories in our organization. Unfortunately, all our time is spent to code. We will be happy if someone can help us make a large and beautiful documentation on readthedocs.
Q: Does this support HDMI-USB dongle from AliExpress? https://aliexpress.ru/item/4001043540669.html?
A: YES, but not out of the box right now. After installation, you will have to manually add a couple of options and everything will work fine (contact us at discord to find out more). In the next couple of weeks, we will add a fully maintained conifiguration. However, it should be noted that the USB dongle has several disadvantages compared to the HDMI-CSI bridge: USB gives you a lot of latency (200ms vs 100ms for CSI2); it doesn't support stream compression control (you won't be able to use KVM in a place with a poor internet connection); it can't automatically detect screen resolution. You can use it, but is the $10 savings worth losing all of these features? The choice is yours.
Required hardware
We support a variety of implementation choices of hardware (we call it platform). The two main are called v0 and v2.
- v0 platform is designed to work with Raspberry Pi that do not have OTG (Raspberry Pi 2 and 3), and requires a little more spare parts for the basic implementation. Also there does not work mass-storage device.
- v2 platform is the most modern implementation supporting all the features of Pi-KVM. It is designed to work with Raspberry Pi 4 and ZeroW but we recommend using 4 because ZeroW is very slow. RPi4 with 2Gb RAM is pretty enough.
Basic hardware
- Raspberry Pi 2, 3, 4 or ZeroW
- MicroSD card
- Raspberry Pi power supply 3A
Video capture side for lowcost S-Video (only for v0 platform)
- Easycap UTV007 device
- HDMI to S-Video converter (not all options work, but these three has been tested) (1 (for PCB (see bellow)) or 2 or 3)
Video capture side for HDMI (for v0 and v2 platforms)
- HDMI to CSI-2 Bridge board (Original Auvidea B101 or any analog based Toshiba TC358743 chip like Lusya bridge).
HID Subsystem (only for v0)
- Arduino Pro Micro (ATMega32u4) with hardware USB for HID sub-system
- Logic level converter module https://www.sparkfun.com/products/12009
- NPN transistor (almost any NPN transistor: 2n2222 or similar)
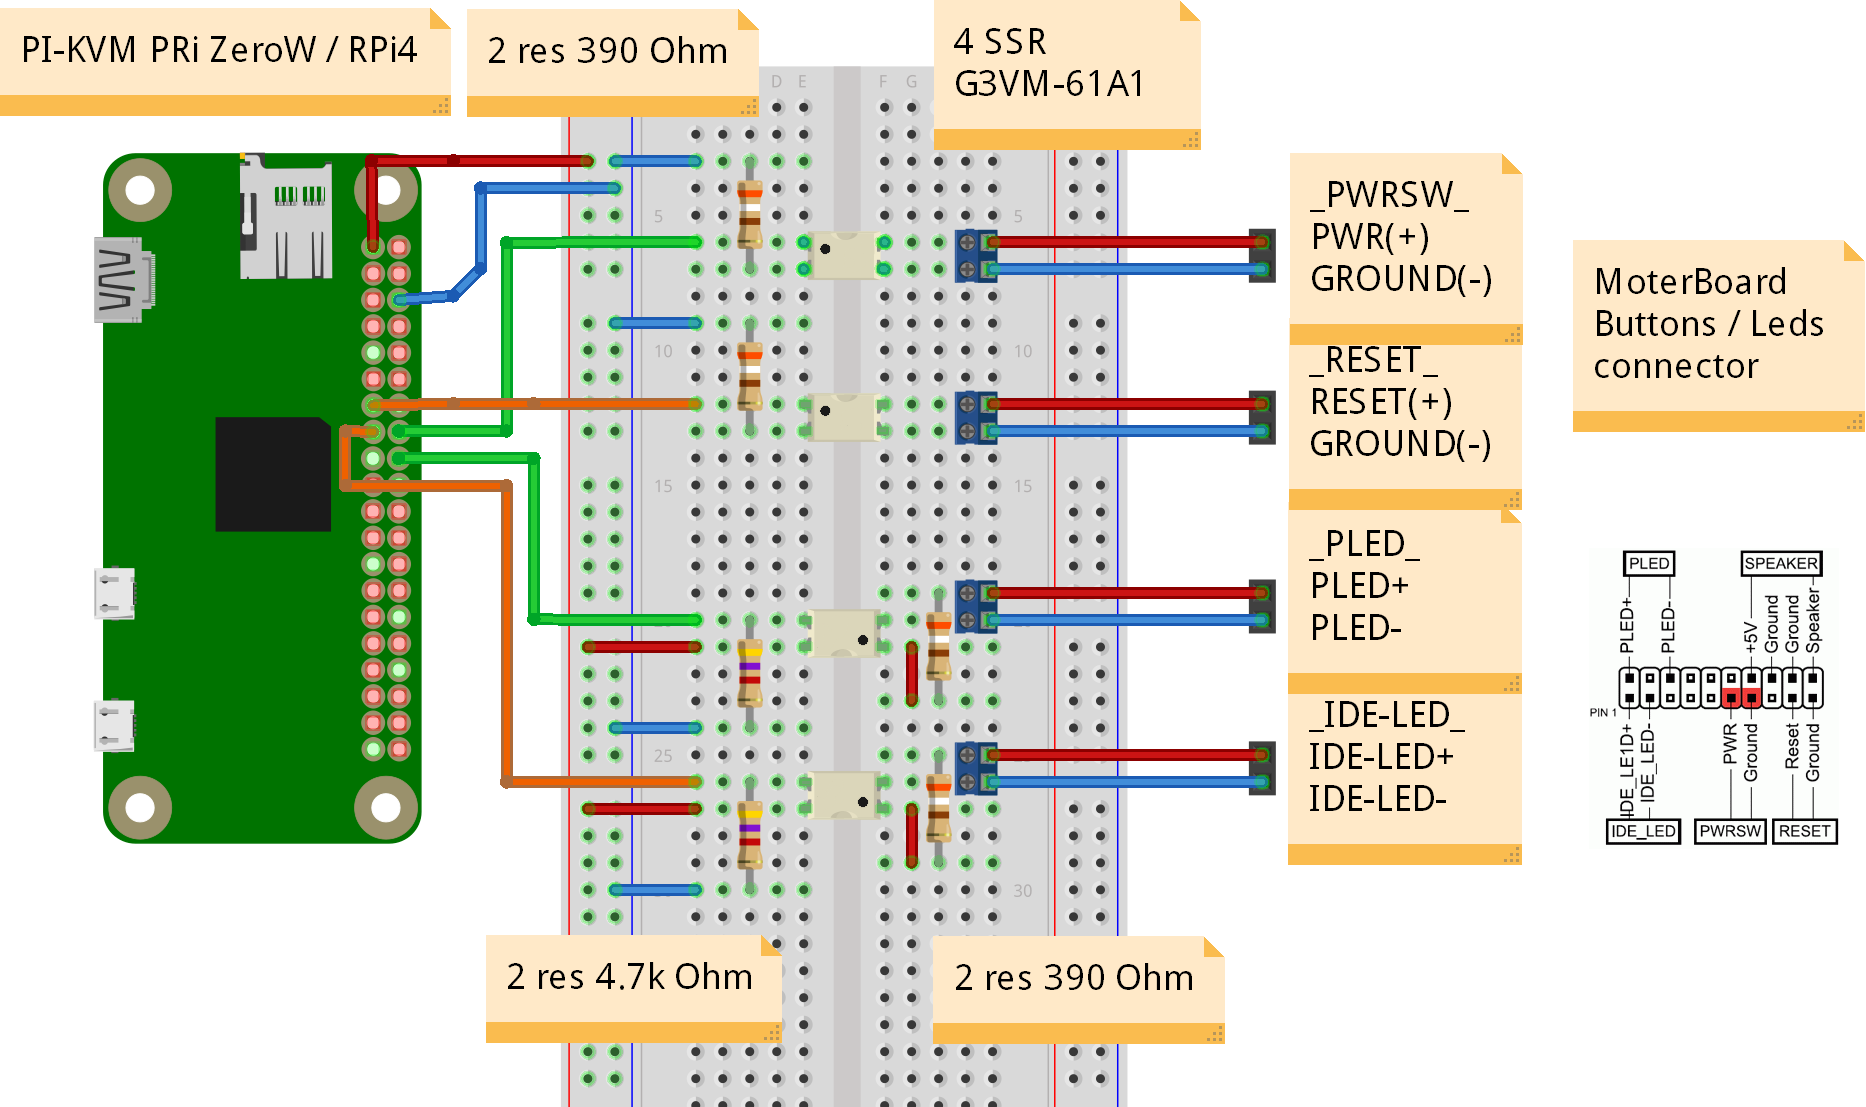
ATX control and other
- GPIO cables for connections (Dupont or identical, suitable for PLS pins and breadboards; for example https://www.amazon.com/gp/product/B01BV2A54G)
- 4x MOSFET relay OMRON G3VM-61A1
- Constant resistors, for transistor/relay (to Raspberry Pi) 220Ohm-1kOhm, those from ATX to relay need to be matched for your motherboard (supposedly 330-470 Ohm)
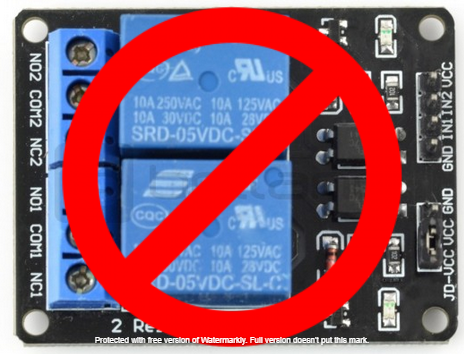
ATTENTION! Don't use random relay modules or random optocouplers. Some relays or optocouplers may not be sensitive enough for the Raspberry Pi, some others may be low-level controlled. Either use relays that are controlled by a high level, or follow the scheme and buy an OMRON. See details: https://github.com/pikvm/pikvm/issues/13
Setting up the hardware
Here is a diagram of how you connect all of the pieces (click to full size):
v0 Diagram
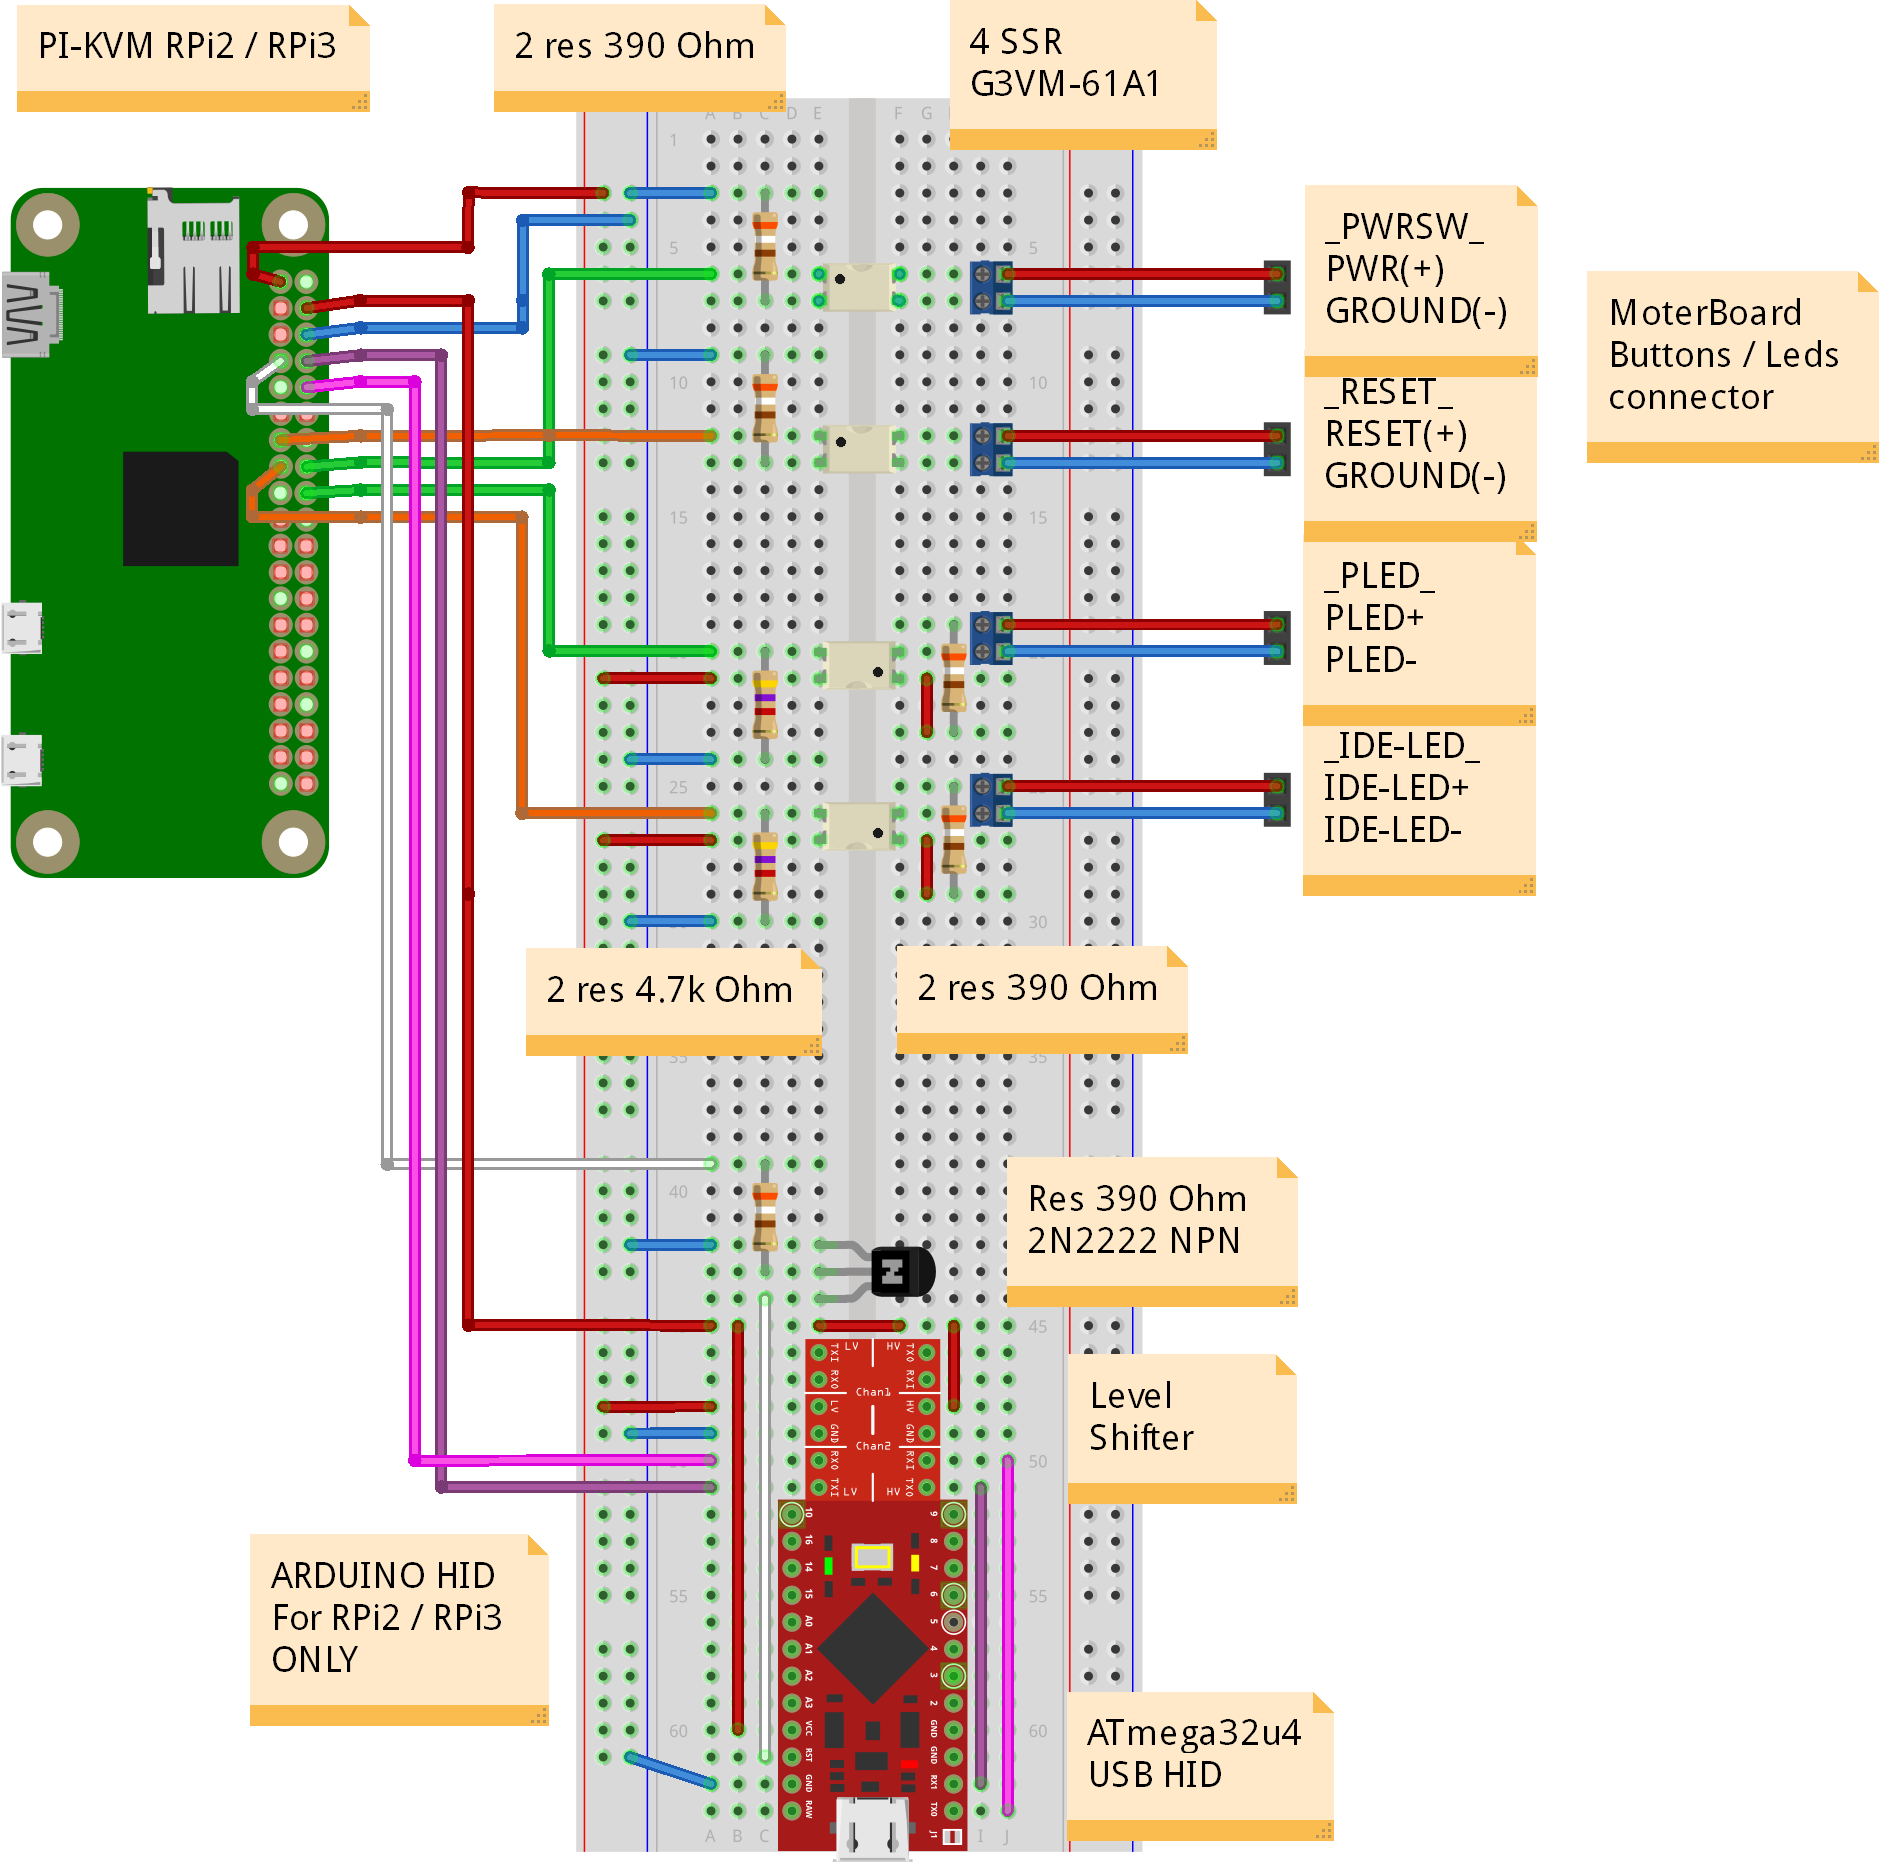
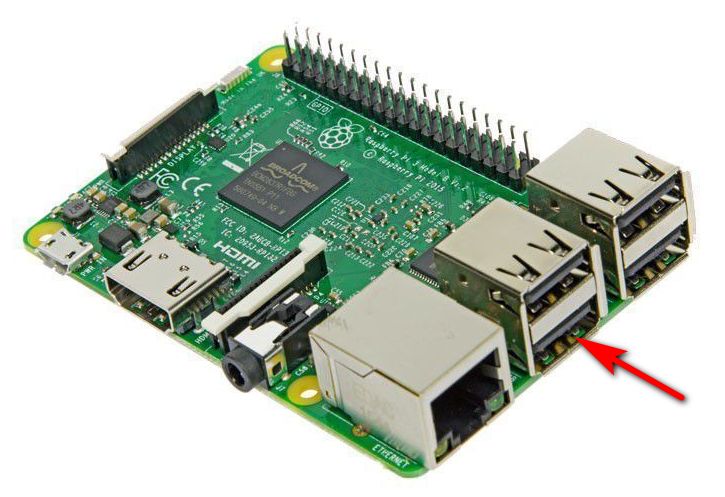
ATTENTION! The S-video capture device must be connected to the USB port shown, not anything else. It is bound in software.
v2 Diagram
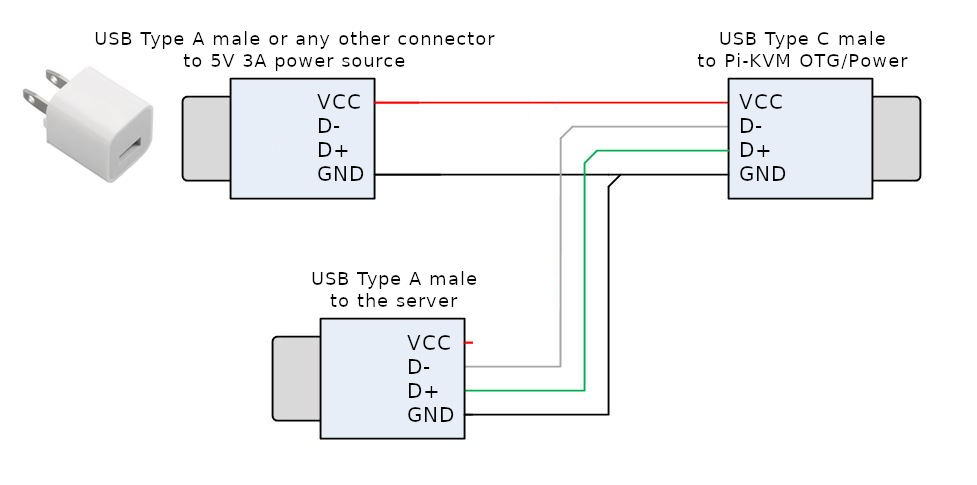
RPi4 only: since it uses one USB-C female connector to giving power and keyboard/mouse/drive emulation you also need to make a special cable to split DATA and POWER lines from USB-C (reasons). You can make it from two suitable connecting cables, or solder from scratch. Be sure to check the circuit diagram, otherwise you may damage your devices. Pinout specific used connectors you can easily find on request "USB pinout" in Google. Please note that if you will make a cable based on the two factory ones, the colors of the wires may not match those shown in the picture. Use a multimeter to make sure the connections are correct.
See this video tutorial for details: https://www.youtube.com/watch?v=uLuBuQUF61o
Also check out small instruction about soldering the ATX controller: https://www.youtube.com/watch?v=hKnKOuH_f8M
Thirdparty PCB for ATX: https://easyeda.com/mark.gilbert/zerow-kvm-v1
Building OS
Pi-KVM OS is based on Arch Linux ARM and contains all required packages and configs to work. To build the OS you will need any Linux machine with a fresh version of Docker (we recommand >= 1:19) with privileged mode (for fdisk and some other commands, check Makefiles if you don't trust us :) )
-
For a clean OS (Like Ubuntu 18) you need to install and configure docker (after adding user in the docker group a relogin is needed), as well as git and make.
[user@localhost ~]$ sudo apt-get install git make curl binutils -y
[user@localhost ~]$ curl -fsSL https://get.docker.com -o get-docker.sh
[user@localhost ~]$ sudo sh get-docker.sh
[user@localhost ~]$ sudo usermod -aG docker $USER
Re-login to apply changes.
-
Checkout build toolchain:
[user@localhost ~]$ git clone https://github.com/pikvm/os [user@localhost ~]$ cd os -
Determine the target hardware configuration (platform). If you are using an analog VGA video capture device, choose
PLATFORM=v0-vga. If you want to use HDMI with Auvidea B101, choosePLATFORM=v0-hdmi. Both options work with boardsBOARD=rpi2andBOARD=rpi3. For Raspberry Pi 4 or ZeroW you can choosePLATFORM=v2-hdmionly andBOARD=rpi4orBOARD=zerow. Other options are for specialized Pi-KVM boards (WIP). -
Create config file
config.mkfor the target system. You must specify the path to the SD card on your local computer (this will be used to format and install the system) and the version of your Raspberry Pi and platform. You can change other parameters as you wish. Please note: if your password contains the # character, you must escape it using a backslash likeROOT_PASSWD = pass\#word.[user@localhost os]$ cat config.mk # rpi3 for Raspberry Pi 3; rpi2 for the version 2, zerow for ZeroW BOARD = rpi4 # Hardware configuration PLATFORM = v2-hdmi # Target hostname HOSTNAME = pikvm # ru_RU, etc. UTF-8 only LOCALE = en_US # See /usr/share/zoneinfo TIMEZONE = Europe/Moscow # For SSH root user ROOT_PASSWD = root # Web UI credentials: user=admin, password=<this> WEBUI_ADMIN_PASSWD = admin # IPMI credentials: user=admin, password=<this> IPMI_ADMIN_PASSWD = admin # SD card device CARD = /dev/mmcblk0If you want to configure wifi (for ZeroW board for example) you must add these lines to
config.mk:WIFI_ESSID = "my-network" WIFI_PASSWD = "P@$$word" -
Build OS. It may take about an hour depending on your Internet connection:
[user@localhost os]$ make os -
Put SD card into card reader and install OS (you should disable automounting:
systemctl stop udisk2or something like that):[user@localhost os]$ make install -
After installation remove the SD card and insert it into your RPi. Turn on the power. RPi will try to get ad IP address using DHCP on your LAN. It will be available via SSH.
-
If you can't find the device's address, try using the following command:
[user@localhost os]$ make scan -
Only for v0. Now you need to flash Arduino. This can be done using your RPi. Before starting this operation, disconnect the RESET wire from Arduino, otherwise the firmware will not be uploaded. Connect the Arduino and RPi with a suitable USB cable. Log in to RPi and upload the firmware. Then connect RESET wire back, disconnect USB and reboot RPi.
[user@localhost os]$ ssh root@<addr> [root@pikvm ~]# rw [root@pikvm ~]# systemctl stop kvmd [root@pikvm ~]# cp -r /usr/share/kvmd/hid ~ [root@pikvm ~]# cd ~/hid [root@pikvm hid]# make [root@pikvm hid]# make install [root@pikvm hid]# reboot -
Congratulations! Your Pi-KVM will be available via SSH (
ssh root@<addr>) and HTTPS (try to open it in a browser athttps://<addr>). For HTTPS a self-signed certificate is used by default.
Tips
-
The Pi-KVM file system is always mounted in read-only mode. This prevents it from being damaged by a sudden power outage. To change the configuration you must first switch FS to write mode using the command
rwfrom root. After the changes, be sure to run the commandroto switch it back to read-only. -
NEVER edit
/etc/kvmd/main.yaml. Use/etc/kvmd/override.yamlto redefine the system parameters. All other files that are also not recommended for editing have read-only permissions. If you edit any of these files, you will need to manually make changes to them when you upgrade your system. You can view the current configuration and all available KVMD parameters using the commandkvmd -m. -
Almost all KVMD (the main daemon controlling Pi-KVM) configuration files use YAML syntax. Read about it if you don't know how to use it.
-
If you want to disable the web terminal use these commands:
[root@pikvm ~]# systemctl disable kvmd-webterm [root@pikvm ~]# systemctl stop kvmd-webterm -
To disable authorization completely edit file
/etc/kvmd/override.yaml:kvmd: auth: enabled: falsethen restart
kvmd:[root@pikvm ~]# systemctl restart kvmd -
If you don't need to control ATX you can disable relevant web menu in
/etc/kvmd/override.yaml:kvmd: atx: type: disabledthen restart kvmd.
-
To use Wake-on-LAN on your server you must define some options such as server MAC and (optional) IP address. Use
/etc/kvmd/override.yaml. Write this:kvmd: wol: mac: ff:ff:ff:ff:ff:ffReplace
ff:ff:ff:ff:ff:ffto MAC of your server. By default, a packet is sent by a broadcast request to the entire IPv4 network (255.255.255.255, port9), but you can address it to a specific static address:kvmd: wol: mac: ff:ff:ff:ff:ff:ff ip: 192.168.0.100 # port: 9 # By default -
To use IPMI BMC you need to set up an appropriate account and run the
kvmd-ipmidaemon (systemctl start kvmd-ipmiandsystemctl enable kvmd-ipmi). Although Pi-KVM supports the IPMI protocol, we strongly recommend that you do not use outside trusted of networks due to its insecurity. Refer to the file/etc/kvmd/ipmipasswdto configure IPMI account. -
To use VNC you need to change the keyboard layout for non-US client keyboard using
/etc/kvmd/override.yaml. For example:vnc: keymap: /usr/share/kvmd/keymaps/ruBy default the username and password authorization is used. This is not supported by all clients (we recommend TigerVNC). To enable passphrase authorization, you need to edit the file
/etc/kvmd/vncpasswdto set passphrases and enable this feature in/etc/kvmd/override.yaml:vnc: auth: vncauth: enabled: trueAfter that you can enable
kvmd-vncdaemon (systemctl start kvmd-vncandsystemctl enable kvmd-vnc). VNC will be available on port 5900 by default.
We recommend disabling automatic quality adjust if there is one in your client (this is called "Auto-Select"in TigerVNC).
Please note: we strongly don't recommend you to use VNC in untrusted networks. The current implementation does not use encryption, and your passwords are transmitted over the network in a plain text. The existing anonymous TLS mode is also not secure enough.
Troubleshooting
-
In step 8 (
make install), you may encounter the following error:/root/.platformio/packages/tool-avrdude/avrdude: error while loading shared libraries: libtinfo.so.5: cannot open shared object file: No such file or directoryCreate a symlink for this library:
[root@pikvm ~]# ln -s /usr/lib/libtinfo.so.6 /usr/lib/libtinfo.so.5And run
make installagain. -
Unexpected interruption of loading the image to Mass Storage Drive
If problems occur when uploading even a small disk image it may be due to unstable network operation or antivirus software. It is well known that Kaspersky antivirus cuts off Pi-KVM connections for uploading, so you should add the site to the list of exceptions or not filter web requests with the antivirus. Antivirus can also affect the performance of certain interface elements, for example the quality slider.
Regarding Kaspersky...the solution is to set the website of pikvm in network in the exclusion list (Protection -> Private browsing -> Categories and exclusions -> Exclusions).
-
Glitchy/Wrong BIOS resolution
On some motherboards, the BIOS may be displayed at a lower resolution, or with some rendering issues/glitches, specially on newer ASUS ones.
e.g
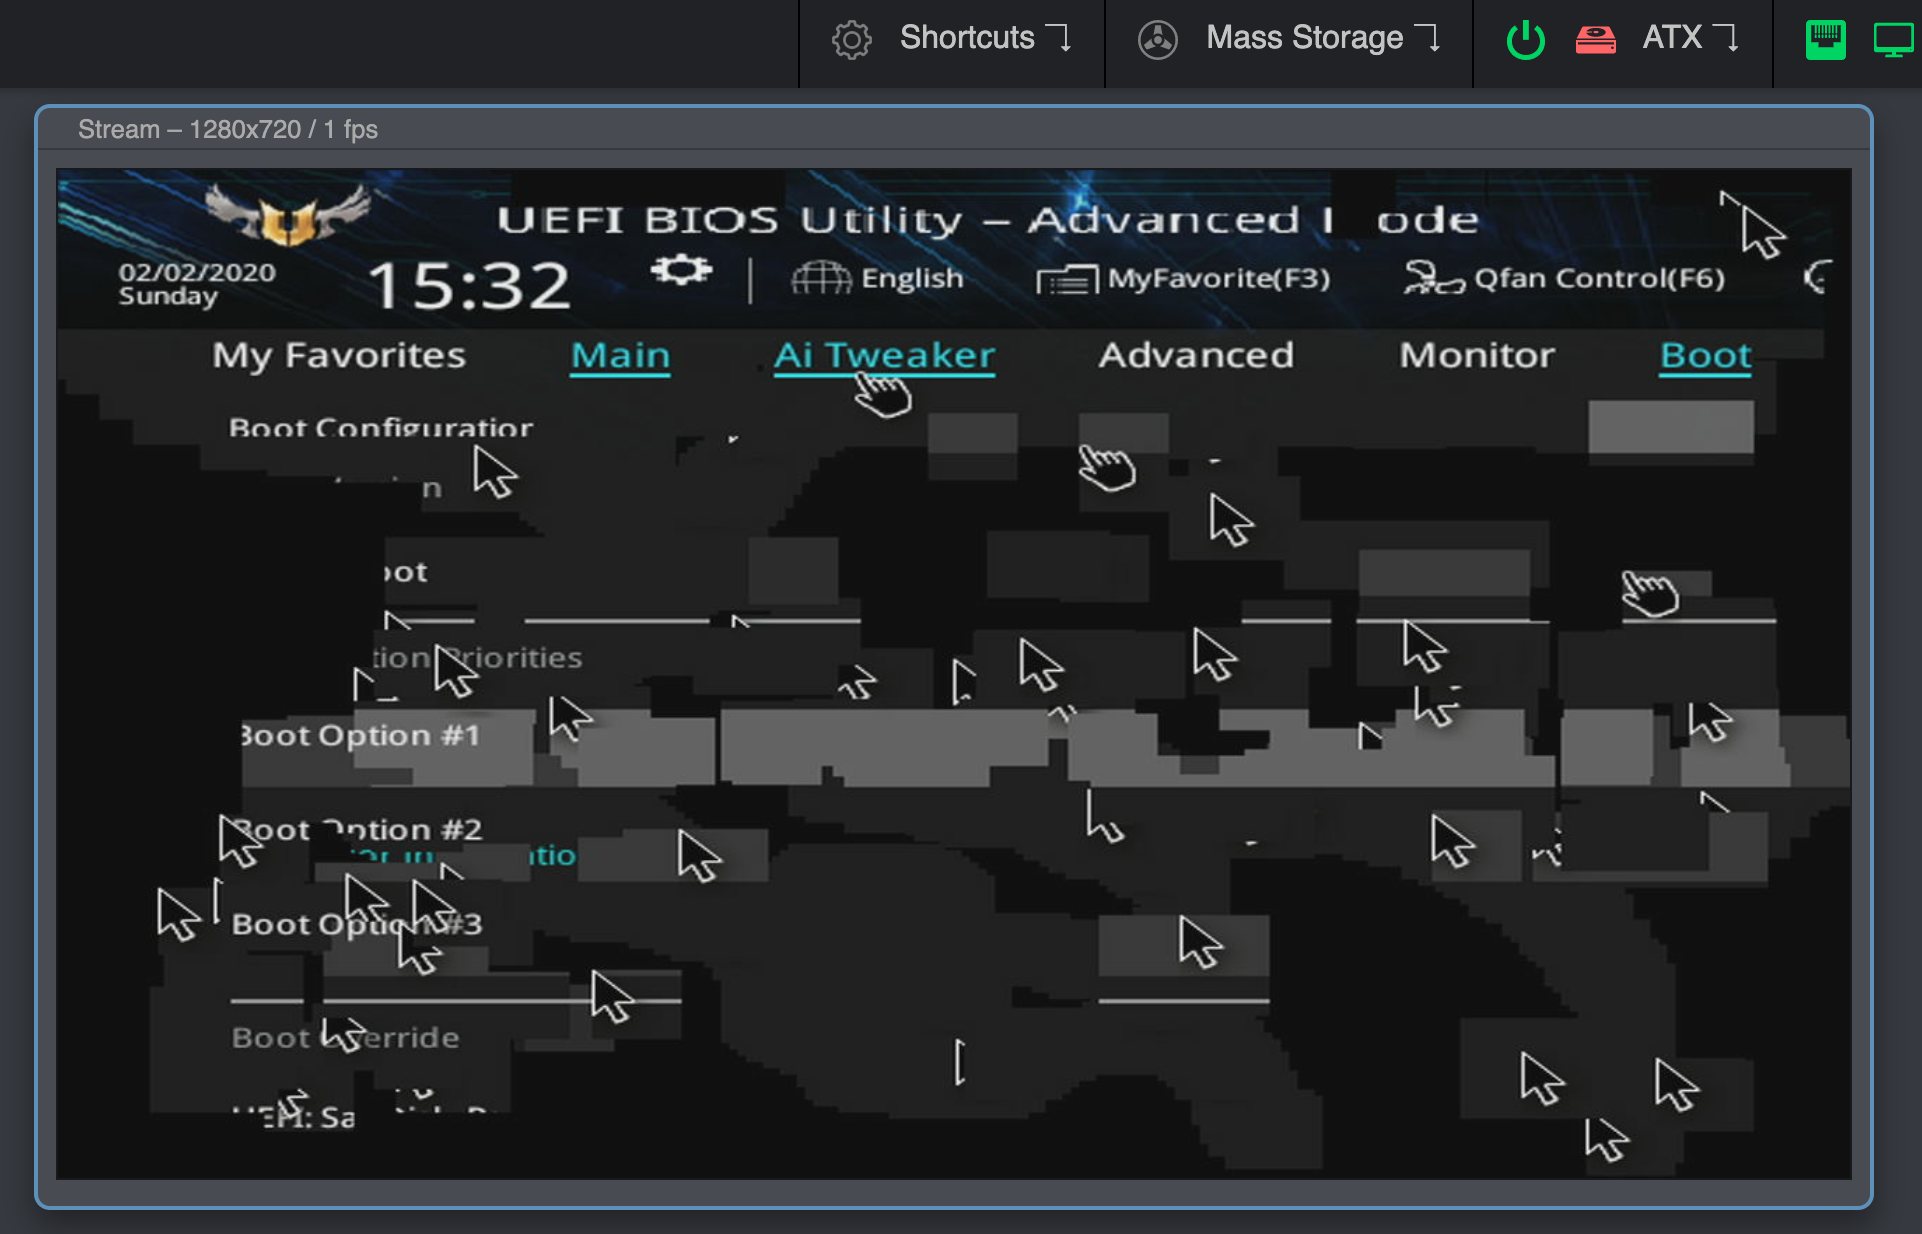
This can be solved by enabling Compatibility Support Module (CSM) on your BIOS, usually under the Boot options.
If you can't or don't want to enable CSM, you can try connecting a DisplayPort monitor, or a dummy plug. If you remove the DP cable/adapter the bug will show up again.
If none of this works, try connecting the DP cable first, boot into the BIOS, disable CSM and shutdown (do not restart) your PC. Boot into the BIOS and enable CSM then shutdown your PC. Then connect the HDMI and turn it on again.
-
If you have any problems or questions, you can contact us using Discord: https://discord.gg/bpmXfz5
Special thanks
These kind people donated money to the Pi-KVM project and supported the work on it. We are very grateful for their help, and memorializing their names is the least we can do in gratitude.
- Aleksei Brusianskii
- Arthur Woimbée
- Ben Gordon
- Branden Shaulis
- Brian White
- Christof Maluck
- Corey Lista
- David Howell
- Denis Yatsenko
- Ge Men
- Grey Cynic
- Jacob Morgan
- Jason Toland
- Jeff Bowman
- John McGovern
- Mark Gilbert
- Mark Robinson
- Mauricio Allende
- Michael Lynch
- Samed Ozoglu
- Truman Kilen
- Walter_Ego